 Hot Chocolate Fudge Cake – think of this as a sliceable version of Chocolate Self Saucing Pudding – with a LOT more chocolate fudge sauce! The perfect cosy dessert for cool winter days that’s easy to make. The chocolate cake of your dreams… I know this is a great dessert for sweater weather. But holy... Get the Recipe
The post Hot chocolate fudge cake appeared first on RecipeTin Eats.
]]>Hot Chocolate Fudge Cake – think of this as a sliceable version of Chocolate Self Saucing Pudding – with a LOT more chocolate fudge sauce! The perfect cosy dessert for cool winter days that’s easy to make.
The chocolate cake of your dreams…
I know this is a great dessert for sweater weather. But holy moly. It’s so good, I’ll wager that after you’ve made it once, you’ll make it over and over again regardless of the weather.
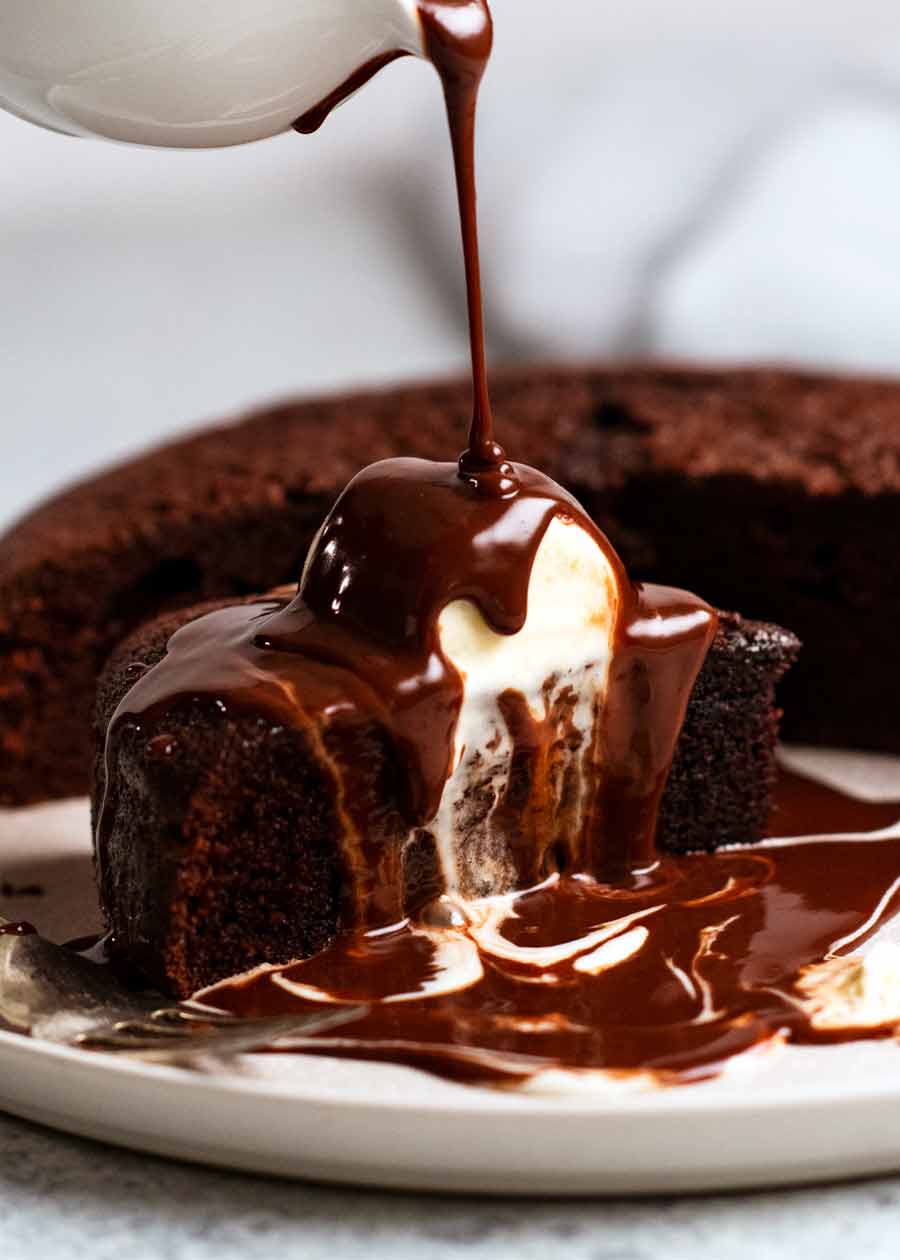
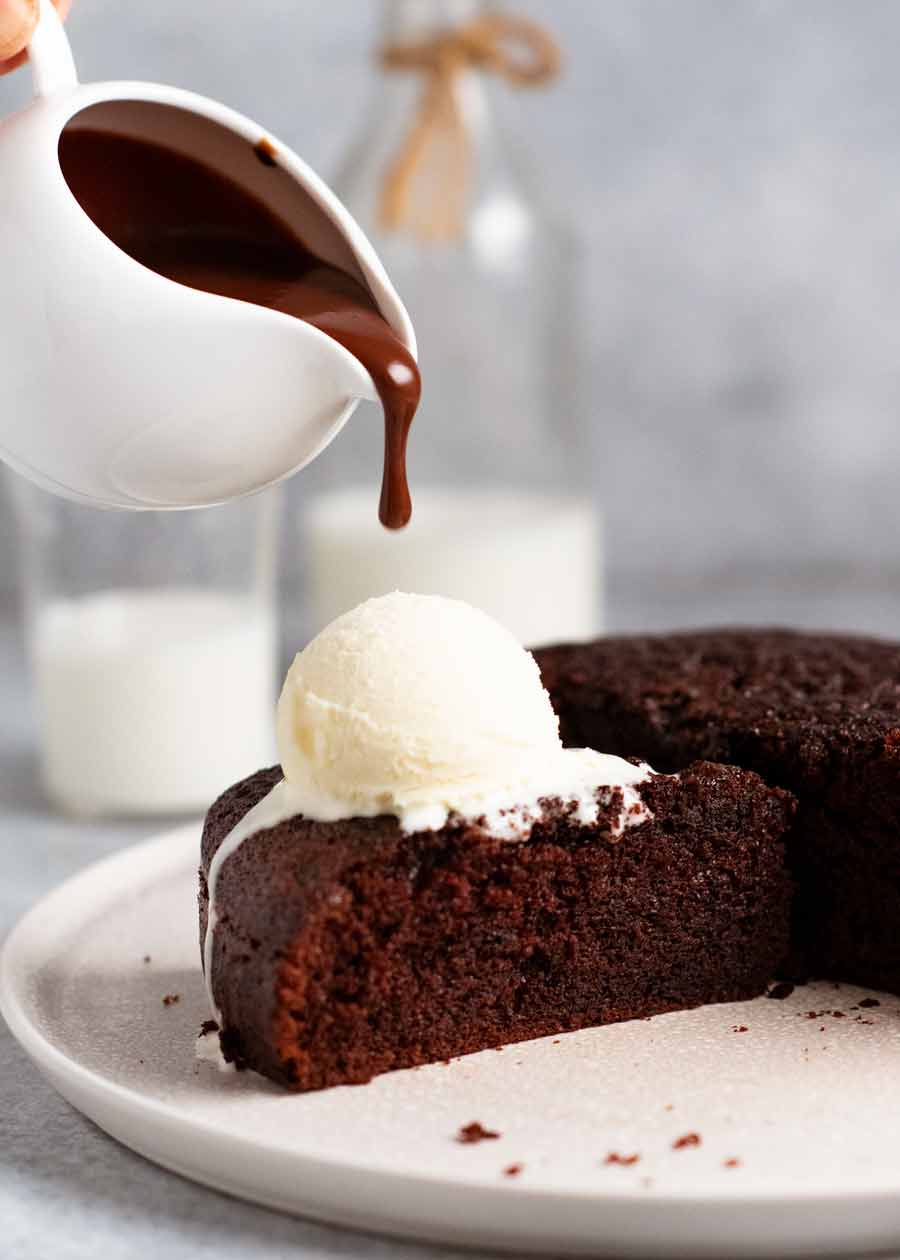
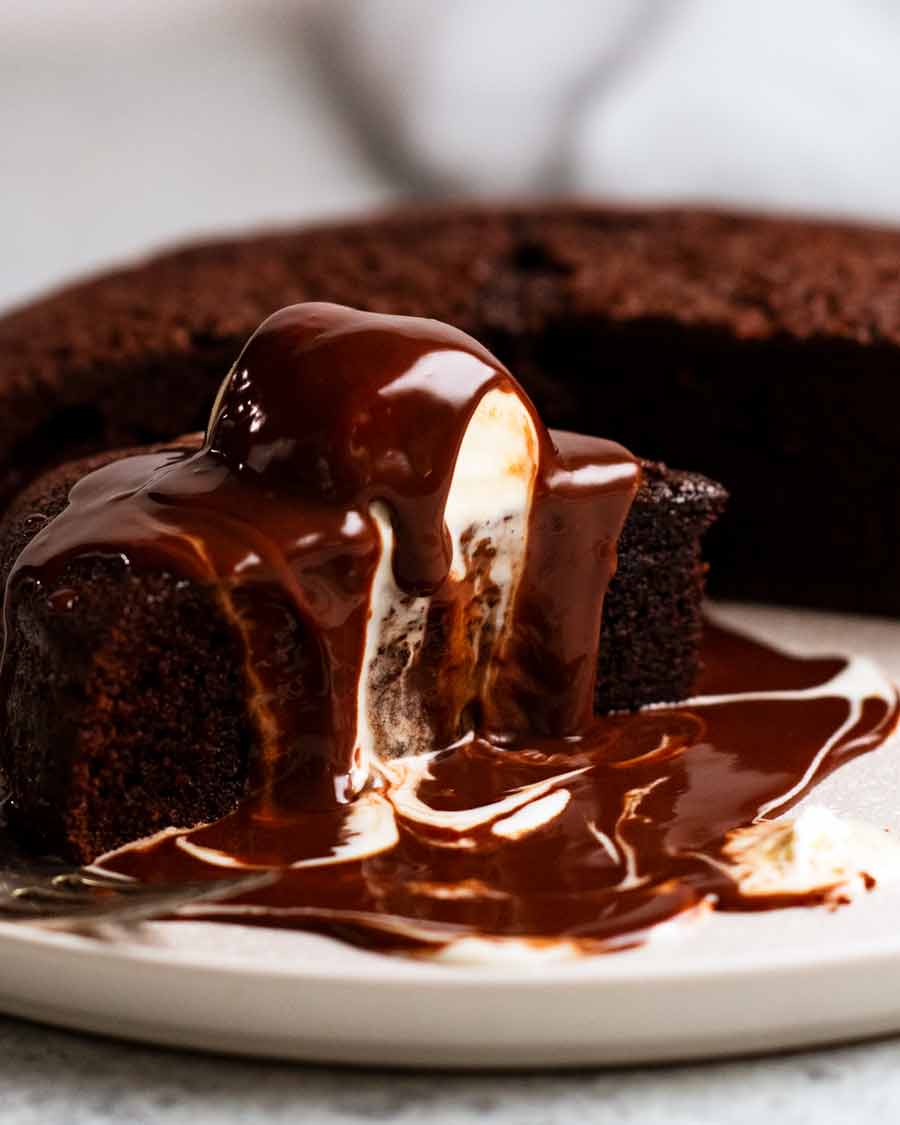
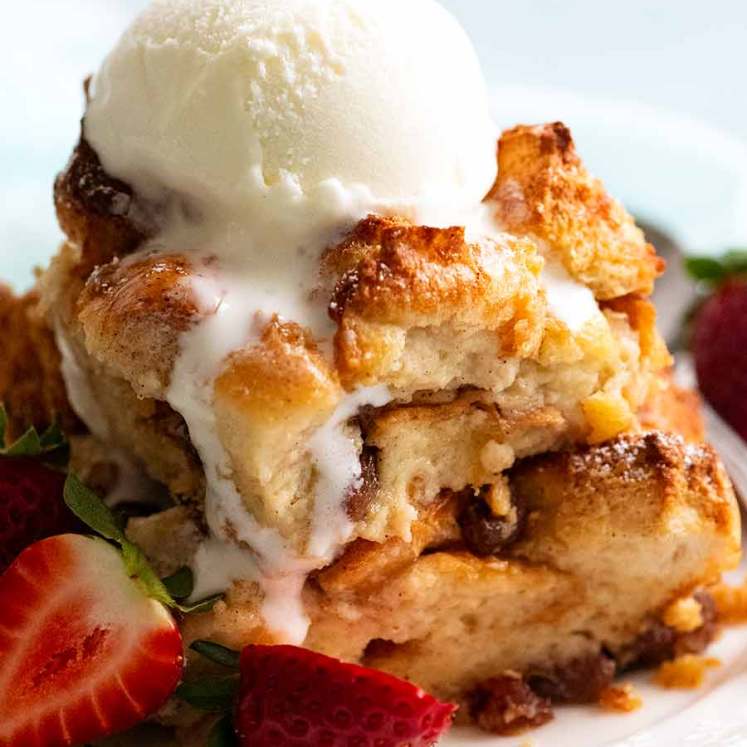
Let me paint the picture for you. A warm slice of soft chocolate cake, moist in a way that cakes can only be when warm. A scoop of melty vanilla ice cream on top.
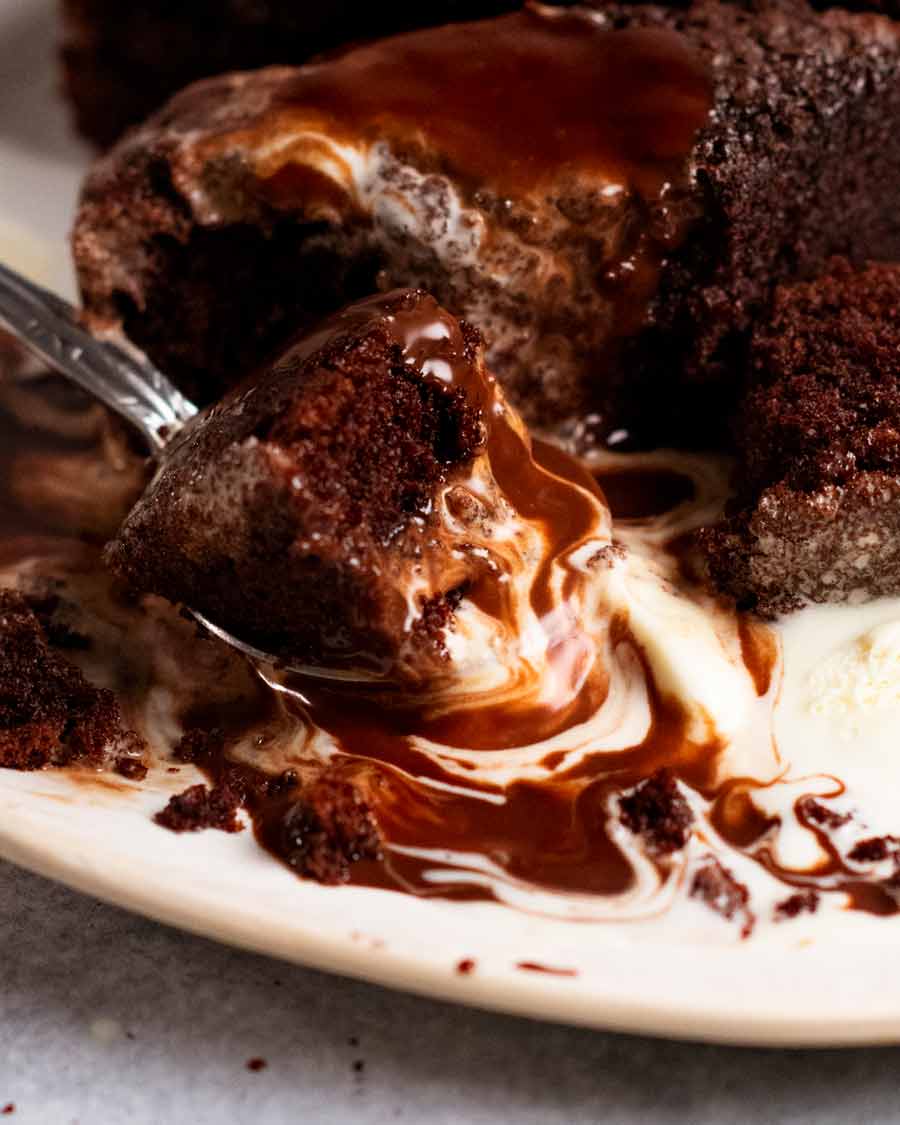
Then you douse – douse, my friends! – with hot chocolate fudge sauce. The ice cream starts to melt, and you get beautiful swirls of chocolate with white streaks pooling around your cake. You dig in with a spoon, getting a big scoop of cake soaked with the chocolate sauce and melted ice cream, and that first bite, that first glorious bite…..
Knees. WEAK.
Did I mention how easy this Hot Chocolate Fudge Cake is to me? The batter is made in a single bowl with a wooden spoon. And that fudge sauce is 2 ingredients – just cream and chocolate.
Ingredients in Hot Chocolate Fudge Cake
Here’s what you need to make this winter dessert. The recipe is based on my classic Chocolate Cake, with some minor adjustments to make it suitable for serving hot as a single layer, unfrosted cake.
Dry ingredients for the warm chocolate cake
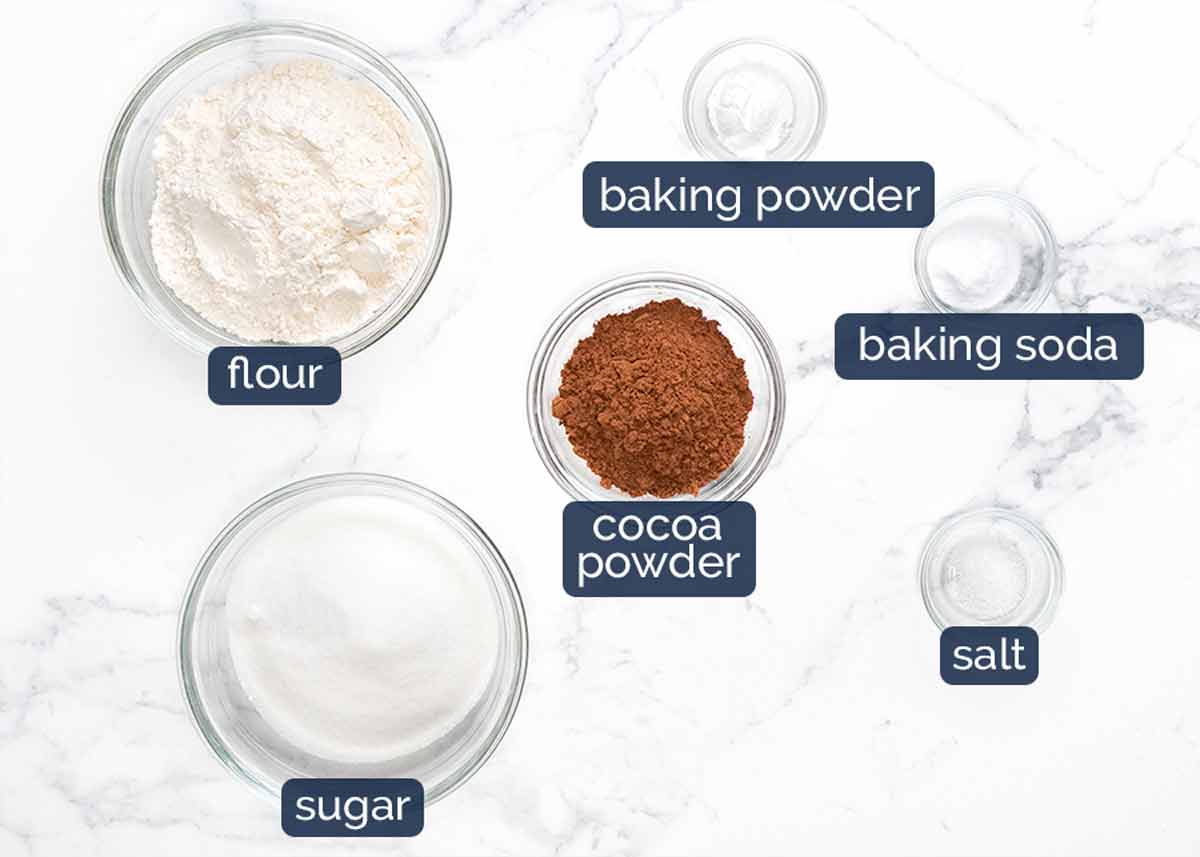
Flour – Just plain / all-purpose flour. Self raising flour will also work but the cake crumb is not as soft. (Skip the baking soda and baking powder if you use self-raising flour).
Baking soda (bi-carb) and baking powder, or use more of either – Both of these makes cakes, muffins etc rise but work differently depending on what you’re making. Baking soda is also ~3x stronger than baking powder. I like using a combination of the two for this cake for a lovely tender crumb and nice shape to the surface of the cake. However, if you only have one or the other, you can use more of what you have. See recipe notes for quantities.
Cocoa powder – Just plain cocoa powder, unsweetened. Not dutch processed – though you can use it if you’ve got this more expensive, more intense type.
White sugar – Use caster sugar / superfine sugar if you’ve got it, because it’s finer so you can be confident it dissolves easily. Else ordinary white sugar / granulated sugar works ok too.
Salt – Just a pinch brings out the flavours in this cake, especially the chocolate. Fairly standard baking practice for me these days, adding a touch of salt for this purpose!
Wet ingredients
And here are the wet ingredients in this cake:

Melted butter AND oil – Butter adds flavour into this cake while oil keeps the crumb fresh and moist for longer. Using both gives us the best of both worlds!
Egg – 1 large egg which means an egg that is sold in cartons labelled “large eggs” which is an industry standard. It is also best to be at room temperature – see this post for a quick way to do this.
Vanilla – For flavour, which compliments the chocolate.
Boiling water – Using hot rather than cold water makes the cocoa flavour “bloom” so the cake tastes more chocolatey. You’ll smell the chocolate the moment the hot water mixes into the batter!
No coffee? Some chocolate cakes include a touch of coffee which brings out the chocolate flavour. I tried it but it didn’t add anything to this cake because you get so much chocolate flavour from the hot fudge sauce!
Hot chocolate fudge sauce
Fudge sauce comes in many forms – some made with cocoa powder and evaporated milk, some with melted chocolate, some a combination of the two. The hot fudge sauce for this cake is the most luxurious of its kind – pourable chocolate ganache that’s made with just chocolate and cream.
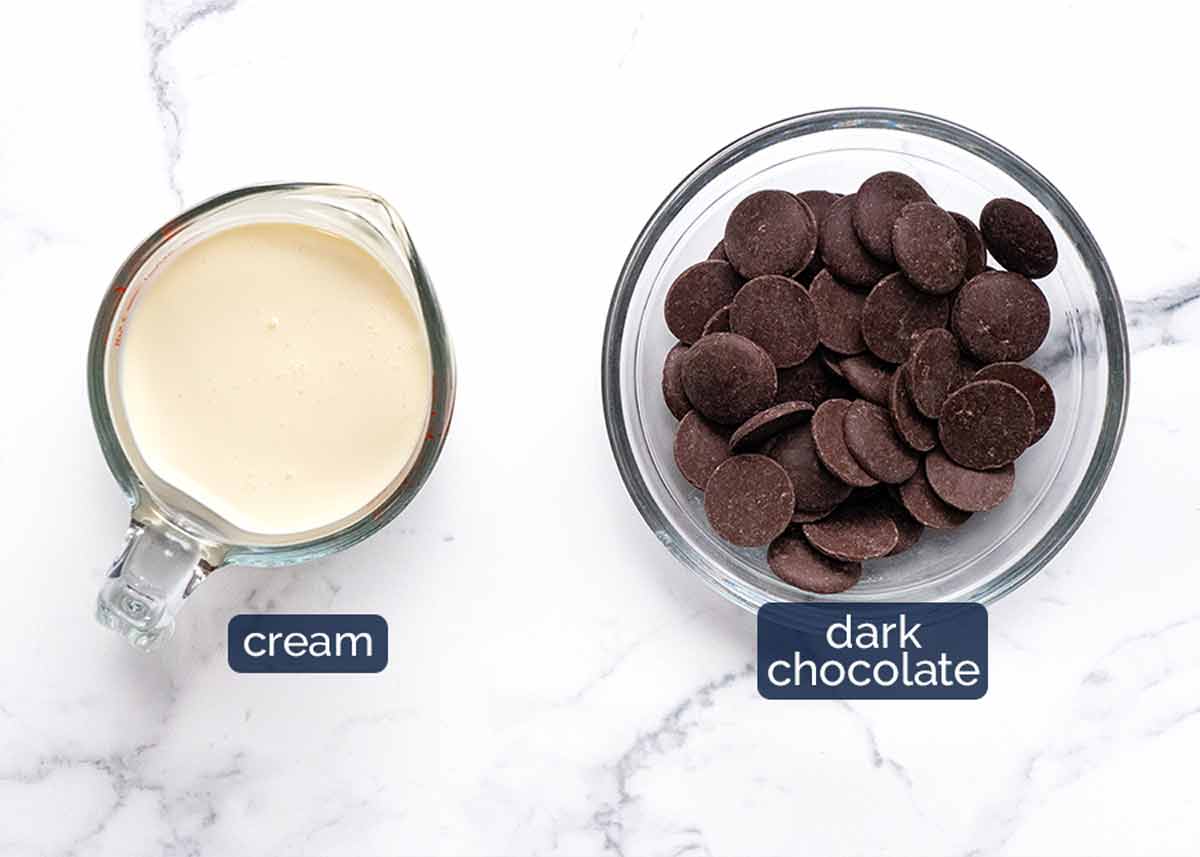
The ratio of chocolate to cream is 1:1 for ganache. However, as I want the sauce to be slightly thicker when warm, I’ve increased the chocolate slightly so it’s 1/ 1/4 cups of chocolate (200g) to 1 cup / 250ml of cream.
Dark chocolate – I use standard baking dark chocolate melts or chips (US: semi-sweet chocolate chips). You can also use chopped 50 – 70% dark chocolate (Lindt is my favourite).
Chocolate melts are just a type of chocolate chips that is available here in Australia. It comes in a disc shape and is designed to melt easily and smoothly. Whereas chocolate chips, while they can also be used for melting, are designed specifically to hold their shape for your favourite chocolate chip cookies rather than melting into puddles.
Milk and white chocolate – These will work but you will need to reduce the amount of cream slightly else the fudge sauce will be too runny. This is because they are softer than dark chocolate. Fellow baking nerds can read more about this in my Chocolate Ganache recipe!
Cream – Either heavy / thickened cream or pure cream will work here. Full fat essential. Reduced fat doesn’t always mix properly into the chocolate and also the sauce will be too thin.
How to make Hot Chocolate Fudge Cake
Get the cake in the oven first. Then make the chocolate fudge sauce – it will need 20 to 30 minutes to cool a bit to allow it to thicken slightly before using.
1. Making the hot fudge cake
Just mixed up in one bowl with a whisk. No stand-mixer or electric beater required. This is a very forgiving cake. Just be sure to get it in the oven as soon as you mix the batter, don’t leave it lying around.
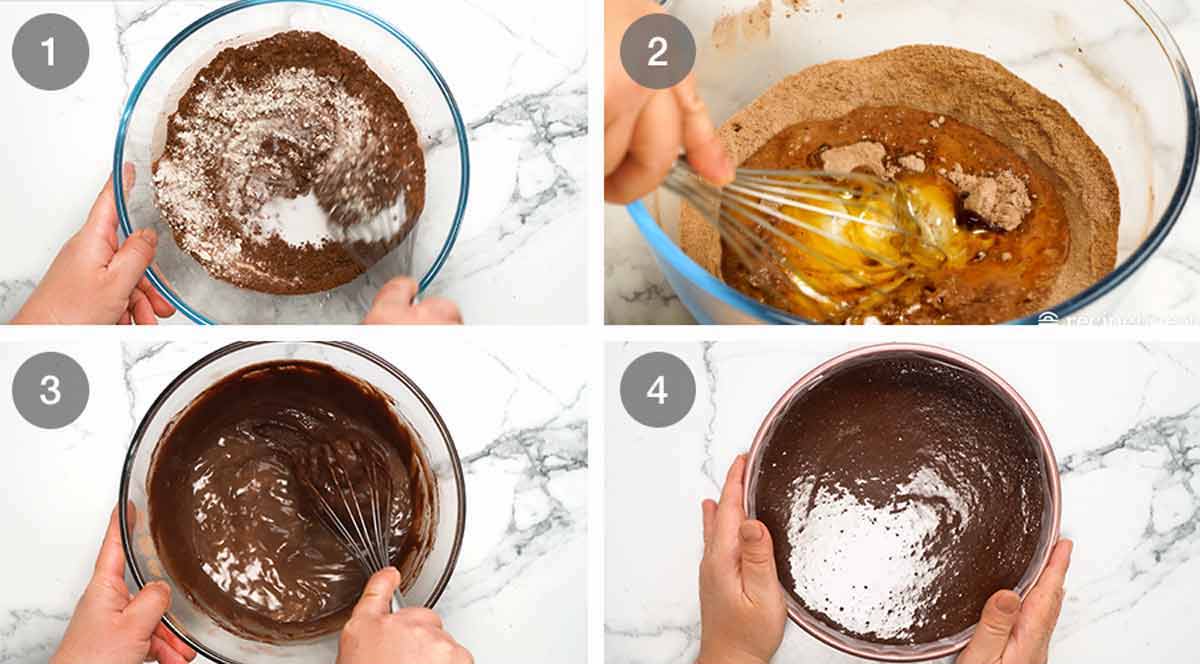
Mix Dry – Whisk the Dry ingredients in a large bowl.
Add Wet – Add the Wet ingredients, except the boiling water, into the same bowl.
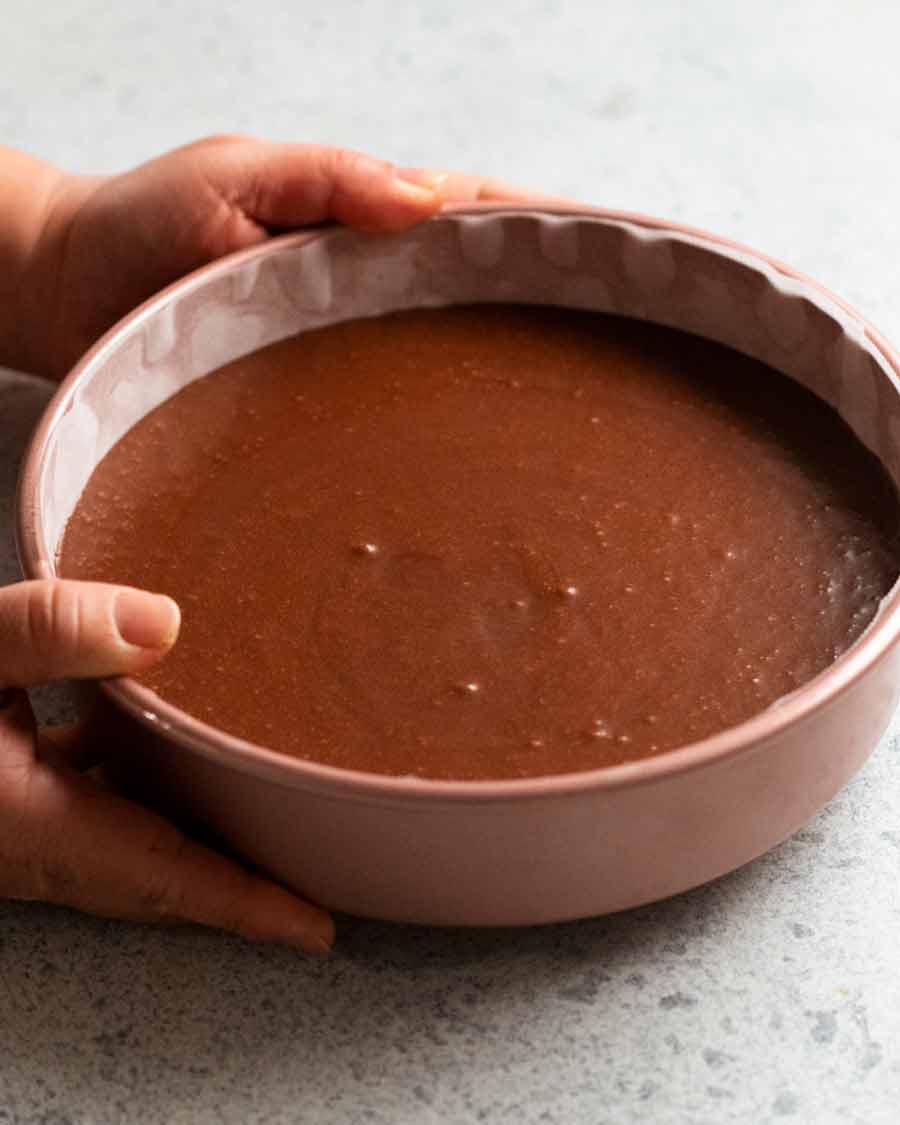
Whisk until combined. Then whisk the boiling water in. The batter will be pretty thin – not as thin as the Chocolate Cake on which this recipe is based, but still pretty thin.
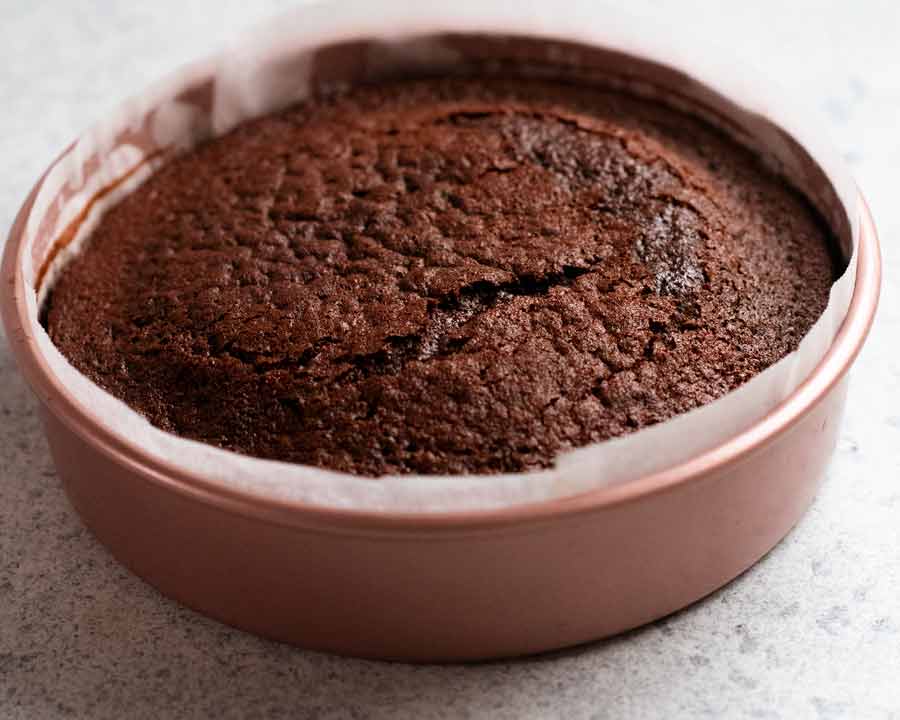
Pour the batter into a lined 20cm/8″ pan. It’s best not to use a springform pan to avoid any chance of batter leakage – because as noted above, the batter is fairly thin.
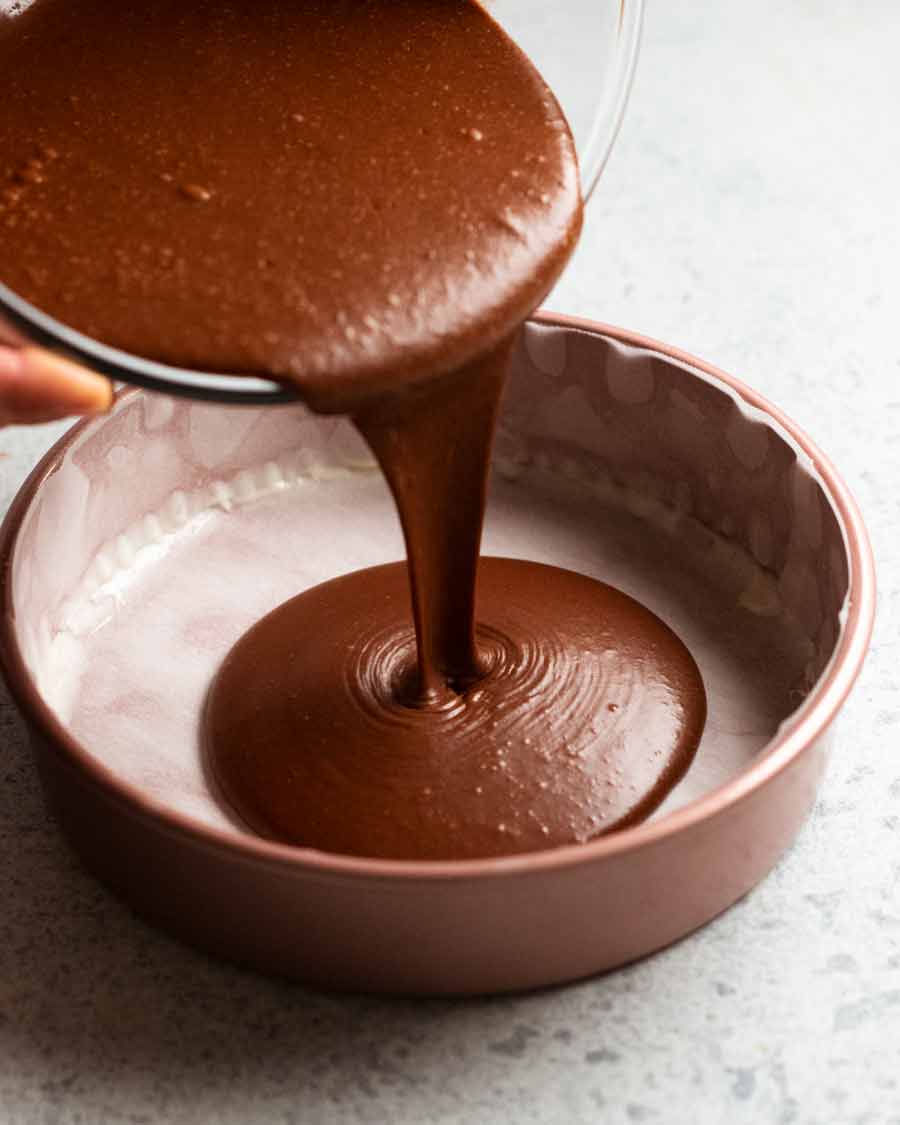
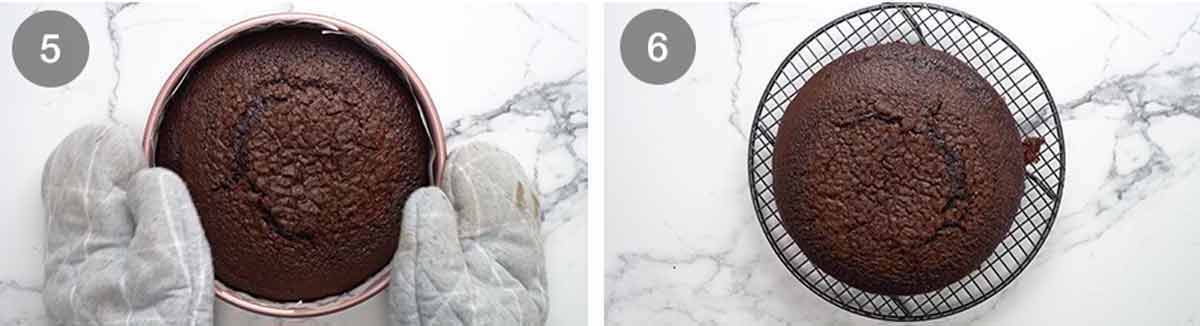
Bake for 40 minutes at 180°C/350°F (160°C fan) or until a toothpick inserted into the centre comes out clean or nearly clean. Remember, we’re making a hot fudge cake here, so it’s fine if the centre is slightly damp!

Cool in the pan for 10 minutes. Then turn it out and let it cool for just another 10 minutes before slicing to serve. Don’t worry, the cake will still be lovely and warm! We just want to rest the cake a bit before slicing. Hot cake is very delicate!
2. Making the hot fudge sauce
While it’s tempting to just put both cold cream and chocolate in a bowl and microwave to melt, this can lead to the chocolate seizing so you end up with a lumpy mess in your hands. Yep, speaking from first hand experience here! Make ganache properly – by pouring hot cream over the chocolate and leaving it to melt before mixing to combine.

Pour hot cream over chocolate – Heat the cream until steamy and hot using whatever method you choose: saucepan or microwave. Then pour it over the chocolate in a bowl.
Full coverage! Shake the bowl / poke as needed to ensure all the chocolate is submerged.
5 minutes – Cover with a plate and leave for 5 minutes so the cream melts the chocolate.
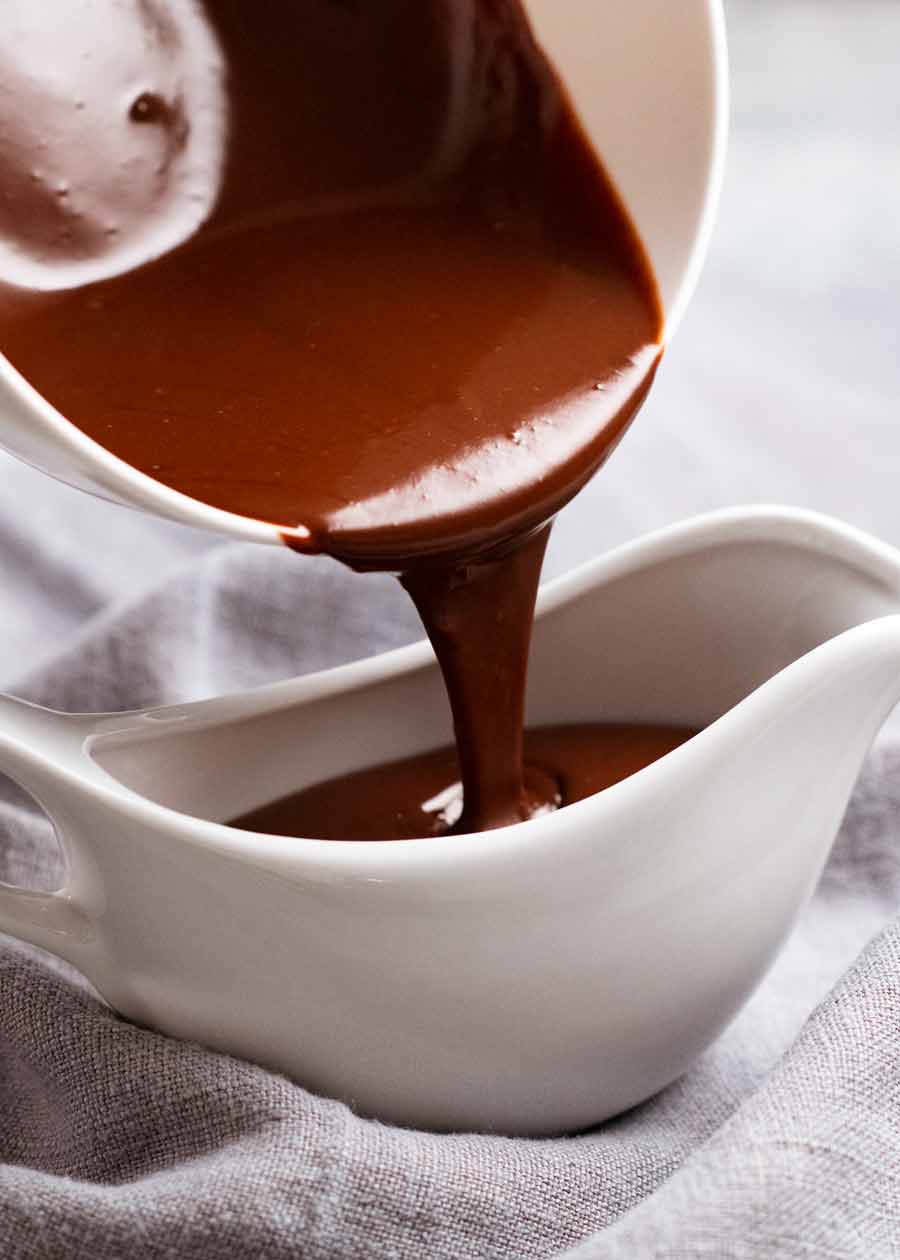
Mix until the cream and chocolate combine into a glossy chocolate sauce. Be patient – it will happen! If you have little chocolate lumps at the end, just pop it in the microwave for 20 seconds for a heat boost, then mix again.
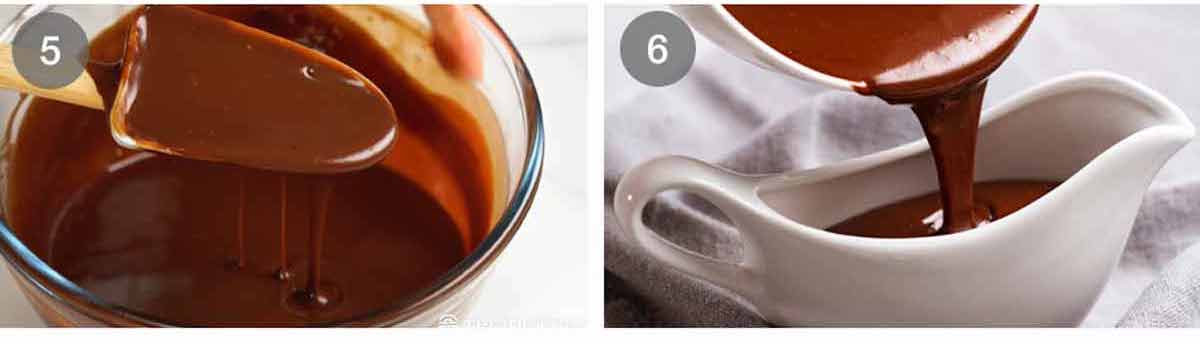
Cool for 20 minutes to let the sauce thicken slightly. Just leave it in the bowl.
Serving – Give it a mix to make it smooth again. Then pour into serving jugs to let everyone help themselves. (Or, if you’re concerned about portion control, you can serve it!).
Reheating and storage – The chocolate sauce will firm up to a peanut butter consistency when refrigerated but can simply be reheated in the microwave back to perfect pourable consistency. It will keep for at least a week – just bear in mind the shelf life of the cream.
3. Serving the hot fudge cake
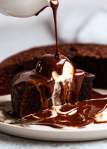
To serve this gloriously cosy, decadent hot chocolate cake, cut slices of cake as generous as you want. Put on a plate – or a shallow bowl (for easy chocolate-sauce-melted-ice-cream scooping). Top with a scoop of vanilla ice cream then douse with warm chocolate fudge sauce. Dive in and swoon!!
And 10 seconds later…..
Matters of storage
The cake has an excellent shelf life of 5 to 7 days in the fridge. It won’t go stale thanks to the smidge of oil we’re using, and also because it is intended to serve hot. Any baked good heated up wipes out any trace of staleness!
The fudge sauce can also be kept for at least 7 days, limited only by the shelf life of the cream. Keep it in the fridge – it will firm up to a peanut butter like consistency. Scoop out what you need, then just microwave to re-melt.
And PS, in case you’re concerned, there’s plenty of hot fudge sauce for serving. 2 whole cups, that’s 500 ml. Imagine running out of chocolate sauce! Devastating. – Nagi x
Watch how to make it
Hot Chocolate Fudge Cake
Ingredients
Dry:
- 1 cup plain/all-purpose flour (Note 2)
- 1/3 cup cocoa powder (unsweetened), sifted (Note 1)30g
- 3/4 tsp baking powder (Note 2)
- 3/4 tsp baking soda/bi-carb (sifted if lumpy) (Note 2)
- 1 cup caster/superfine sugar (sub ordinary white sugar)
- 1/4 tsp salt
Wet:
- 1 large egg , at room temperature
- 1/2 cup milk , full fat, at room temperature
- 75g / 5 tbsp unsalted butter , melted and cooled slightly
- 1 tbsp oil (canola, veg or other neutral oil) – keeps cake moist for days
- 1 tsp vanilla extract
- 1/2 cup boiling water
Chocolate fudge sauce:
- 1 cup thickened / heavy cream, or pure cream (not low fat, too thin)
- 1 1/4 cups dark chocolate melts or chips (US: semi-sweet chips) – or finely chopped 60 – 70% cocoa chocolate block (Note 3)
Serving:
- Vanilla ice cream
Instructions
- Preheat oven to 180°C/350°F (160°C fan). Grease a 20cm/8" cake pan with butter then line with paper.
- Whisk Dry ingredients in a large bowl.
- Add Wet – Then add all the Wet ingredients EXCEPT the boiling water. Whisk until combined. Then add the boiling water and whisk until smooth. The batter will be pretty thin.
- Bake 40 min – Pour into the pan. Bake for 40 minutes or until a skewer inserted into the centre comes out mostly clean – a faint smear of batter isn't a bad thing, we're making a fudge cake here!
- Cool in the pan for 10 minutes. Invert onto a plate, then onto a cooling rack or plate right side up. Cool for a further 10 minutes – the cake will still be warm for serving.
- Serving – Cut slices of the warm cake. Top with a scoop of ice cream. Douse with fudge sauce – just shy of 1/4 cup per slice (10 slices). Eat and swoon!
Chocolate fudge sauce (makes 2 cups):
- Heat cream until hot, just before boiling point, using your method of choice – saucepan or microwave.
- Stand 5 min – Put chocolate in bowl. Pour over hot cream. Ensure all chocolate is submerged, then cover with a plate. Leave for 5 minutes.
- Mix – Using a whisk or rubber spatula, mix vigorously until the cream and chocolate combine into a silky chocolate sauce.
- Cool to thicken for 20 minutes. Give it a stir then pour into a jug for serving!
Notes
– Just baking soda: use 1 teaspoon in total Self raising flour – Skip both the baking soda and baking powder, switch the plain flour with self raising flour. The crumb won’t rise quite as much but still fluffy and lovely! 3. Chocolate – Use chocolate intended for baking sold in the baking aisle, not eating chocolate (Lindt 70% is the exception). If using a block, chop it finely. Don’t use ordinary eating chocolate – it’s hit and miss. Some will melt fine, others do not. AUSTRALIA: “Melts” are intended for melting so are safest to use. However, chips will melt fine too. US: Semi-sweet chips are perfect for this. 4. Storage – Cake will keep for 5 – 7 days in the fridge (stays moist thanks to a touch of oil). Warm to serve. Fudge sauce will keep for at least a week – factor in the cream shelf life. Firms up in the fridge, just warm to melt. Both the cake and sauce can also be frozen for up to 3 months. Nutrition per serving, assuming 10 servings and all the sauce is consumed. Excludes ice cream.
Nutrition
Life of Dozer
Busted, helping himself to the bin. He’s so gross! 😝 Probably rebelling because he was deprived of chocolate cake. No chocolate for dogs!

The post Hot chocolate fudge cake appeared first on RecipeTin Eats.
]]> The only thing I make when rhubarb season arrives – rhubarb crumble! I like to add apple into mine so the filling isn’t just baby-food-mush. Adore the tangy filling – there is nothing else like it. Serving with ice cream is a MUST! There’s nothing like rhubarb! This is one of those rare recipes where... Get the Recipe
The post Rhubarb Crumble with Apple appeared first on RecipeTin Eats.
]]>The only thing I make when rhubarb season arrives – rhubarb crumble! I like to add apple into mine so the filling isn’t just baby-food-mush. Adore the tangy filling – there is nothing else like it. Serving with ice cream is a MUST!
There’s nothing like rhubarb!
This is one of those rare recipes where I can’t offer flexibility – because there is no substitute for rhubarb! There’s nothing like it – the unique celery-like texture, bright red colour and signature tang. Even its cooking qualities are unusual. It goes from apple-like crispy to very soft, with seemingly no in-between “tender crisp” like you get with most fruit.
Which, I just realised, might sound unappetising. 😂 But actually, the softness when cooked is is what makes it such a great filling for a crumble. Though also, it is the reason why I like to combine it with apple, to give it some much needed texture.
For those of you new to rhubarb…..
What it is – A vegetable, but mostly used for desserts! Looks like celery except with red stalks.
Flavour – Tart, like lemon but less sour. You wouldn’t eat a pie filled with lemon flesh, way too sour! Whereas you can, with rhubarb.
Why people love it – The striking colour and unique tangy flavour, quick to cook (hard to soft in 5 minutes on the stove), easy to prep (no peeling, just cut the stalk).
What it’s used for – Mostly desserts. Crumble is a common use – I’m so unoriginal, I know. Either just rhubarb, or combined with other fruit – apple and strawberry are favourites. Why? Partially for texture (rather than having a dish full of just very soft rhubarb which some people – ahem, me – likens to baby food) and also perhaps price (rhubarb is $5-$6 a bunch, you need 2 to make a rhubarb-only crumble).
It’s also used stewed, like a compote and jams, for decorating (think: red stalks baked on top of cakes, muffins, pastries), tarts.
How to use it – Usually cooked, though can be eaten raw, I had it in salads. When cooked it’s soft, the tangy flavour is tempered and juicier.
How to cook it – Baked, stewed. When cooked it’s so soft it does not hold its shape when picked up. Chopped pieces breaks down into a jam-like consistency within 5 minutes on the stove.
When it’s in season – Opposite times in opposite parts of the world!
– Aust/NZ: late winter to spring (June – Sept)
– US/UK/northern hemisphere: spring to summer (April – June)
– Forced rhubarb: UK early variety, Jan – Mar. Grown in the dark rather than outdoors. More tender, pink rather than red and juicier. Haven’t tried this crumble recipe with it as it doesn’t exist in Australia. Suspect adjustments required including less sugar and juice thickener. Suggest using Nigella’s forced rhubarb crumble recipe instead.Grows like a weed. Un-killable, I’m told. Try planting some!
Ingredients in Apple & Rhubarb Crumble
See the section above for rhubarb chatter. This section will cover everything else!
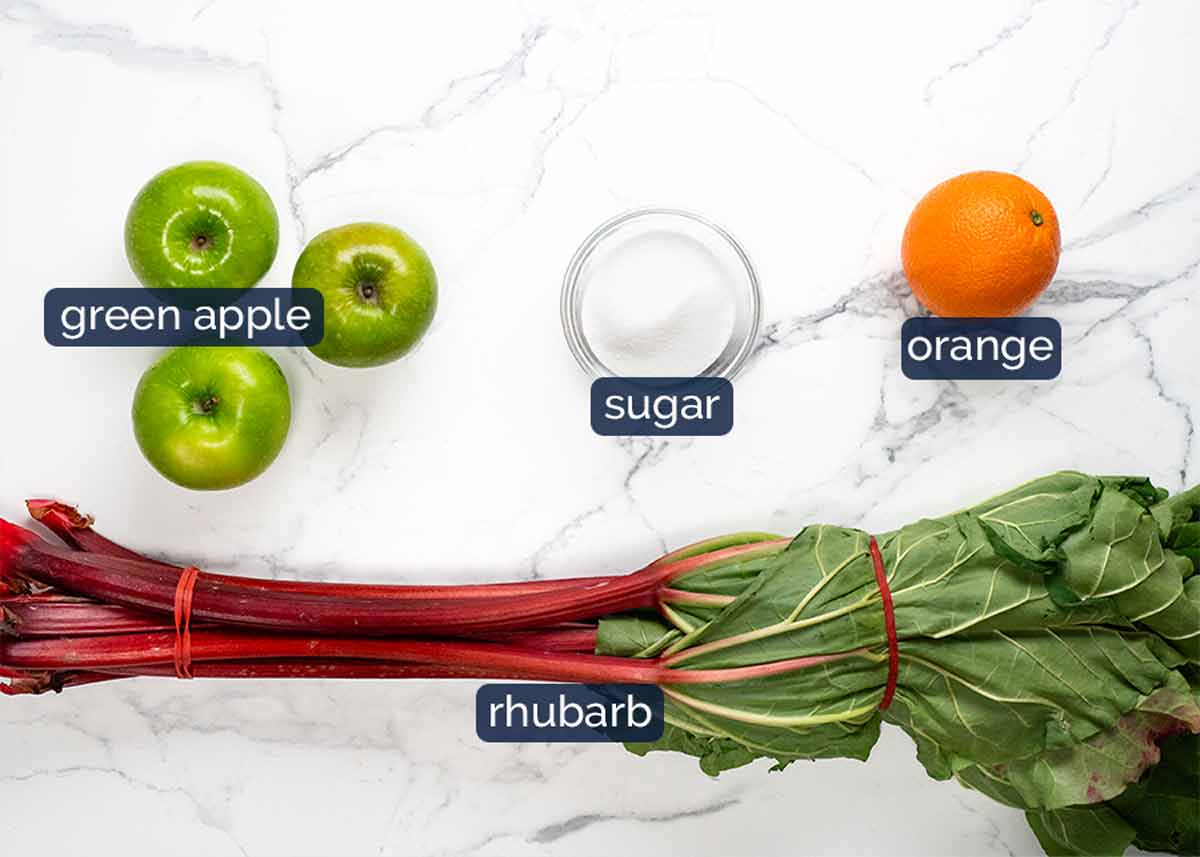
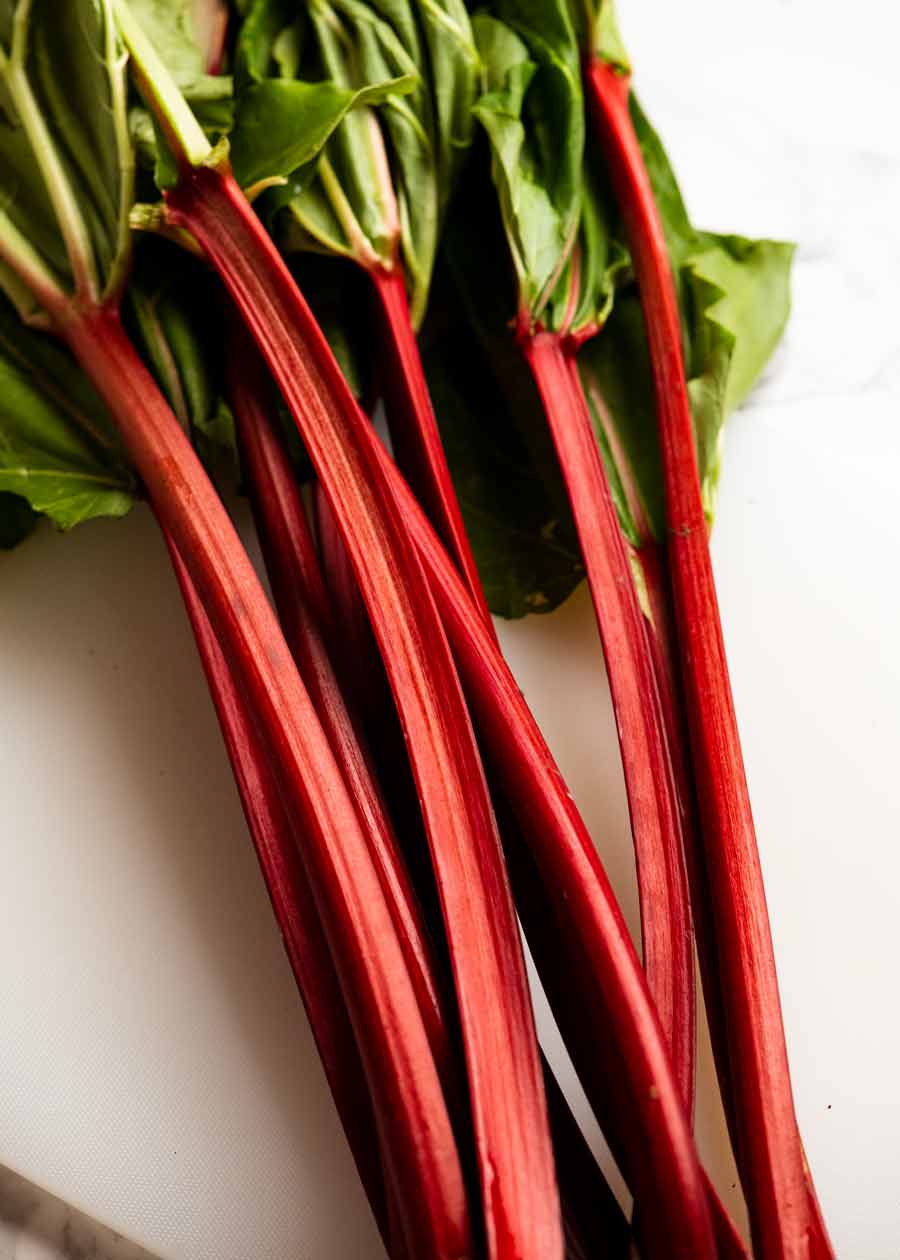
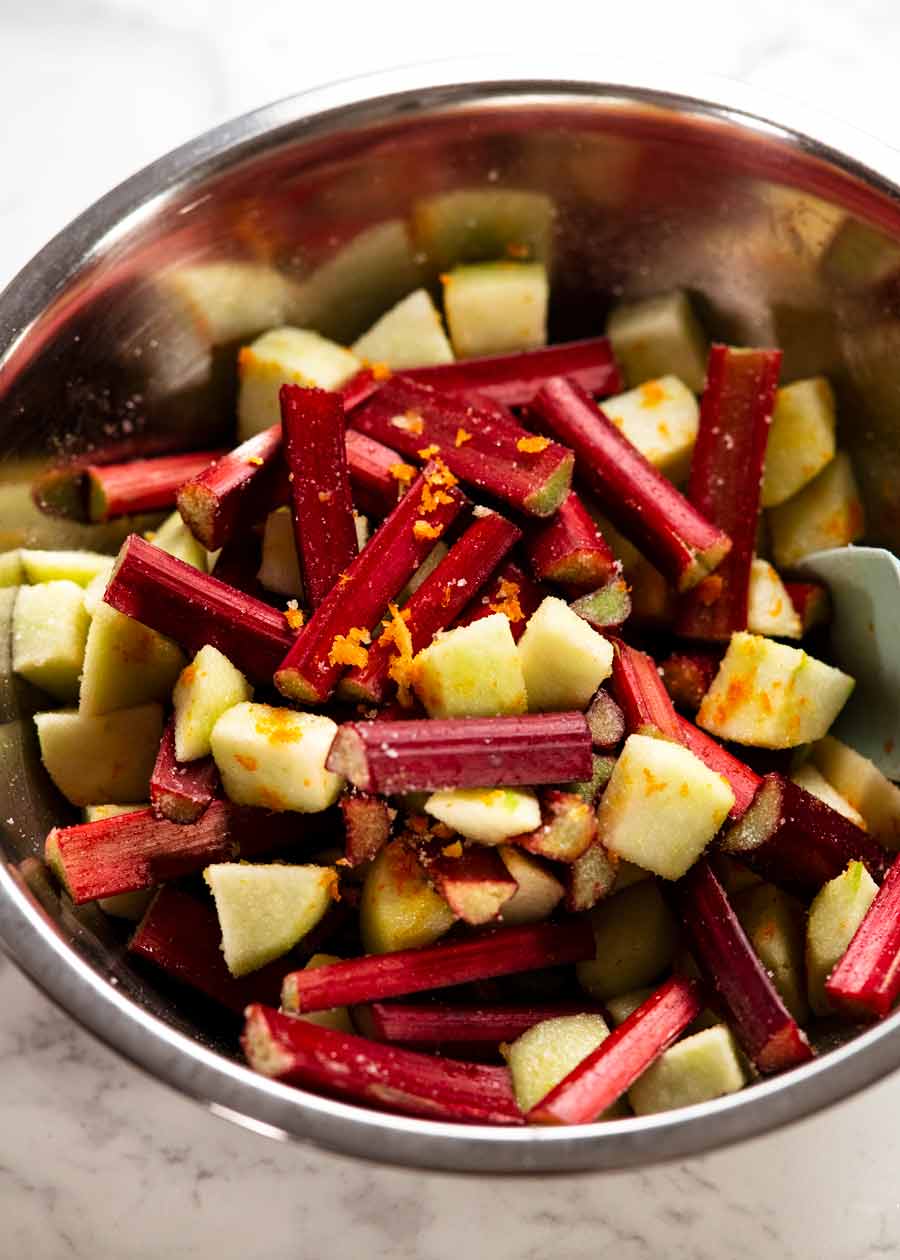
Rhubarb – Chatter per above. You will need one big bunch, about 10 – 12 stalks. Sometimes the bunches are small and dismal so rummage around for the biggest and best. Look for celery-like firm stems, not floppy dehydrated ones (juice-less). You need 4 1/2 – 5 cups once the stems are cut. If you’re a little short, that’s ok. The crumble will still work fine! You could also go a little more too.
Granny Smith (green apples) – As noted above, I like combined rhubarb with another fruit to give some texture to the filling. Otherwise it’s just a big dish of very soft rhubarb which has a texture like apple puree when you eat it.
Granny Smith is my choice for its tartness (matches the rhubarb) and ability to hold its shape when cooked.
Sugar – To balance the tang of the rhubarb and green apple, and to create a syrup with the juices.
Orange zest – Optional! Adds a little citrus zing.
No syrup thickener – Early versions of rhubarb crumble used cornflour/cornstarch or flour to thicken the juices I expected to come out of the rhubarb as it baked. But actually, rhubarb isn’t as juicy as apple, strawberry, peach and other fruits I use in crumbles and cobbler recipes. So it made the filling pasty rather than creating a syrup sauce. Turns out, you don’t need it. The majority of the juiciness of rhubarb stays inside the barely-holding-together cooked rhubarb pieces that bursts out in your mouth when you bite into it!
Crumble topping
This crumble topping has less butter in it than my classic apple crumble topping so it’s crisper. Reason: the more buttery crumble steals the juice from the rhubarb which a) makes the topping “doughy” on the underside and b) rhubarb filling lacks juice. It took multiple iterations (“the crumble is pasty!!” 😝) before we figured this out!!
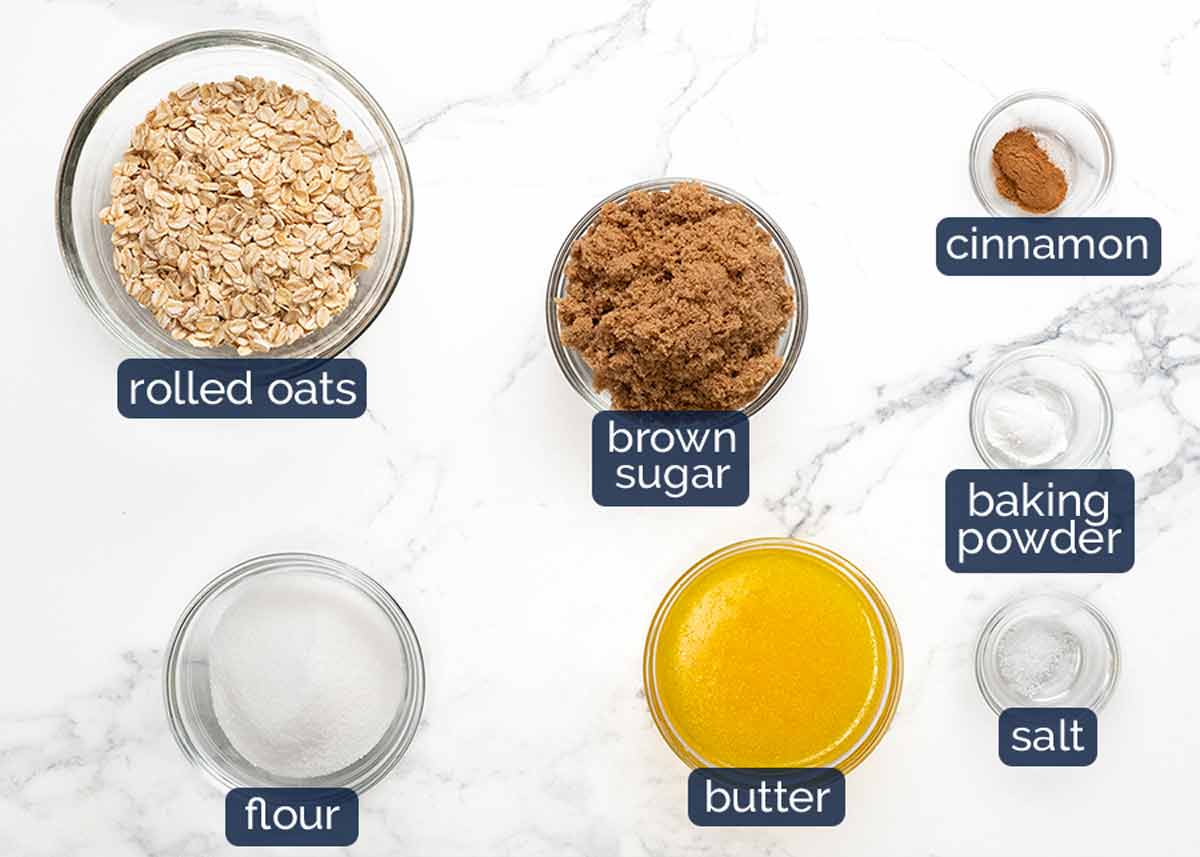
Roll oats – Just regular oats. Not steel cut, not quick cook.
Brown sugar – For better caramely flavour and colour for the topping. But can be substituted with white sugar.
Butter – For buttery goodness and the wet ingredient that brings the crumble mixture together.
Baking powder – To give the topping a bit of lift, otherwise it is a little too rock hard!
Flour – Plain/white flour. Almond meal works well as a gluten free substitute.
Cinnamon – Mandatory in virtually every crumble I make!
Salt – Just a pinch, to bring out the flavours.
How to make Apple & Rhubarb Crumble
Nice and easy. Rhubarb is so easy to prepare!
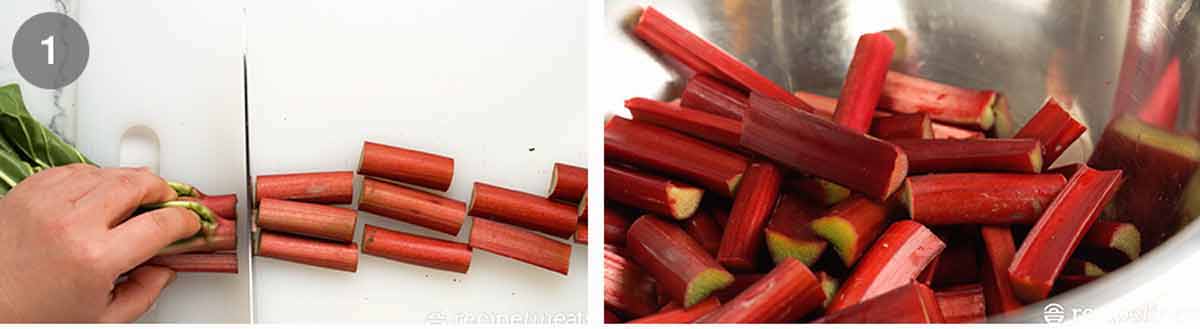
Rhubarb – Wash the rhubarb stems. Trim off the dirty end. Then cut into 4cm / 1.5″ even lengths. Discard the leaves – they should not be eaten.

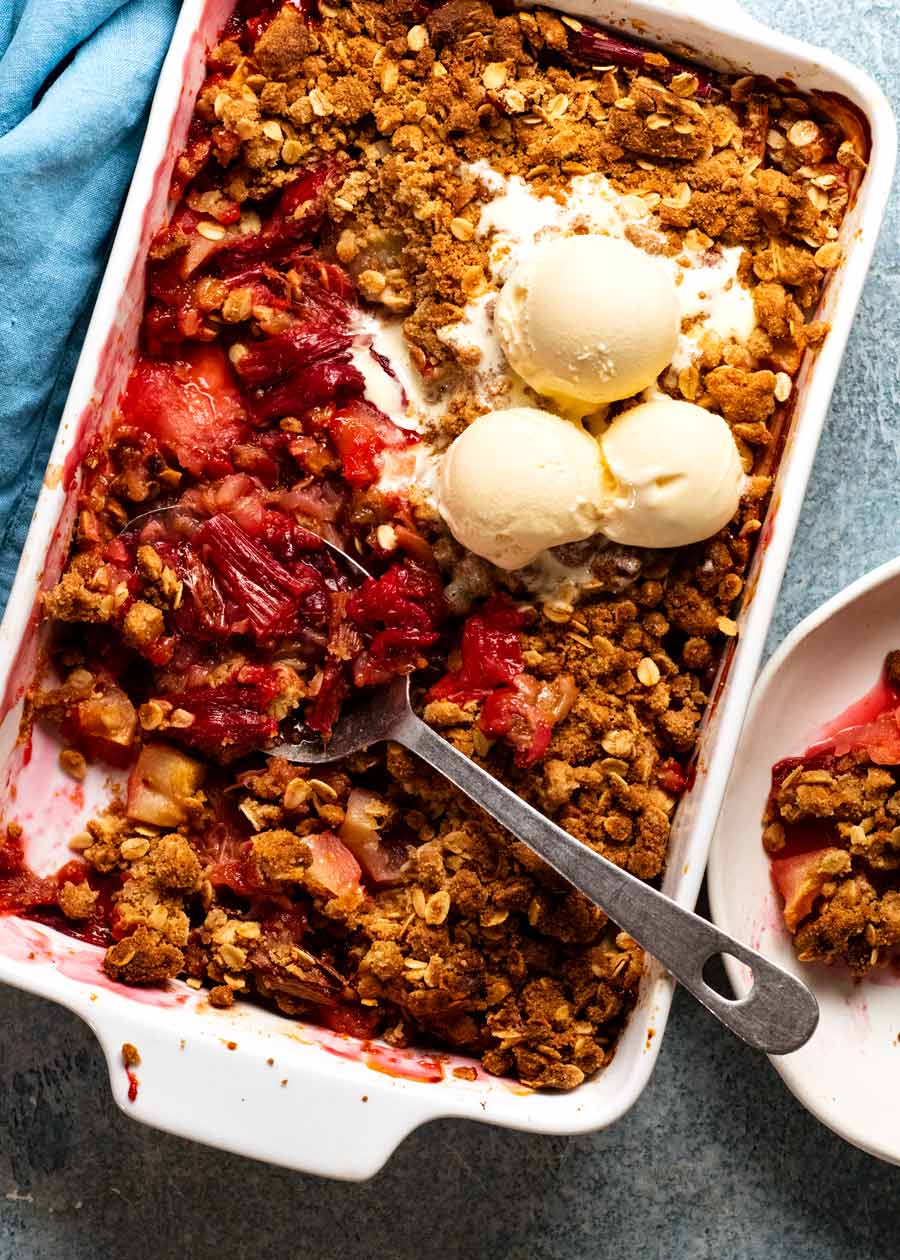
Toss the rhubarb with apple pieces, sugar and orange zest in a large bowl. Then spread in a 30 x 20cm baking dish (12 x 8″).
Baking pan size – If you don’t have a pan of this size, go smaller rather than larger. If the pan is too big, then the filling layer gets too thin and will be a little less juicy than ideal (the crumble topping absorbs some of juices).
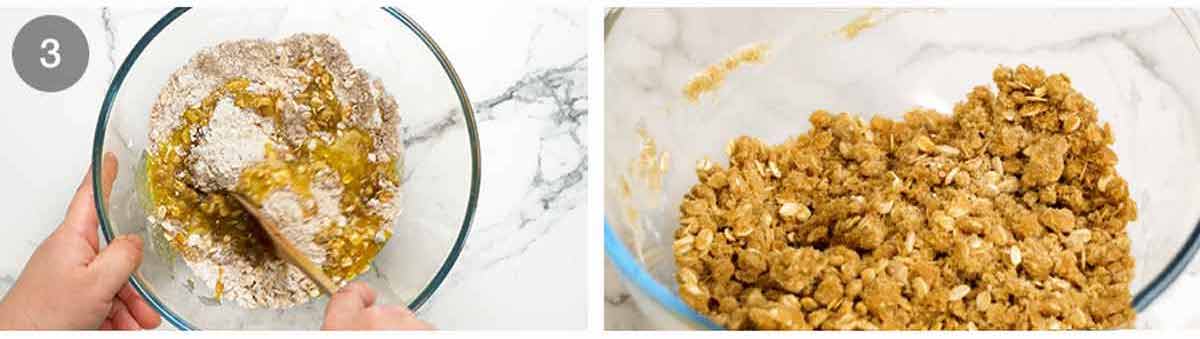
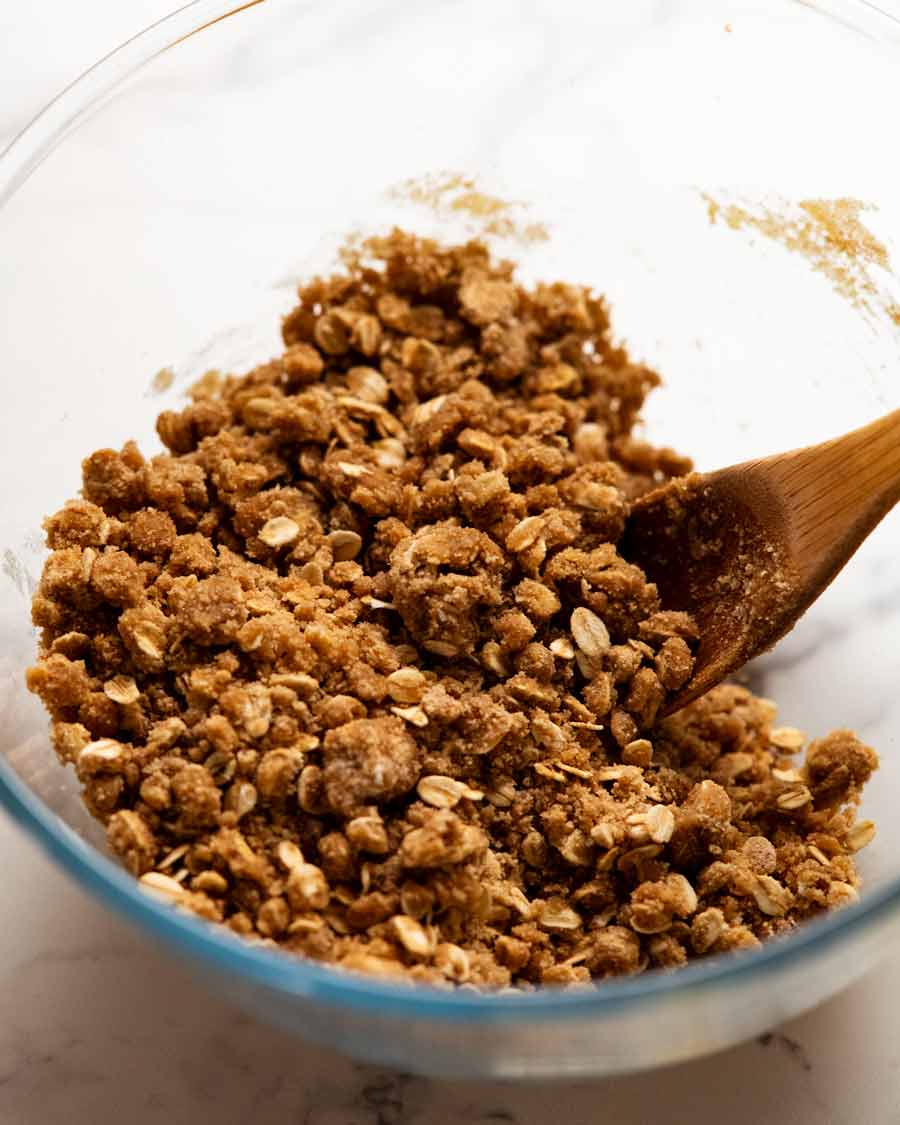
Crumble topping – Put all the crumble topping ingredients in a bowl and mix until you no longer see flour. As noted above in the ingredients section, this mixture has less butter than my classic crumble topping. So you’ll need to mix a little longer. Smear up the sides of the bowl and use a cutting motion as needed to get it all mixed up.
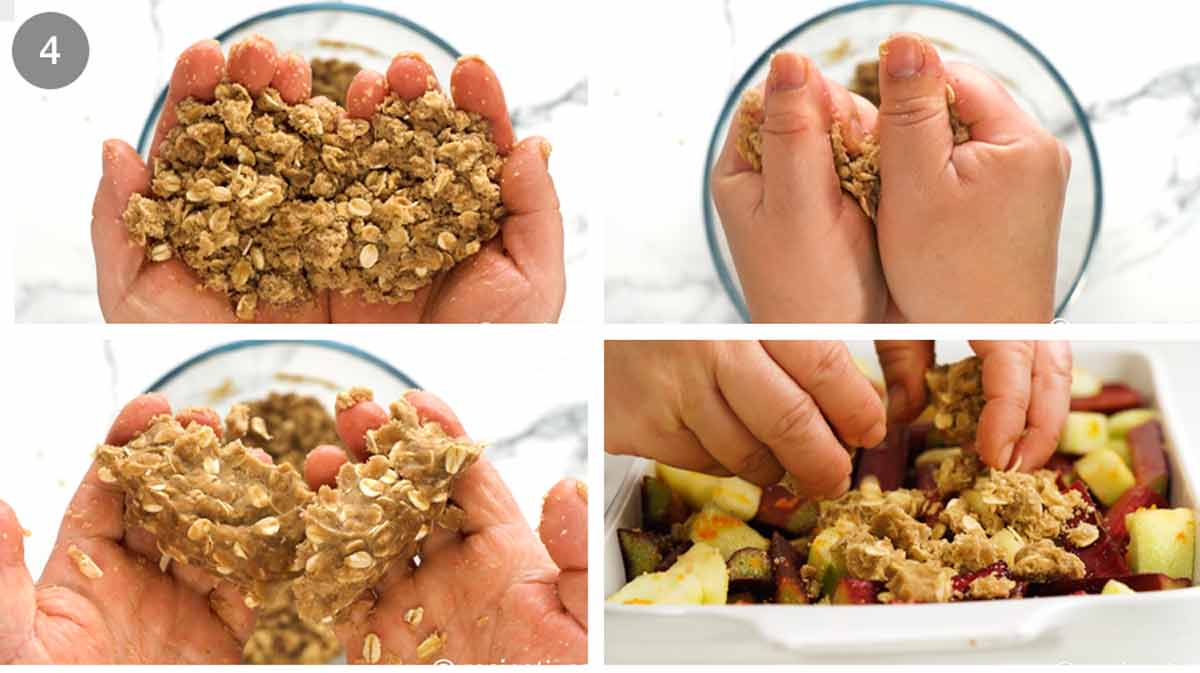
Chunky bits! Grab handfuls of the crumble mixture and enclose in your first to press together. Then use your fingers to break into clumps to cover the surface.
Why I do this strange step? Couple of reasons! Firstly, as mentioned earlier, rhubarb is less juicy than typical fruits used in crumbles (like apple) so I don’t want sandy crumble topping falling into the rhubarb and stealing the precious juices. It makes the filling pasty, as I found out firsthand.
Secondly, the topping for rhubarb crumble is sandier (for reasons outlined in the ingredients section) but I still want the crumbly chunks for crunch rather than a layer of dry sand. Solution? Scrunch in hands, then crumble. Easy!
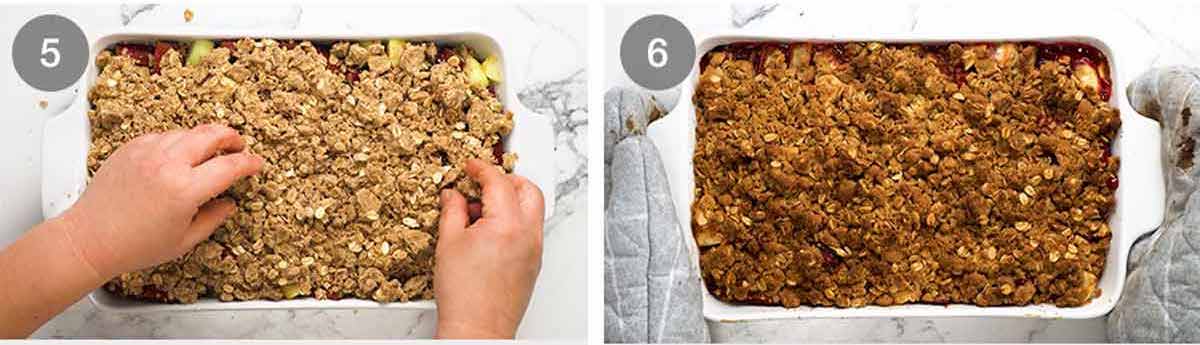
Cover surface with the crumble mixture.
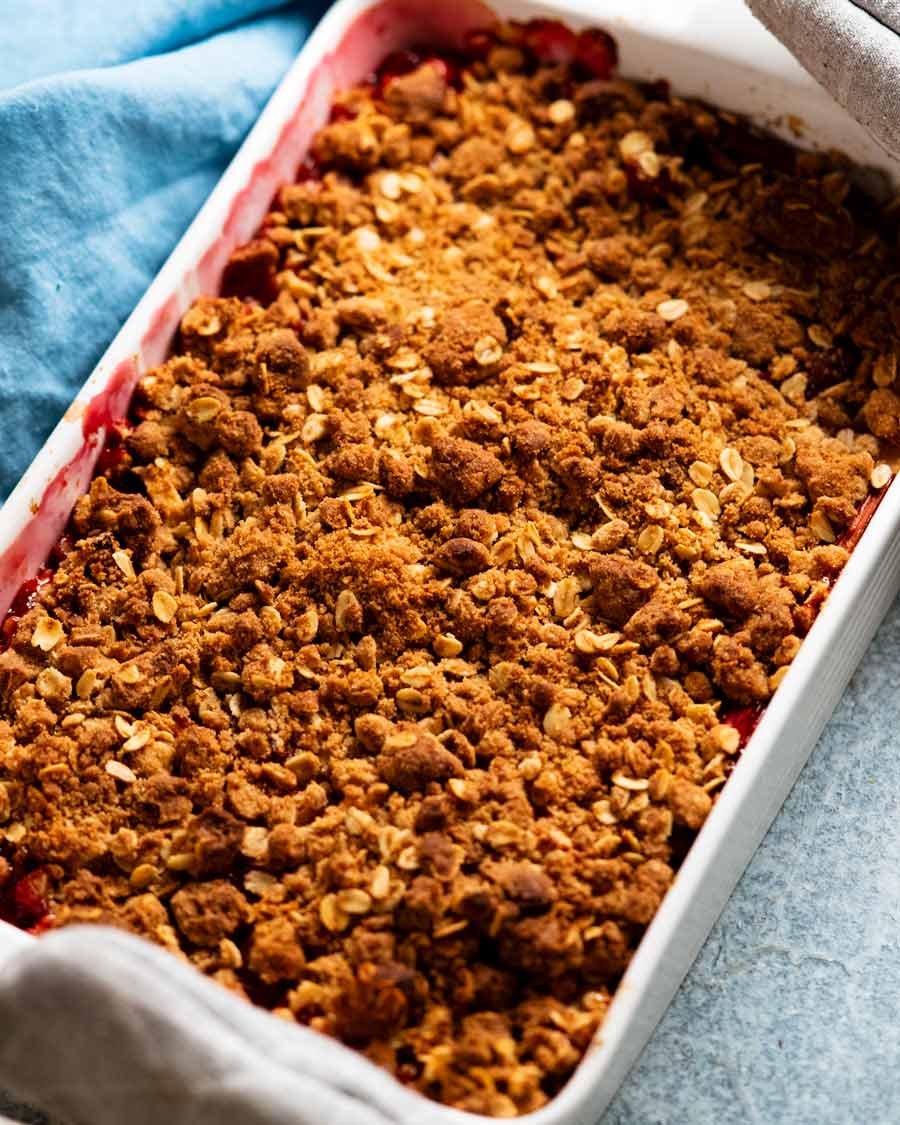
Bake for 35 minutes until the crumble topping is golden, the rhubarb is tender and you see red juices bubbling up the sides. Poke the rhubarb with a butter knife to check! Sometimes, firmer and thicker pieces of rhubarb can take an extra 5 minutes but 35 minutes is consistently the perfect bake time for me.
Rest for 5 minutes before serving. This let’s it cool down slightly as well as giving the juices a chance to thicken slightly.
IMPORTANT serving point!
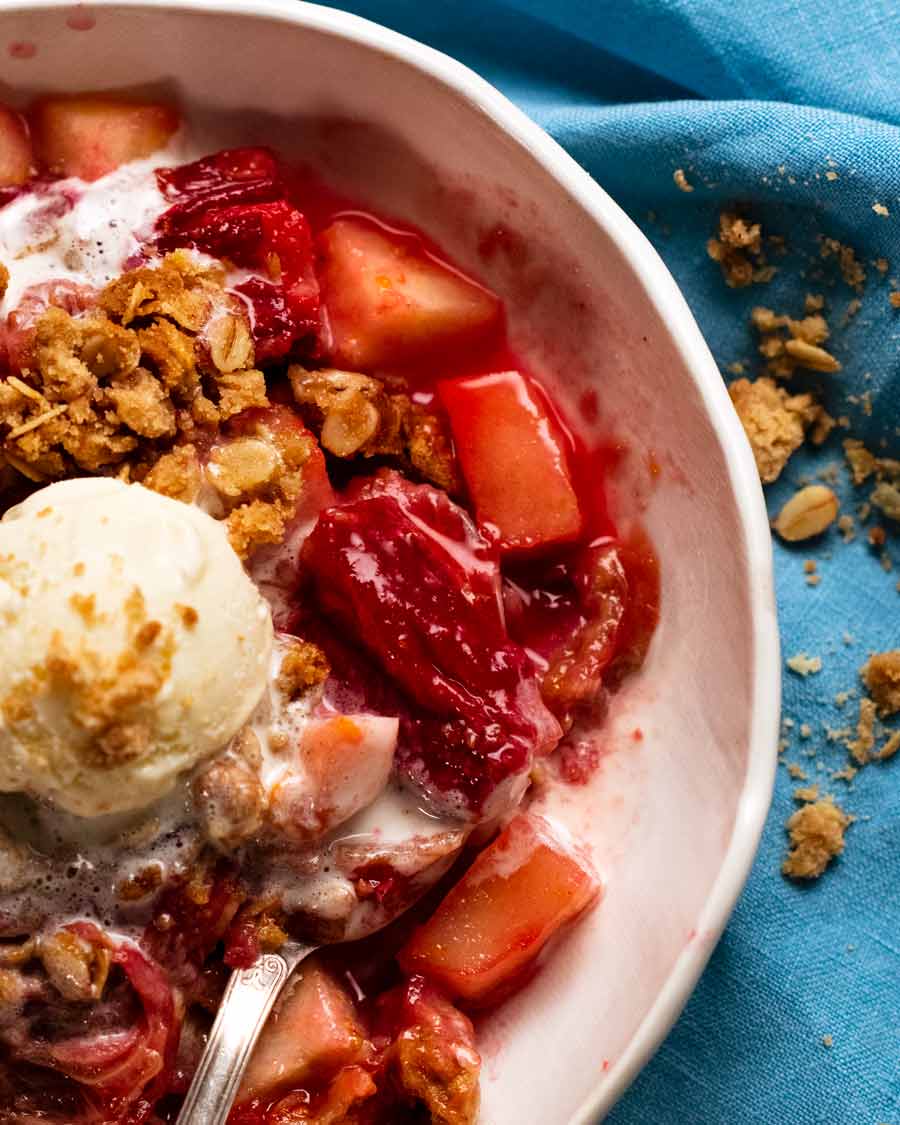
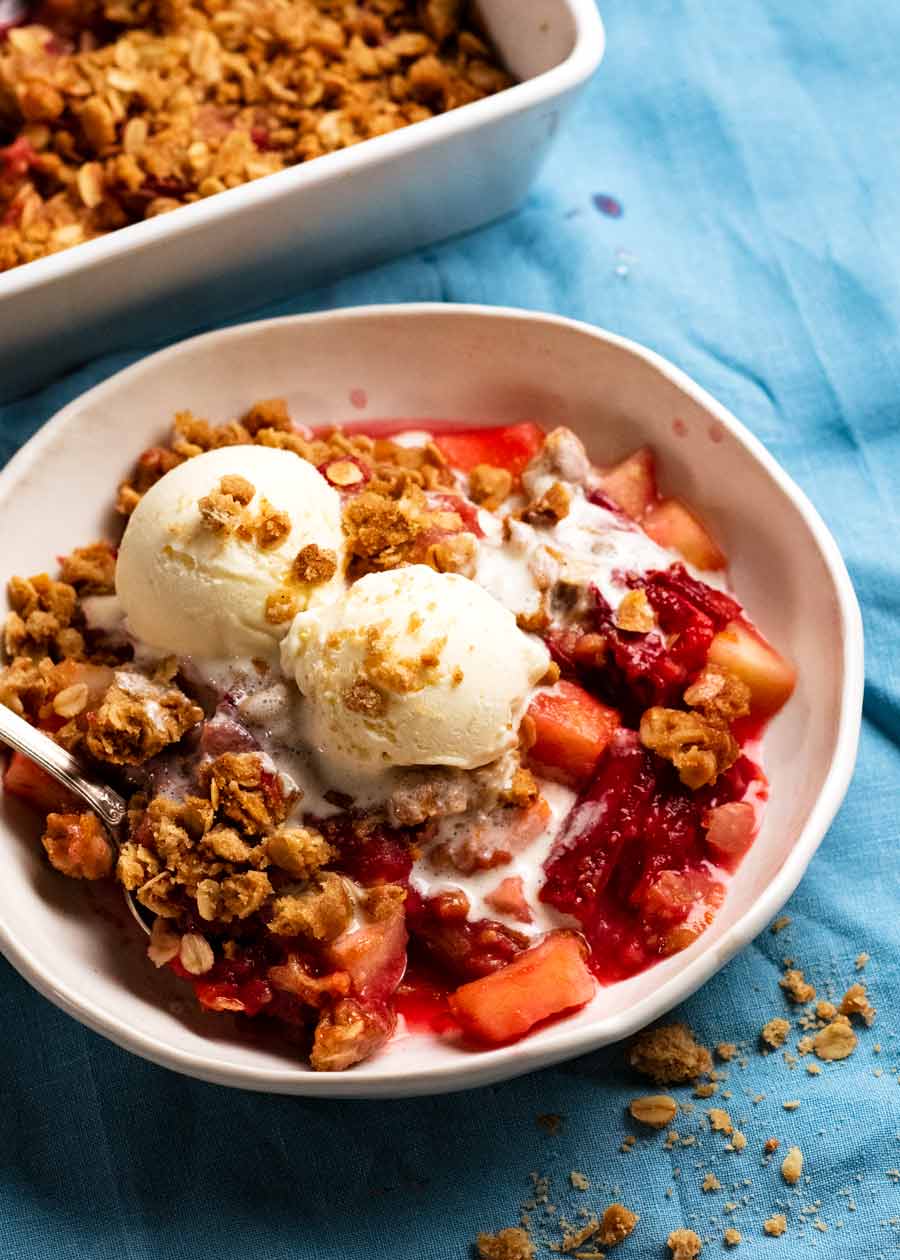
With every crumble recipe I’ve shared, I very strongly recommend serving with ice cream – or custard.
With rhubarb crumble, it’s not a strong recommendation. It’s a must! The tartness of the filling demands something creamy to balance it out. And also, the filling is not as juicy and syrupy as other crumble fillings because, as I’ve repeated a bizarre number of times throughout this post, rhubarb just isn’t as juicy as other crumble fruits like apple, strawberry, peaches etc.
So I’m not urging you to serve with ice cream or custard. I’m making it mandatory. Please promise me you won’t skip it! – Nagi x
Watch how to make it
Apple and rhubarb crumble
Ingredients
Rhubarb filling:
- 500g/ 4 1/2 cups rhubarb stems , cut into 4cm / 1.5" pieces (1 large bunch rhubarb, 10 – 12 stems, cleaned, DISCARD LEAVES) – Note 1
- 1/3 cup white sugar
- 3 Granny Smith apples (~600g/1.2lb whole) , peeled and cut 1.5cm / 3/5" cubes, ~3 cups/450g once cut (Note 2)
- Zest of 1 orange , optional but recommended
Topping:
- 1 cup rolled oats (not quick or steel cut)
- 1 cup flour , plain/all purpose
- 3/4 cup (tightly packed) brown sugar
- 1/2 tsp baking powder
- 1/2 tsp cinnamon powder
- 90g/ 6 tbsp unsalted butter , melted
- Pinch of salt
Serving (must!)
- Vanilla ice cream – or pouring custard
Instructions
- Preheat oven to 200°C/375°F (180°C fan).
- Filling: Place rhubarb, apple, sugar and orange zest in a large mixing bowl and toss well. Spread evenly in a 30 x 20cm baking dish (12 x 8") (Note 3)
- Crumble topping: Place topping ingredients in a bowl and mix with a wooden spoon until all the flour is incorporated (use cutting motion/ smearing up wall, as needed). It will be a sandy mixture.
- Scrunch & top: Grab handfuls of crumble and enclose your fist to press into lumps. Break into clumps and scatter over the filling. (Note 4 explains this unusual step!).
- Bake for 35 minutes or until rhubarb is soft and the crumble is golden brown. (Bake time – Note 5)
- Rest & serve: Remove from the oven, rest for 5 minutes. Scoop into bowls and serve with vanilla ice cream or custard!
Notes
Nutrition
Other members of the crumble and cobbler family
Life of Dozer
Laundry day is always a concerning day for him.

The post Rhubarb Crumble with Apple appeared first on RecipeTin Eats.
]]> This is a Honey Cake made with only honey as the sweetener, no sugar, so you can really taste the honey (such cakes are rarer than you think!). You’ll love how it’s soaked with rich honey syrup, flooding the cake with extra honey flavour and making the crumb beautifully moist. This sweet gem is brilliant... Get the Recipe
The post Honey Cake appeared first on RecipeTin Eats.
]]>This is a Honey Cake made with only honey as the sweetener, no sugar, so you can really taste the honey (such cakes are rarer than you think!). You’ll love how it’s soaked with rich honey syrup, flooding the cake with extra honey flavour and making the crumb beautifully moist.
This sweet gem is brilliant as a pudding-like dessert to finish off a cosy dinner, or served for afternoon tea with friends.
Honey Cake
I had a load of home-harvested honey gifted to me by people in my life who keep their own bees. Thinking how best I could flatter such a lovely ingredient, I developed a slightly mad obsession with creating a cake that used honey and no sugar whatsoever. Sounds simple enough, right?
WRONG!
Turns out, it’s much harder than it seems. For one, sugar plays an important part in making cakes rise. When creamed with butter, sugar creates little air pockets as the cake bakes. When you remove sugar from the equation, cakes have a tendency to be very dense, as I discovered from various honey cake recipes I tried.
The other problem? Pretty much all the ones I tried don’t actually taste of honey. What’s the point then, I ask??! 😂
So I am chuffed to present my own honey cake recipe which I think does the cake justice both in name and the eating! It was broadly adapted from this Greek Honey Cake. If you do an ingredient comparison though, you’ll see that the end result bears little resemblance. The most distinct difference is the absence of sugar in my recipe.
Ingredients in Honey Cake
Straightforward ingredients in this recipe! The key ingredient is of course, honey (imagine that! 😂).
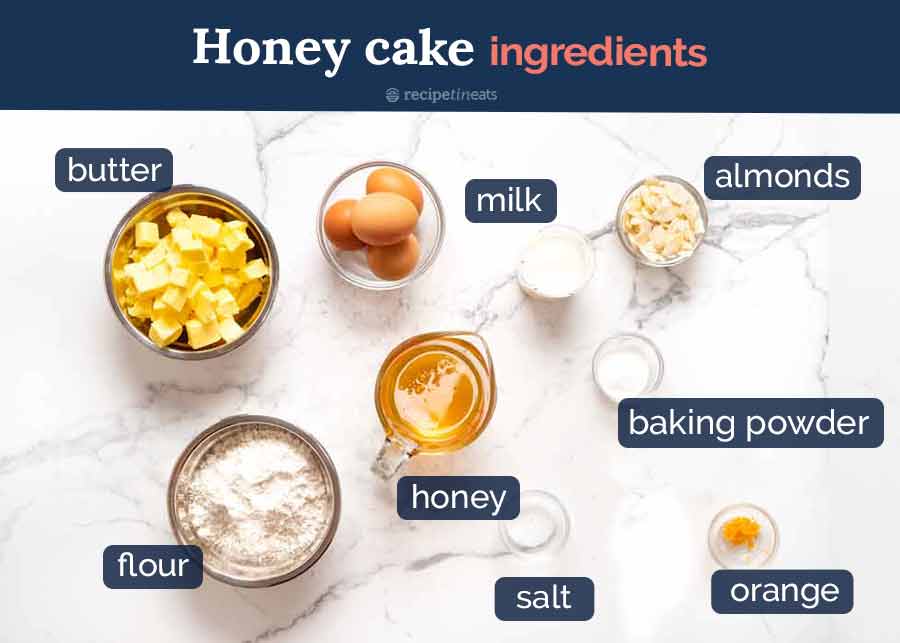
Honey – Not all honey is created equal! The better quality the honey, the stronger the honey flavour and the better the result. To be honest though, while I don’t want to encourage you to use dirt cheap mass-produced honey since it can sometimes be bulked out with sugar syrup, even if you use a regular mainstream brand the honey flavour will still absolutely come through in this cake.
Butter (at room temperature) – When recipes call for butter at room temperature or softened butter, the butter needs to be firmer than you probably think. Ideally it is 18°C / 64°F. This is soft enough to whip, but still cool enough that when you touch it, you don’t end up with a slick of grease on your finger.
Butter that is too soft can lead to greasy cakes that do not rise as well as they should. In fact, this is one of the most common problems in cake making!
Here’s a quick way to bring butter to room temperature: Cut fridge-cold butter into 1.5cm cubes (1/2″ thick slices if you have a US stick of butter). Scatter on a plate. Microwave 2 cups of cold tap water for 4 minutes on high in large mugs or a jug. Remove the warmed water, quickly put the butter plate in its place and close the door. DO NOT turn the microwave back on. The residual heat in the microwave air will soften the butter in 5 minutes.
Large eggs at room temperature – The eggs need to be at room temperature and not fridge-cold, to ensure they incorporate into the batter easily.
A quick way to warm up fridge-cold eggs: Place eggs in a large bowl, cover with warm tap water (just warm, not hot) and leave for 5 min. Wipe dry and use per recipe.
Egg size (“large eggs”): 50 – 55g / 2 oz per egg is the industry standard of sizes sold as “large eggs” in Australia and the US. If your eggs are significantly larger or smaller in size, just crack the eggs into a jug, whisk and measure out 200g / 7 oz.
Flour – Just all purpose/plain flour for this recipe. Self-raising flour will work as a substitute but the cake will contain more baking powder than the recipe calls. This will cause the baked cake to dome a little in the middle.
Baking powder – To make the cake rise. If yours has been sitting in the dark corners of the pantry for a while, test it to make sure its still alive!
Milk – Full-fat is better though low fat is fine too.
Salt – Just a bit, to bring out the other flavours in this cake. It’s generally good baking practice to add a pinch of salt into sweet recipes.
Orange zest (optional) – Recommended but not the end of the world if you skip it. A pinch of orange zest magically enhances the honey flavour in this cake. You won’t be able to taste the zest in the cake unless you have a very refined palette. (I don’t. Hence why the flavours of my recipes are usually kapow! rather than subtle! 😂 )
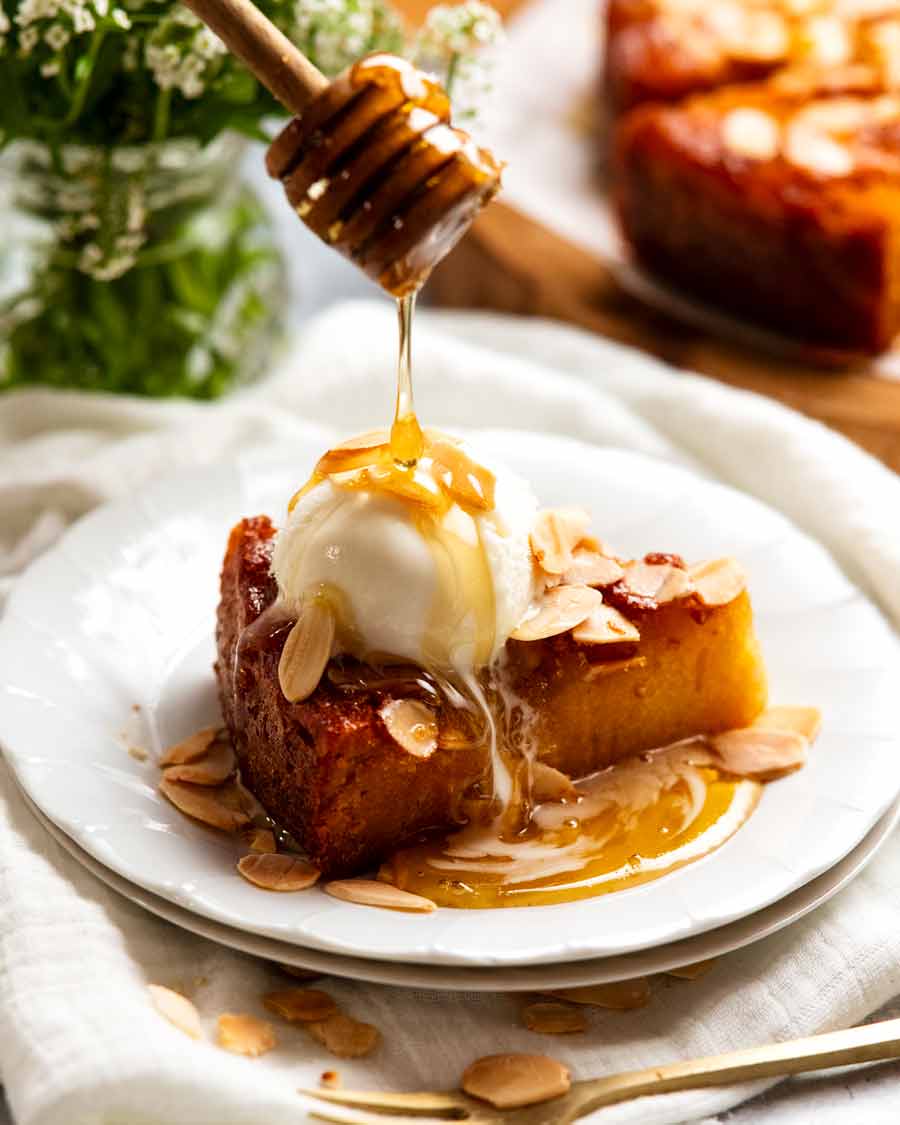
Flaked almonds – For decorative purposes, for flavour and for shielding the surface of the cake so it doesn’t get too dark when baked (neat huh!)
Next is the honey syrup we use to soak the cake.
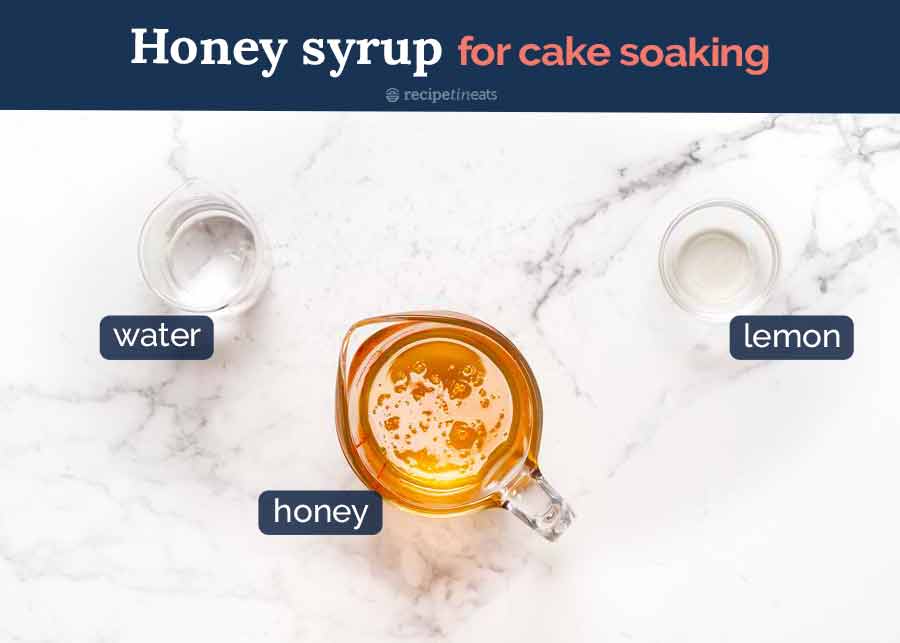
Honey – Yes, more honey! I told you, you definitely won’t miss the honey flavour in this cake! 😂
Water – To thin the honey a bit, so that we can safely simmer the honey for 5 minutes without it getting too thick.
Lemon juice – Just the finest touch, 3/4 tsp. It adds a very delicate but welcome hint of lemon freshness. It’s such a small amount you’re probably wondering what’s the point?? But you really can taste the little twang it brings! Having said that though, it’s not a deal killer if you skip it. Not like making this cake without, say, honey. 😂
How to make Honey Cake
The secret to this cake really lies in the balance of ingredients. The cake-making steps themselves are very bog-standard!
First up, making the cake.
1. The cake
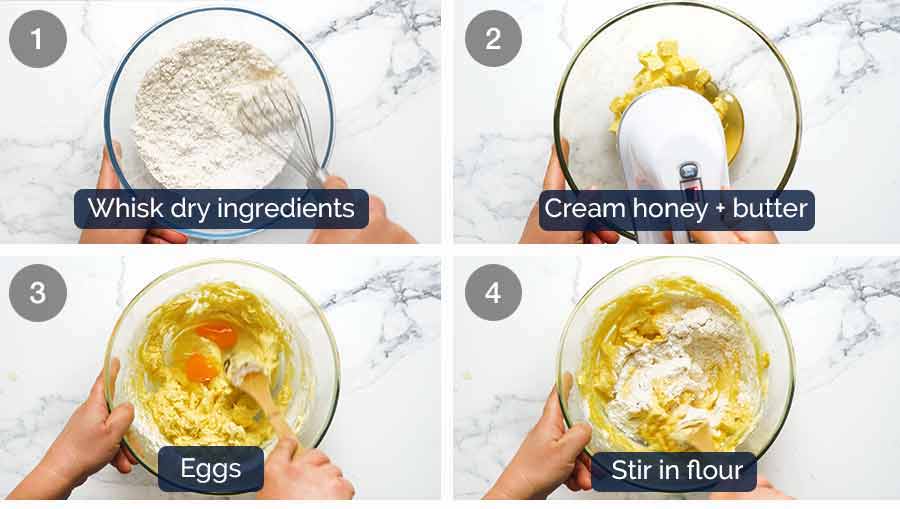
Whisk dry ingredients: Place the dry ingredients in a bowl and whisk together.
Cream butter and honey: A standard cake making step often deployed for butter and sugar. But here, we’re doing this step with honey instead! Beat it for a good 3 minutes on medium-high, a bit longer than you usually go for when baking with sugar as the honey is denser.
Add eggs one at a time, alternating with flour – Switch to a wooden spoon. We’re going to mix in the eggs one at a time, alternating with portions of flour. So, add one egg, then mix until incorporated. The mixture will curdle at first, but keep stirring and it will come together after around 30 seconds.
Add flour in four lots – After the first egg is mixed in, add 1/4 of the flour and mix just until you can no longer see flour. Add another egg, mix until incorporated. Then 1/3 of the remaining flour. And so on, with the 2 remaining eggs.
Why switch to a wooden spoon after creaming the butter? Because a beater will aerate the eggs too much, causing the cake to dome rather than finishing with a nice flat surface. This shape will cause the honey syrup to run down the sides instead than soaking into the cake – and we can’t have that 😱!
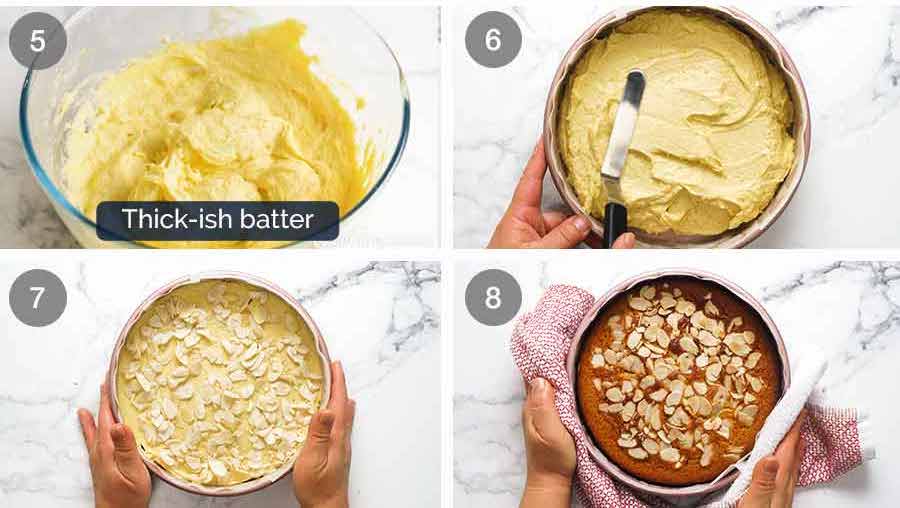
Finish batter – Lastly, stir in the milk and orange zest. The finished batter is quite thick and will look a bit like whipped cream rather than completely smooth, as per the photo.
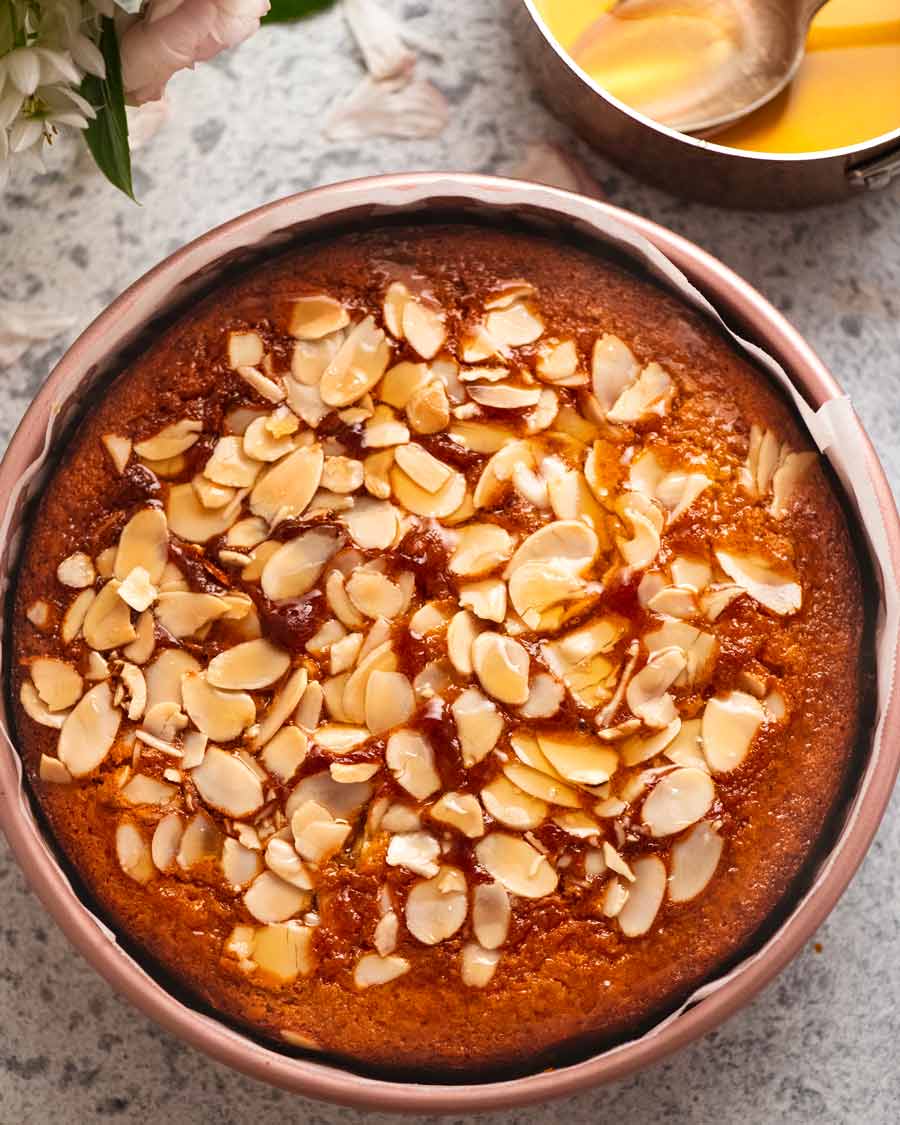
Scrape into pan – Scrape the batter into a baking paper-lined pan and smooth the surface. Even if you have a non-stick pan its best to line it with baking paper to ensure the cake doesn’t stick.
Sprinkle the batter surface with the flaked almonds.
Bake for 45 minutes or until a skewer inserted into the centre comes out clean. Then take the cake out of the oven but leave it in the pan, and cool for 15 minutes. This is an important step, to let the cake settle before soaking in syrup. If you skip it, the cake ends up too dense (impatience is a virtue rarely rewarded in baking, as I often discover to my detriment!).
Next, we’re going to SOAK it in honey syrup! Make the syrup while the cake is resting.
2. Soaking in Honey Syrup
My favourite step is here. Nope, not the soaking part. I mean the cake-poking part! So satisfying … 😂
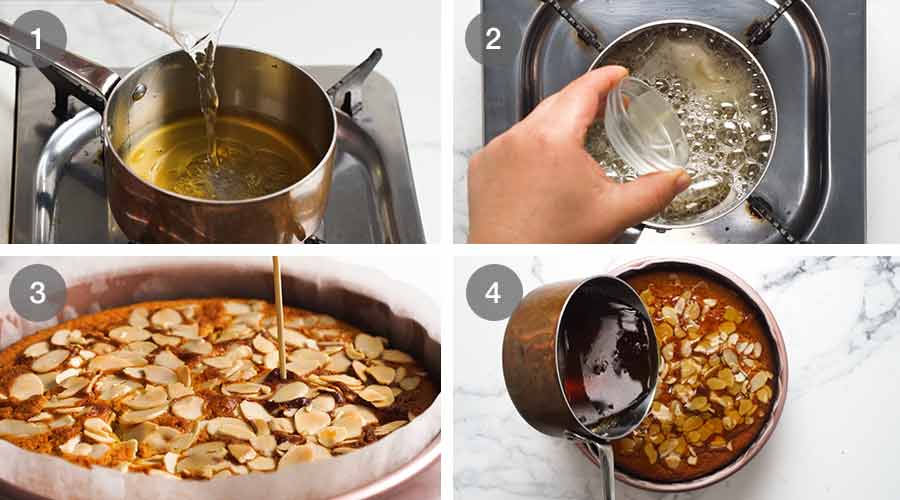
Make the Honey Syrup while the cake is cooling for 15 minutes.
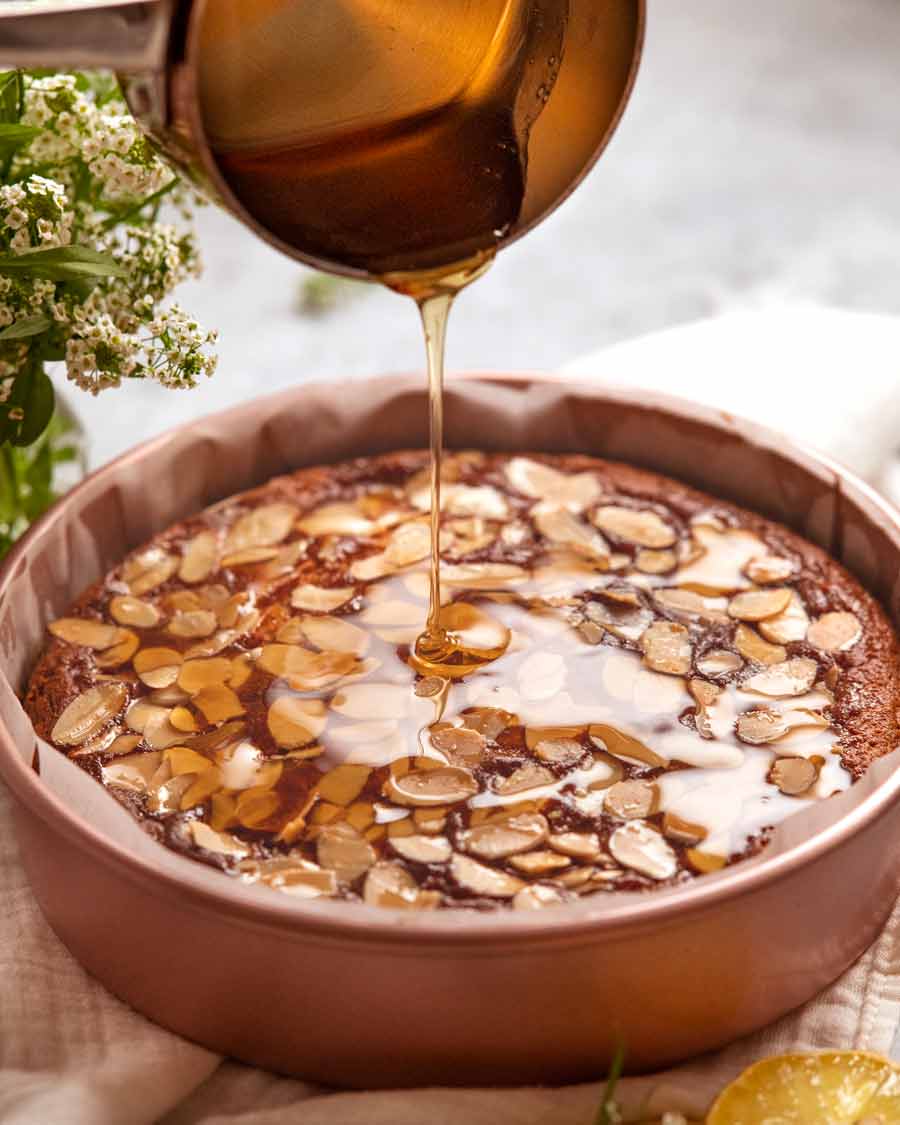
Simmer the honey and water for 5 minutes to reduce. This concentrates the honey flavour, while heating the honey thins it so it gets absorbed more readily by the cake.
Add lemon juice and simmer for a further 2 minutes. Then cool the syrup for 5 to 10 minutes.
Poke holes in the cake, after it’s rested for 15 minutes. Bamboo or metal skewers work well. Poke with gusto, all the way down to the base – around 30 or more holes. Poke between the almonds so you don’t disturb them. (See … it’s a game … hence the appeal! 😂)
Honey syrup – Pour over the honey syrup in 4 goes, waiting between each pour for the syrup to soak in before doing the next. Use a spoon if needed to spread the syrup evenly across the surface. Then leave to soak for a good 15 minutes.
TIP: If your cake has a slight dome on it, lightly press the dome down with a spatula after baking to flatten the surface, else the syrup tends to just run off the cake and down the sides. Not the end of the world as it then gets absorbed by the base and sides of the cake. But it is nicer when the syrup has soaked the middle of the cake too.
And we’re done! See the section below for serving suggestions …
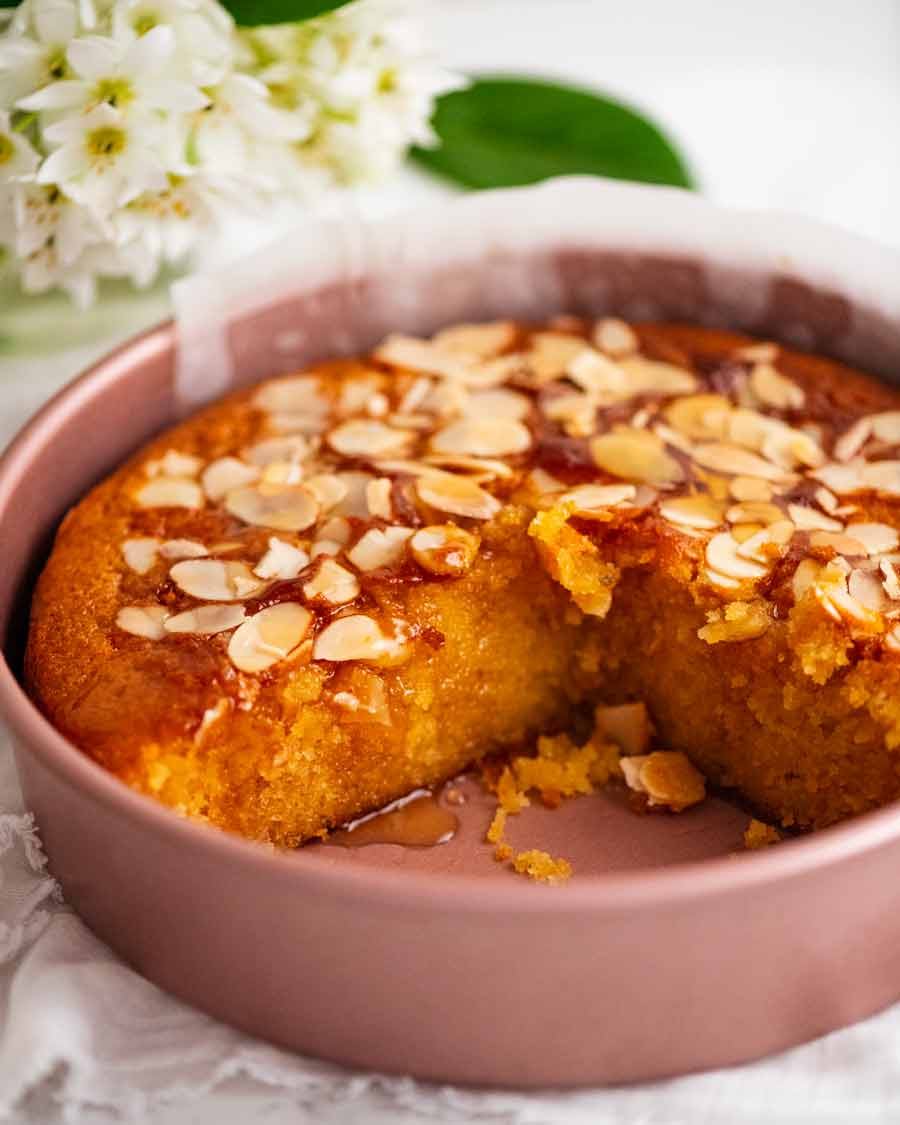
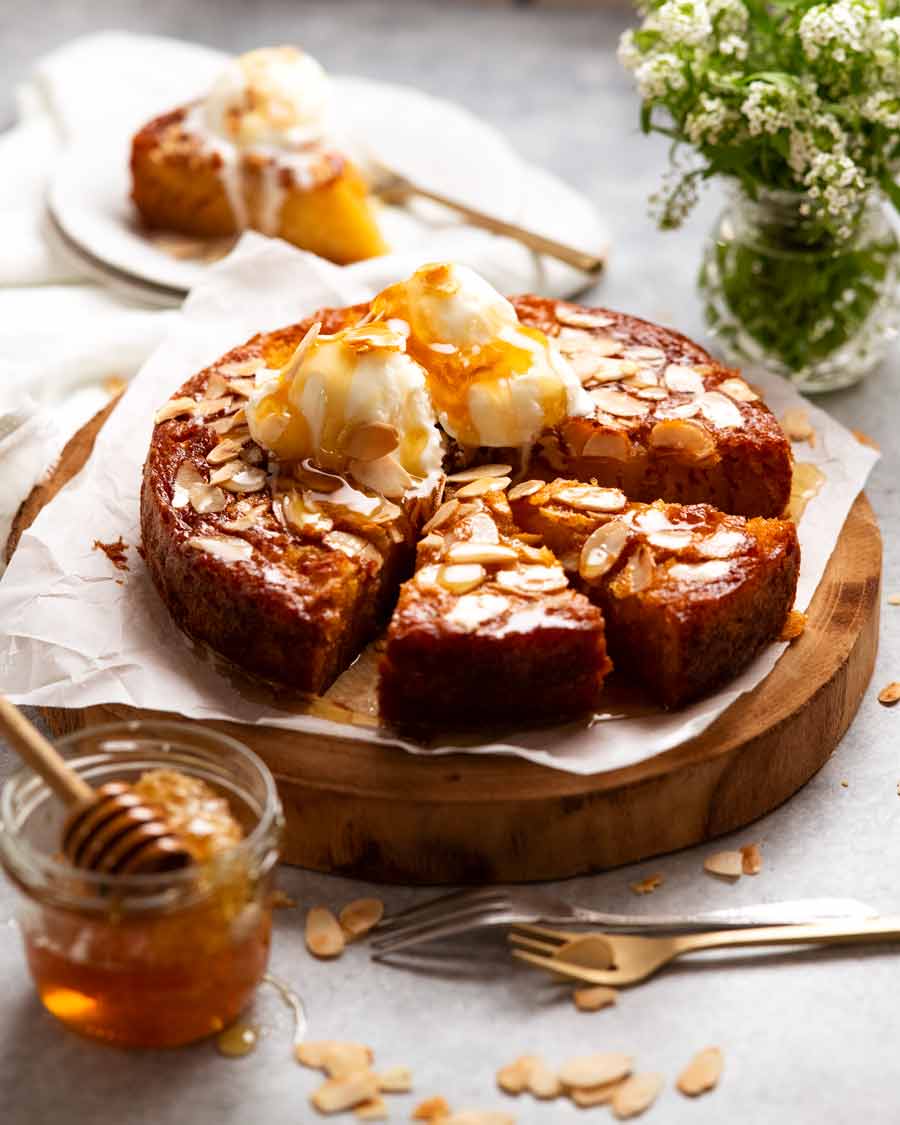
Serving and storing Honey Cake
This Honey Cake is best served warm because the cooler it gets, the denser it becomes. So serve it freshly made or else leftovers also reheat perfectly, making it ideal for making ahead too. To reheat, just 30 seconds in the microwave for a slice will do, or covered in the oven for around 15 minutes.
With its honey syrup-soaked crumb and crunchy toasted almond topping, I like serving this cake plain because there’s plenty of taste and texture going on here already. However, if you want to jazz it up, I would never discourage that! Try a big dollop of cream or vanilla ice cream (or BOTH!) with a an additional sprinkle of lightly toasted almonds (flakes or slivered), and a drizzle of extra warm honey. SO GOOD!
I think I just talked myself out of serving it plain – Bring on the toppings, on second thought!!! 😂 – Nagi x
Watch how to make it
Video typos I need to fix! Oven baking time is 45 minutes, not 50 minutes. And 15 minutes is enough for the honey syrup soaking step though you can leave it for the 30 minutes indicated in the video.
Honey Cake
Ingredients
Honey cake
- 1 cup plain flour (Note 1)
- 1 1/2 tsp baking powder
- 1/2 tsp cooking salt (kosher salt)
- 225g (1 cup) unsalted butter , at room temperature (Note 2)
- 2/3 cup honey
- 4 large eggs , at room temperature (Note 3)
- 3 tbsp milk , preferably full-fat, slightly warmed
- 1 pinch orange zest , optional (brings out honey flavour)
- 1/3 cup almond flakes
Honey syrup
- 2/3 cup honey
- 1/4 cup water
- 3/4 tsp lemon juice (recommended but optional)
Topping options for serving
- Vanilla ice cream, cream, lightly toasted almond flakes or slivered almonds
Instructions
Honey Cake:
- Preheat the oven to 180°C/350°F (160°C fan).
- Prepare cake pan: Butter and line a 20cm/8" round pan or springform pan with baking paper (base and sides).
- Whisk Dry ingredients: Whisk together the flour, baking powder and salt in a small bowl.
- Cream butter and honey: In a separate bowl, cream the butter and honey for 3 minutes, scraping down the sides halfway, until smooth and fluffy. (Speed 7 handheld beater or stand mixer fitted with whisk attachment).
- Add eggs and flour – Add one egg, mix with a wooden spoon for 30 seconds until mostly incorporated into the batter (mixture will looked curdled). Then add in 1/4 of the flour and mix until the batter comes together. Repeat again – mixing in 1 egg, then a portion of flour – until you've used all the eggs.
- Milk and zest: Stir in the milk and orange zest, stir until the batter is almost completely smooth. The batter should be quite thick, but soft.
- Bake 45 min: Scrape batter into the prepared pan, smooth the surface and sprinkle with almonds. Bake for 45 minutes or until a knife inserted into the centre comes out clean.
- Cool 30 min: Remove cake from the oven. Cool for 30 minutes in the pan – don’t skip this else the cake gets too dense when soaked with syrup.
- Honey Syrup: Meanwhile, make the syrup. Bring the honey and water to a gentle boil for 5 minutes over medium-low heat. Add the lemon juice and boil for 2 more minutes. Remove from heat, cool for 10 minutes then use per below.
- Poke and soak: Poke about 30 holes all across the surface using a skewer (between the almond flakes). Pour 1/4 of the warm Honey Syrup across the surface (if using a springform pan, put it on a plate in case it leaks). Once it mostly sinks in, repeat 3 more times, waiting between pours for the syrup to soak in. Then leave the cake to soak for 15 minutes.
- Serve: Serve warm. Remove the springform pan sides, or serve it straight out of the cake pan (Note 4 for removing from cake pan). I typically serve it plain. However Topping Options suggested above would never be turned away!
Notes
Serve this for dessert after….

Nutrition
Life of Dozer
When Dozer went to the Grounds of Alexandria. He can’t read.🤷🏻♀️


The post Honey Cake appeared first on RecipeTin Eats.
]]> Thai Black Sticky Rice Pudding is a traditional Thai dessert that is favoured by upscale modern Asian restaurants for its striking jet black colour. It’s hard to believe you can make something so delicious that is fundamentally, made with just rice, water and sugar! Welcome back to THAI WEEK! Welcome back to the final instalment... Get the Recipe
The post Thai Black Sticky Rice Pudding appeared first on RecipeTin Eats.
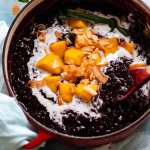
]]>Thai Black Sticky Rice Pudding is a traditional Thai dessert that is favoured by upscale modern Asian restaurants for its striking jet black colour. It’s hard to believe you can make something so delicious that is fundamentally, made with just rice, water and sugar!
Welcome back to THAI WEEK!
Welcome back to the final instalment of THAI WEEK, a week where I’m sharing 3 recipes to make your very own Thai feast at home!
Every now and then, I like to do a recipe theme week. This week it’s THAI week, with three classic recipes to make your very own Thai feast at home:
Thai Yellow Curry – Made from scratch, this is flavour you literally cannot buy in a jar!
Green Papaya Salad – Great as side, yet substantial enough as a starter.
Black Sticky Rice Pudding (this recipe) – Dessert!

Thai Black Sticky Rice Pudding
Black sticky rice is a type of glutinous whole grain rice used to make desserts in Thailand and a number of other South-East Asian nations. It has an eye-popping, natural ink-black colour, and when cooked has a nutty flavour with a creamy and sticky pudding-like texture.
Hence the name of this dish – Black Sticky Rice Pudding!
While white sticky rice pudding may be the more well-known Thai dessert, here in Australia upmarket Thai and Modern Asian restaurants tend to favour black sticky rice, for its exotic and eye-catching appearance. It’s not all looks though – it also has a better flavour!
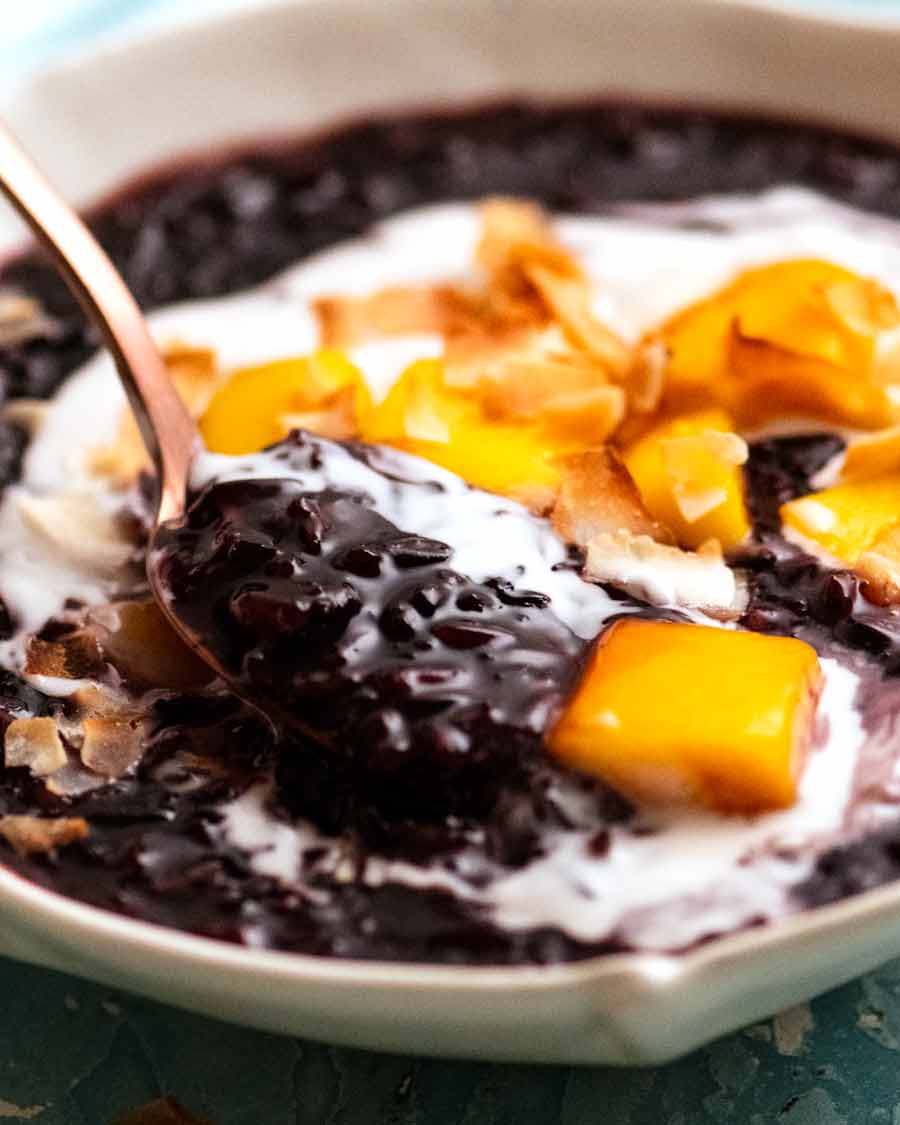
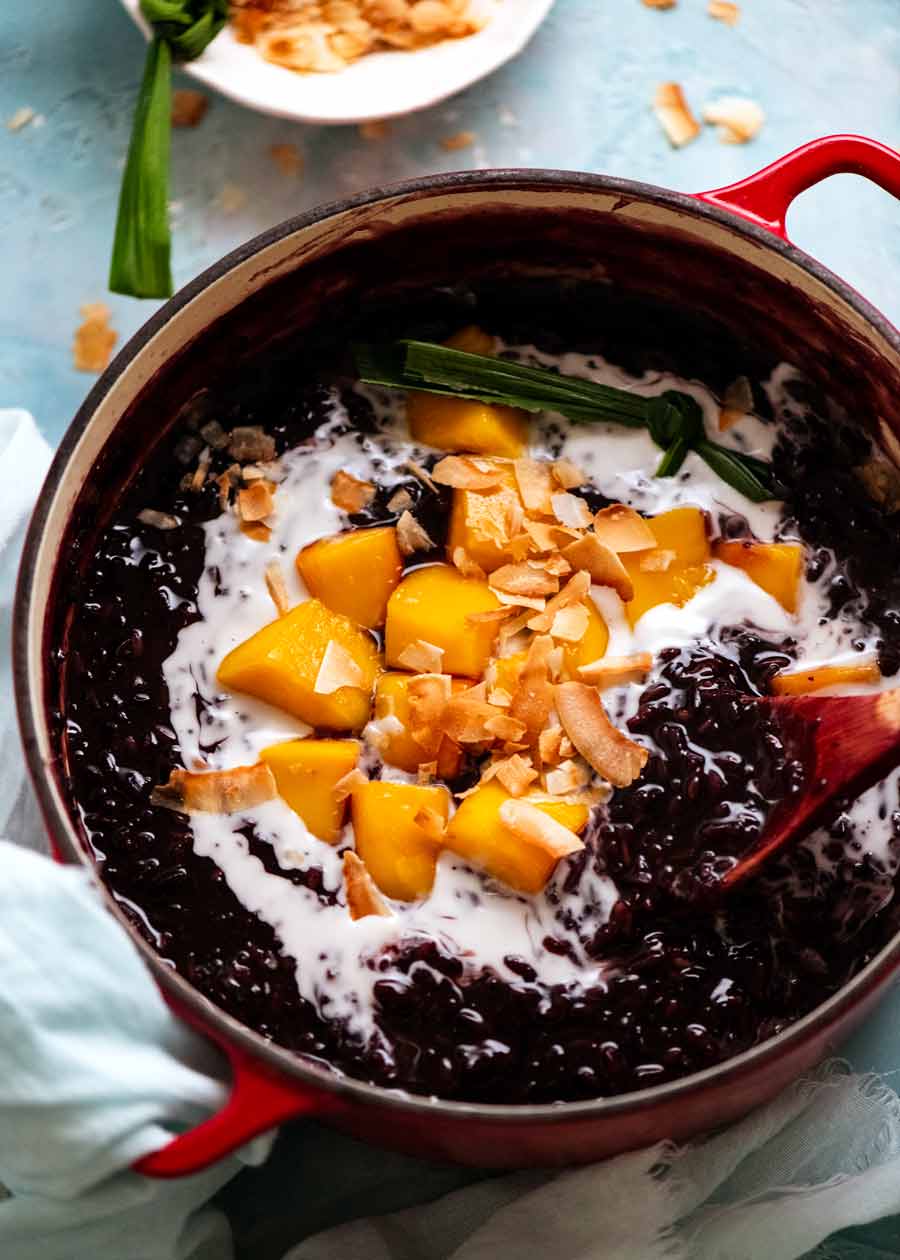
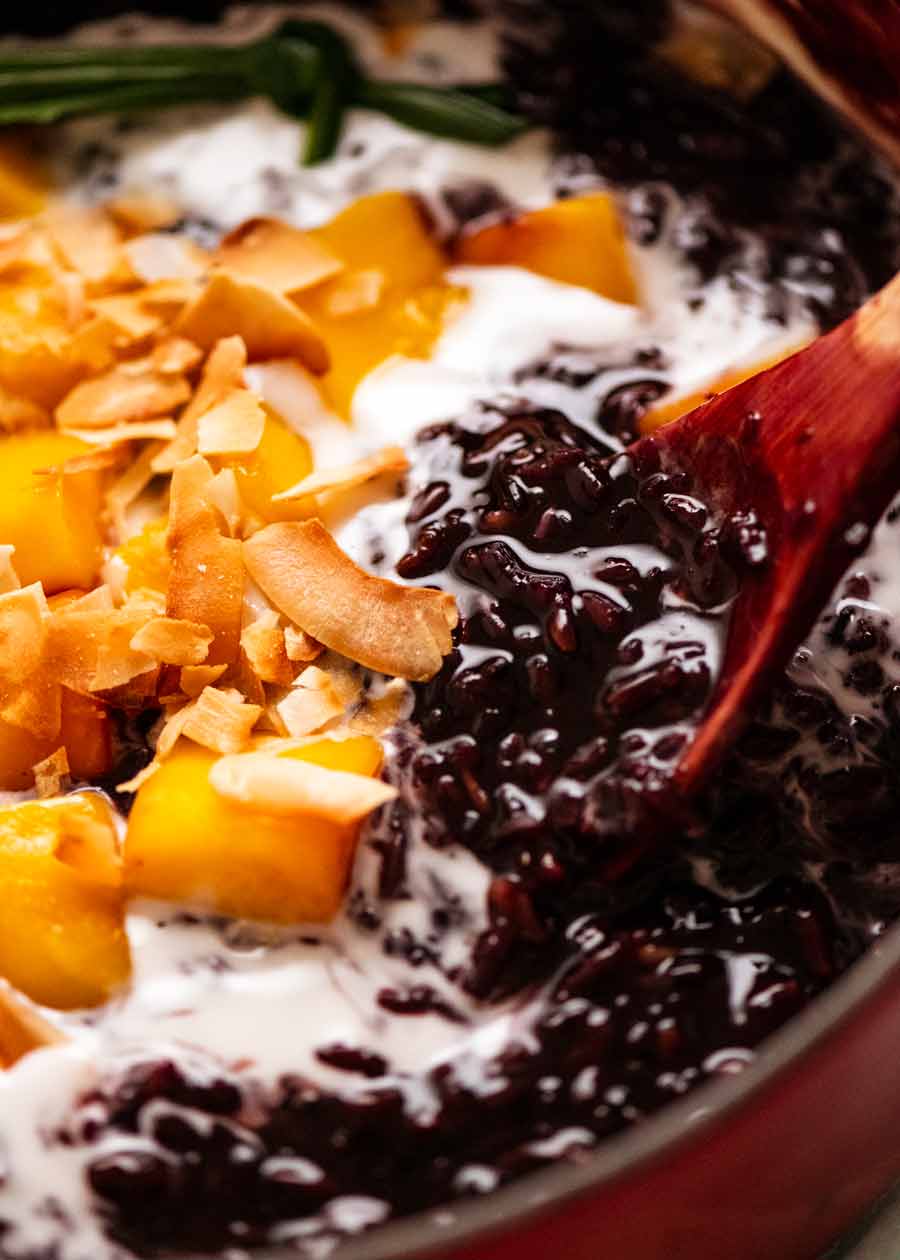
Just like Western puddings, fresh fruit and a creamy sauce are the perfect accessories to complete the dessert. Sticky rice puddings are frequently finished with good drizzle of coconut cream, and sliced tropical fruit of some kind – usually juicy mango.
Rich but not cloying, and shining with the flavours of South-East Asia, this is the quintessential Thai dessert!
(PS. Despite the name, glutinous rice is actually gluten-free. It is rice starch that is responsible for the stickiness. In fact, this dessert is also vegan, nut-free and lactose-free. This might just be the one dish everyone on the planet can happily enjoy!!! 😱🤣)
What you need to make Black Sticky Rice Pudding
At its simplest, you only need sticky rice, sugar, salt and water to make a really delicious sticky rice pudding. Everything else just makes it even better, but is still entirely optional!
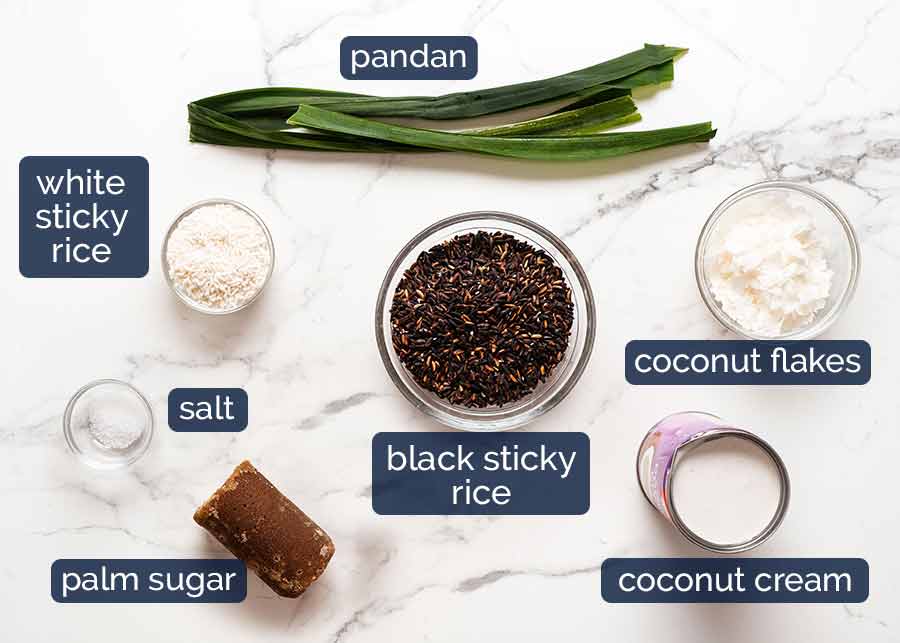
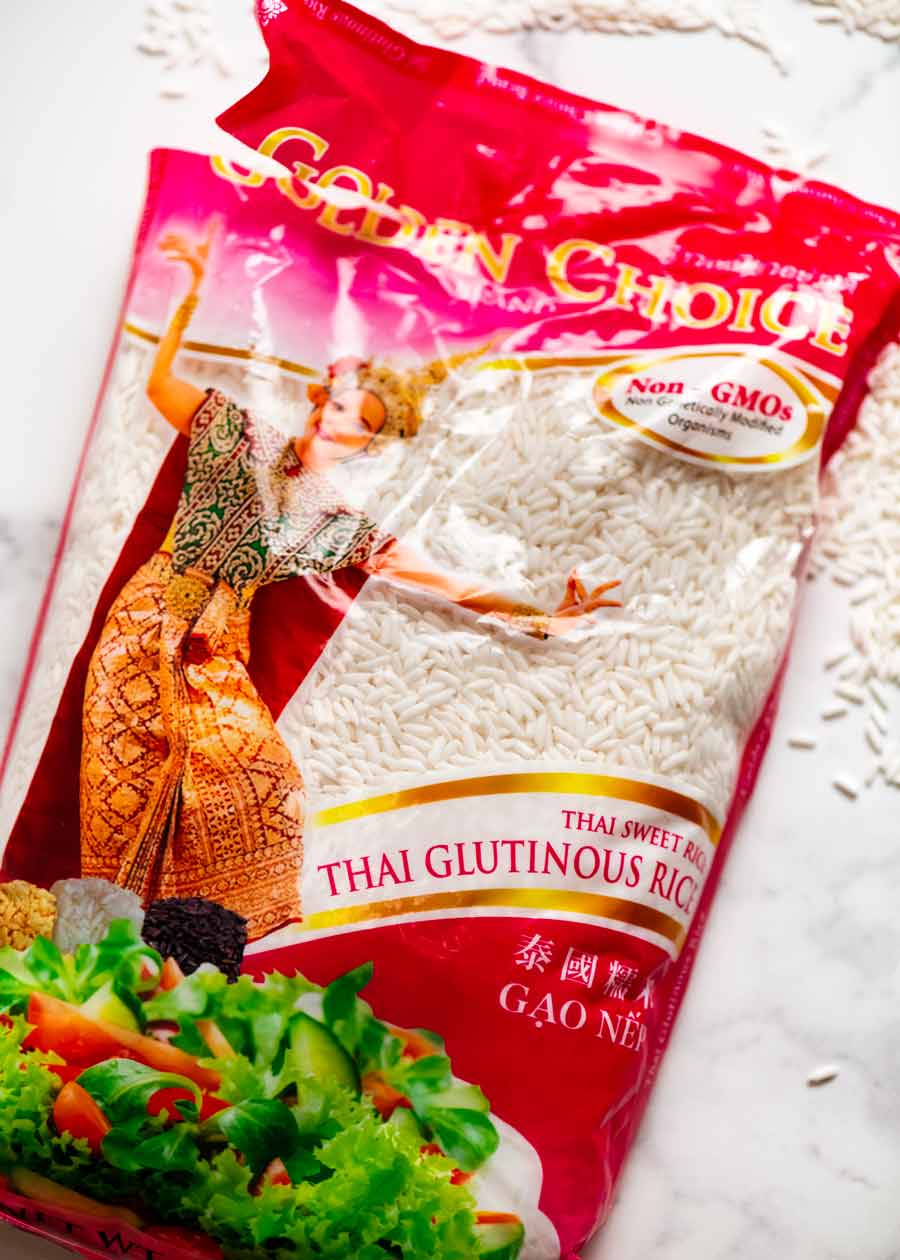
Sticky rice – Usually labelled “glutinous rice”, this rice becomes sticky when cooked which is what gives a creamy texture to this pudding. Black sticky rice has a wonderful nutty flavour already so we only need water to cook it. See below for more on sticky rice.
Find it in Asian and Thai grocery stores, or online such as here and here (Australia).
Pandan leaves – Known in English as screwpine, this is a plant native to South-East Asia that looks similar to a palm tree. The long leaves are added to cooking for their coconut-like scent and flavour for both savoury and sweet applications – especially cakes and desserts. Pandan can be used in powder form, for wrapping things (usually steamed or fried), or just added whole into cooking liquids to infuse like we do in this rice pudding.
It’s sold fresh and frozen in Asian stores and sometimes (🤞🏻) at Harris Farms in Sydney & Queensland.
Can’t find it? Leave it out. This dish is still worth making without it!
Palm sugar – Extracted from palm trees (wait, did the name give it away?😂), this sugar is used in South East Asian cooking for its intense caramel sweetness. Substitute with brown sugar, preferably dark brown sugar for better flavour.
Salt – A distinct flavour in black rice pudding is a noticeable amount of salt. It’s not a dominant taste, like Salted Caramel. But you can definitely taste it and it’s much needed to balance the sweetness.
Optional toppings
Coconut cream – This is used to drizzle on top of the finished dish for serving. It not only adds a lovely touch of rich coconut flavour but also adds a pretty visual flourish to an otherwise very black bowl of rice! Highly recommended but not essential.
Coconut flakes – Lightly toasted for a garnish. This is optional!
Fresh fruit (not pictured above) – Asian tropical fruits are the most authentic choice. I used mango – a classic – but because it’s not mango season, I just used canned mangoes which these days, are actually very, very good! Other fruits that would go brilliantly are papaya, lychees, longan, durian (!!!), mangosteen, dragonfruit etc. If these are hard to source, summer stone fruit, melons or even sweet citrus fruits would also be absolutely lovely.
These toppings are purely optional. Black rice pudding is absolutely worth making with no toppings at all!
Sticky Rice for Thai Black Sticky Rice Pudding
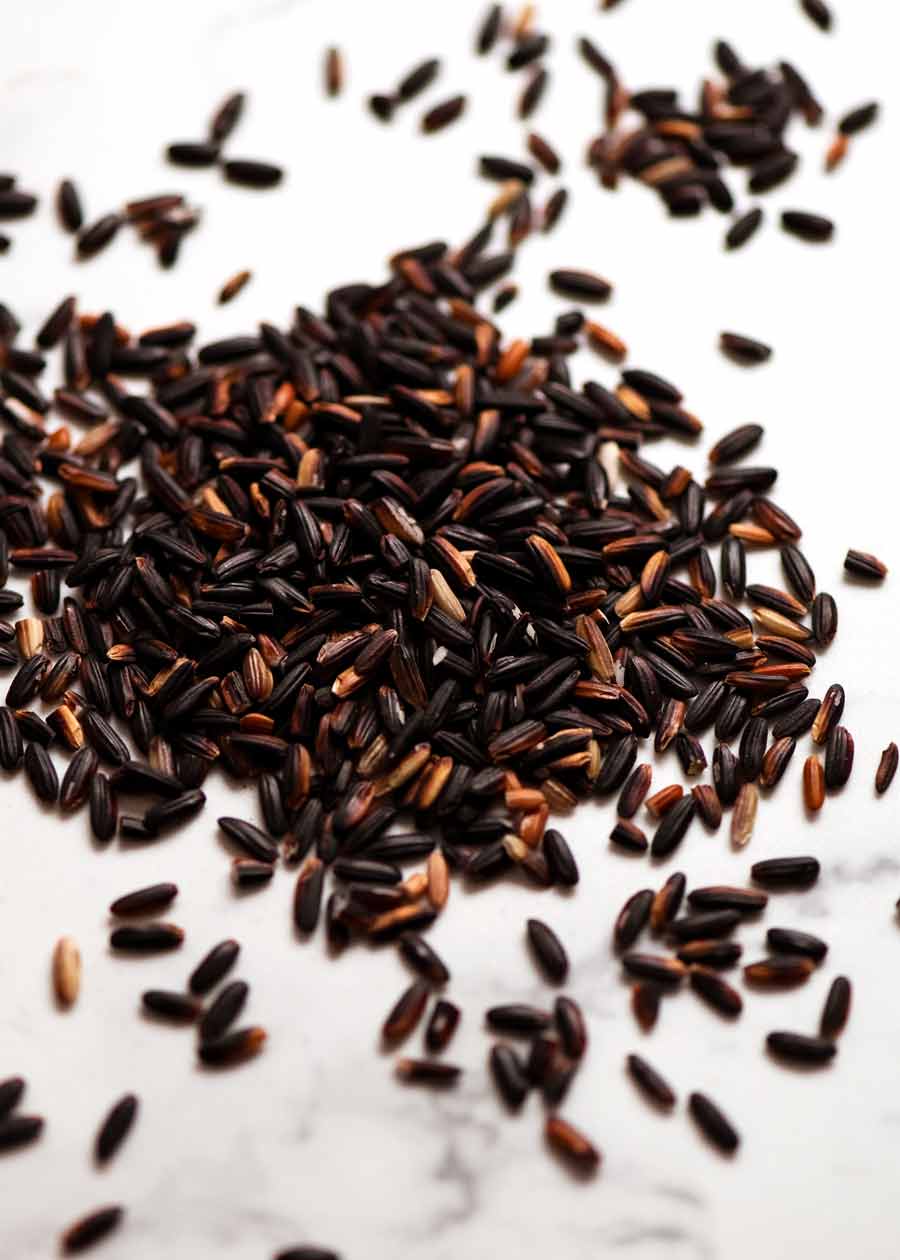
Black sticky rice 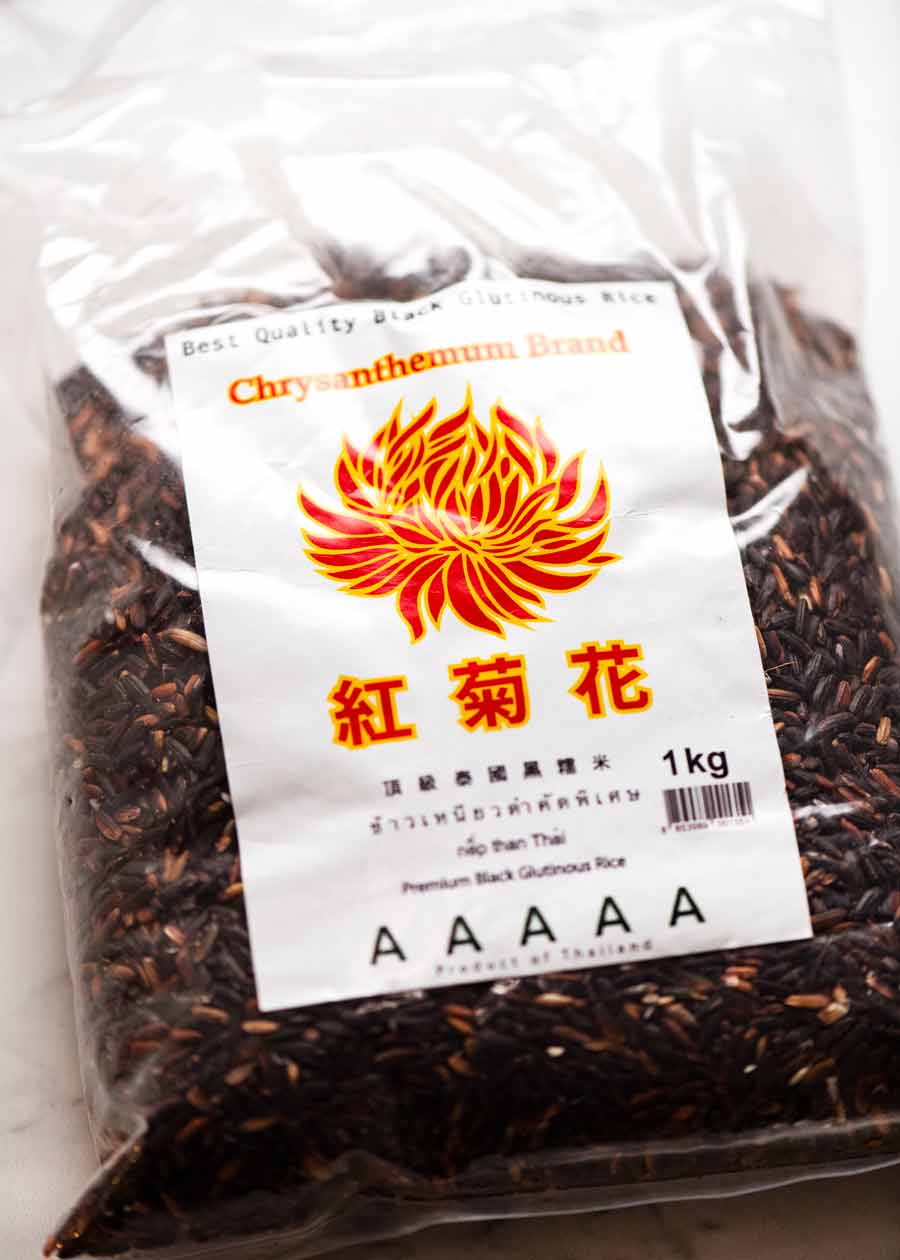
Labelled “black sticky rice” or “glutinous rice” 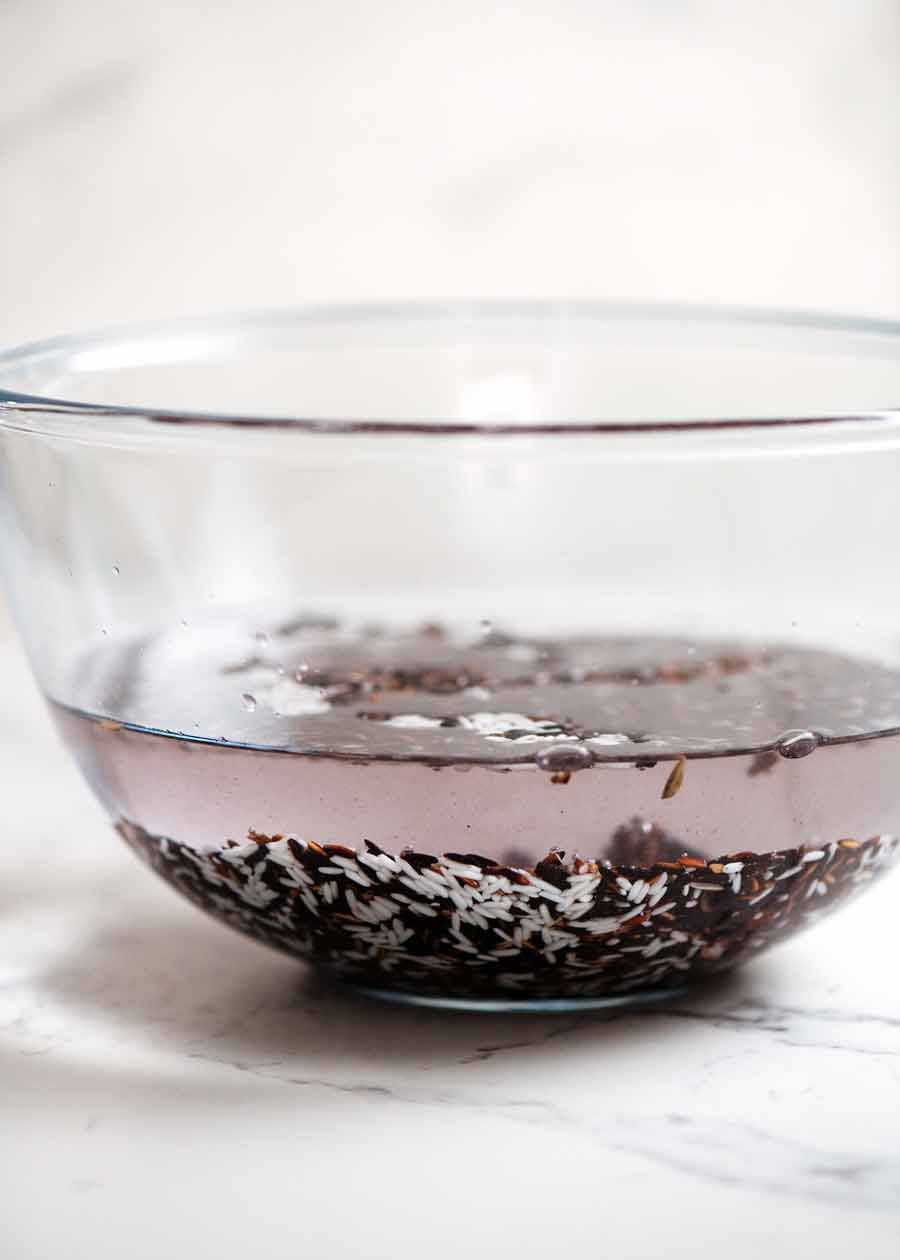
Soaking black and white sticky rice before cooking
There are different varieties of black rice, some of which are glutinous (sticky) and some which are not (such as Chinese Forbidden Rice).
The black rice used to make Thai Sticky Rice Pudding is black glutinous rice. Glutinous rice becomes sticky when cooked, which is the consistency you need to make this glossy, creamy pudding. You won’t get the same result with normal non-glutinous rice, regardless of colour.
Here in Australia, the most common black glutinous rice is from Thailand, though I understand it’s also grown in the Philippines, Indonesian and other Asian countries.
Find it in Asian and Thai grocery stores, or online such as here and here (Australia). It’s usually sold labelled as “glutinous rice”.
White Sticky Rice (optional)
Funny as it sounds, in addition to black sticky rice the recipe also calls for a small amount of white sticky rice. Most Thai black sticky rice recipes call for a combination of both black and white sticky rice because white rice is stickier than black rice, which gives the rice pudding a thicker and creamier texture, while the black rice has more flavour.
However, I consider the white rice to be optional. This pudding still has a really lovely creamy texture even without white rice. It’s just slightly better with white rice!

How to make Thai Black Sticky Rice Pudding
It’s soooo easy! Soak → Simmer → Eat (psst! This parts the best!😂)
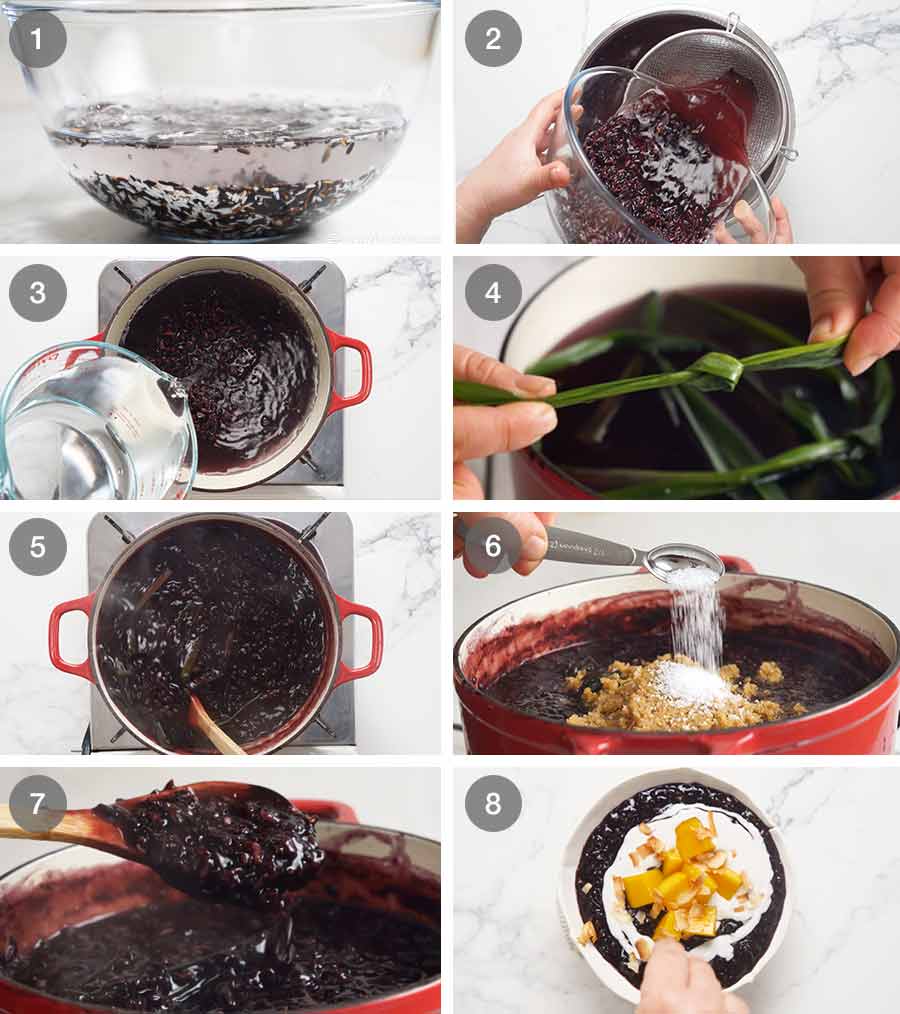
Soak the rice for at least 4 hours, or overnight. This ensures that the rice cooks through evenly. If you skip this step, you’ll find that the outside of the rice grains becomes overly soft before the inside cooks through.
Drain the rice and shake off excess water.
Combine with water – Place rice in a small pot with water.
Pandan leaves – Fold the pandan leaves so they will easily fit inside the pot. Then tie into a knot. This breaks the fibres and releases more flavour into the rice.
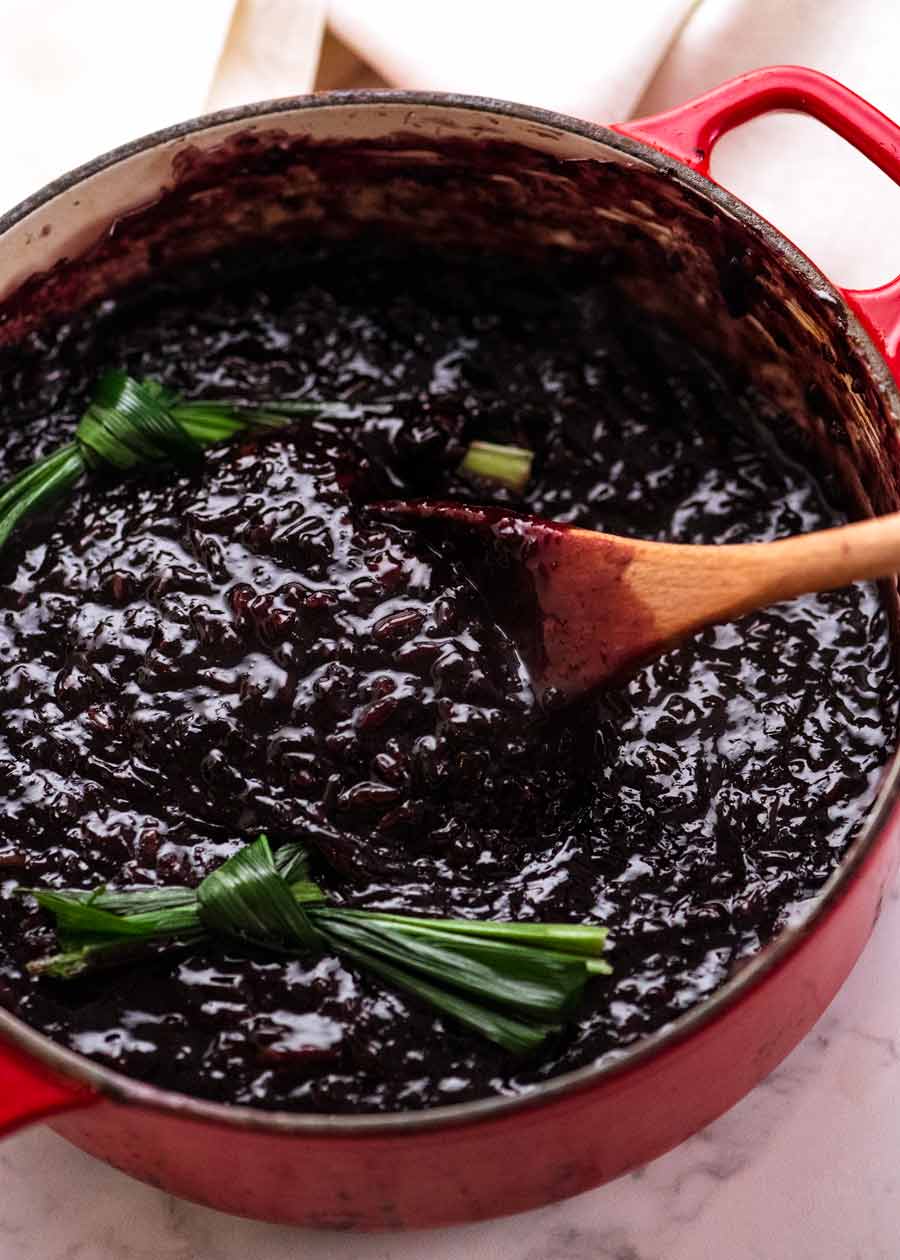
Simmer for 30 minutes on low heat, stirring almost constantly for the last 15 minutes as it thickens to ensure the base doesn’t catch. The liquid will reduce and thicken due to the starch in the rice.
Sugar – Add palm sugar and salt, then stir to dissolve. It will only take around 30 seconds or so.
Thickness – The black rice pudding should be thick, creamy and glossy as pictured above. Not stodgy and gluey! When spooned into serving bowls it should ooze gently, like good risotto.
Serve – Ladle into bowls, then top with a drizzle of coconut cream (highly recommended), toasted coconut flakes (recommended) and diced mango (a lovely extra, but entirely optional), if using.
This is what the consistency should be like – thick and creamy, not stodgy!

In case you are wondering about my hierarchy of topping priorities (highly recommended down to entirely optional), it’s because this rice pudding is so tasty even unadorned that I guarantee you will be tempted to eat it plain, straight out of the pot.
It’s hard to believe that of a rice pudding just made with rice, water and sugar, isn’t it?? But it’s true!
What to serve with Thai Black Sticky Rice
This is dessert! Finally, a Thai dessert to share, after years of sharing Thai starters and main dishes. 🙌🏻
In addition to the Thai Yellow Curry and Green Papaya Salad I shared earlier this week as part of Thai Week, here are some other Thai restaurant favourites to get you inspired:


And with that, Thai week is done! I hope you enjoyed it as much as I did creating, photographing, filming and … oh, who am I kidding? We all know EATING the food tops the list!
Got a request for the next theme week?? Pop it in the comments below! – Nagi
Watch how to make it
Thai Black Sticky Rice Pudding
Ingredients
- 1 cup black glutinous rice (aka black sticky rice) (Note 1)
- 4 tbsp white glutinous rice (white sticky rice) (Note 1)
- 4 cups water
- 2 pandan leaves , folded and knotted (Note 2)
- 1 cup (loosely packed) palm sugar (or brown sugar), grated with box grater (Note 3)
- 1/2 tsp salt
Toppings:
- 1/2 cup coconut cream (very highly recommended)
- 1/8 tsp salt
- 1/2 cup shaved coconut , toasted, optional (Note 4)
- Mango cubes or crushed peanuts , for topping, optional
Instructions
- Soak rice: Place both rices in a bowl and cover with water (5cm / 2" above). Soak for 4 hours (up to 12 hours).
- Strain the rice and add it to a small pot or large saucepan.
- Pandan leaves: Add the knotted pandan leaves.
- Simmer 30 minutes: Add 4 cups of cold water. Bring to boil. Turn stove down to low so it's simmering very gently (small, slow little bubbles). Simmer 30 minutes (no lid), stirring frequently for the last 15 minutes and almost constantly towards the end (so the base does not catch).
- Consistency: Rice should be soft / fully cooked through, water reduced, and sauce should be creamy not watery (starch from rice thickens water).
- Add sugar: Stir in sugar and salt until it dissolves (~20 seconds).
- Ladle into bowls – it should ooze slowly, not be runny nor so thick it stays in a mound, see video for consistency. (If it's too thick, add a touch of water and stir).
- Toppings: Mix coconut cream with salt. Drizzle onto rice pudding. Top with toasted coconut and mango if using. Serve immediately.
Notes
Life of Dozer
The moment when Dozer discovered the fridge was full of French cheese… (for care packages for my team going out shortly!)

And the moment I realised it:

Not sure who was happier…
The post Thai Black Sticky Rice Pudding appeared first on RecipeTin Eats.
]]>