 Here’s a copycat recipe for Australia’s (current) favourite confectionary – Golden Gaytime Popcorn! Caramel popcorn drizzled with chocolate and sprinkled with biscuits crumbs, it’s ridiculously addictive but rather expensive. Save a fortune by making it yourself! Golden Gaytime Popcorn Popcorn and candy lovers alike were in a tizzy of excitement with Golden Gaytime Popcorn was... Get the Recipe
The post Golden Gaytime popcorn (copycat) appeared first on RecipeTin Eats.
]]>Here’s a copycat recipe for Australia’s (current) favourite confectionary – Golden Gaytime Popcorn! Caramel popcorn drizzled with chocolate and sprinkled with biscuits crumbs, it’s ridiculously addictive but rather expensive. Save a fortune by making it yourself!
Golden Gaytime Popcorn
Popcorn and candy lovers alike were in a tizzy of excitement with Golden Gaytime Popcorn was first released. Yours truly included. The chatter between closet popcorn-loving friends, however, quickly moved from “Far out, this is crazy good!” to “OMG can you believe it’s so expensive”??
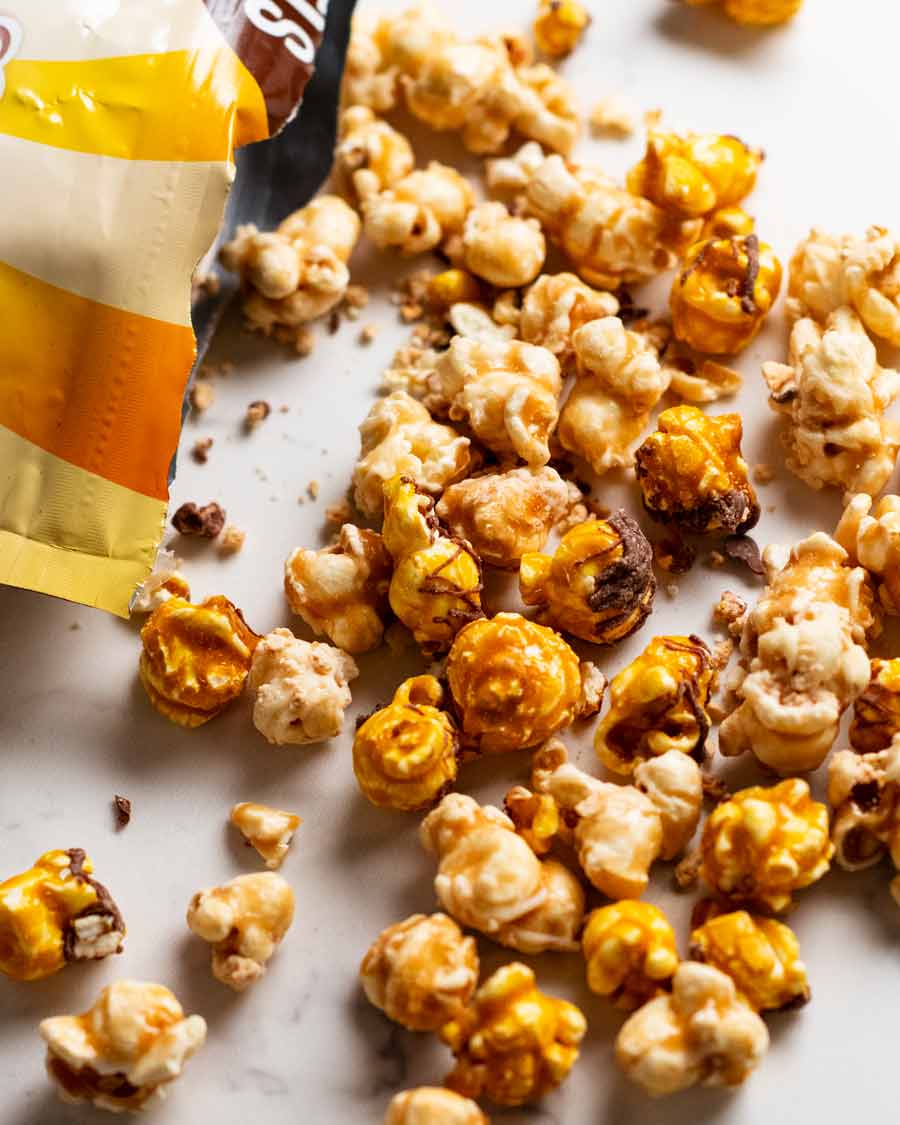
Named as such because it’s a popcorn version of a beloved Australian’s ice cream called Golden Gaytime, one packet of the Gaytime popcorn is $5.75 for 100g (3.5 oz). A small bag with just 2 cups of Gaytime popcorn. I can’t afford to feed my addiction!!
Which, of course, lead to what was affectionately dubbed The Gaytime Popcorn Project – a homemade version I was confident I could create for 80% cheaper. How’d I do? My report card is at the bottom of the post!
Store-bought Golden Gaytime popcorn

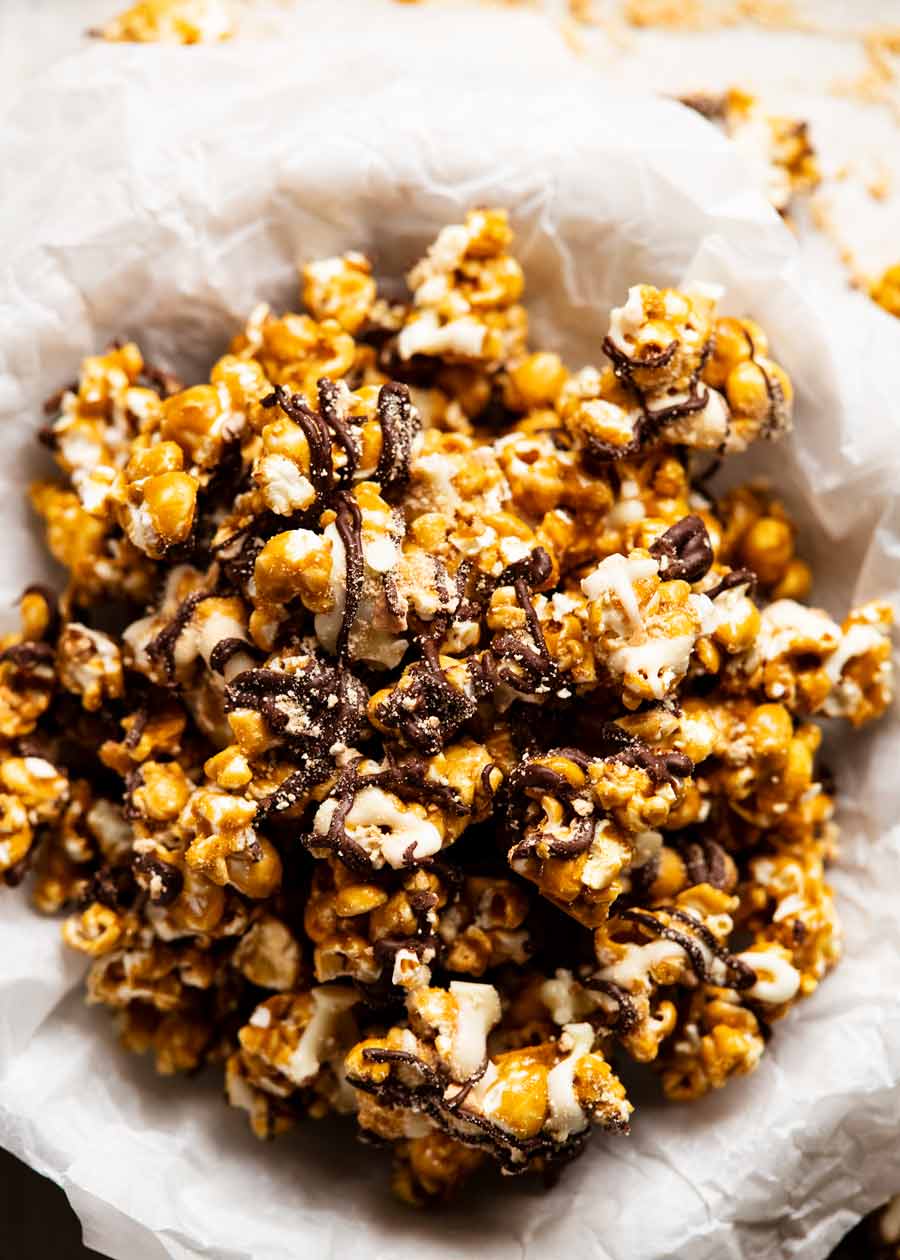
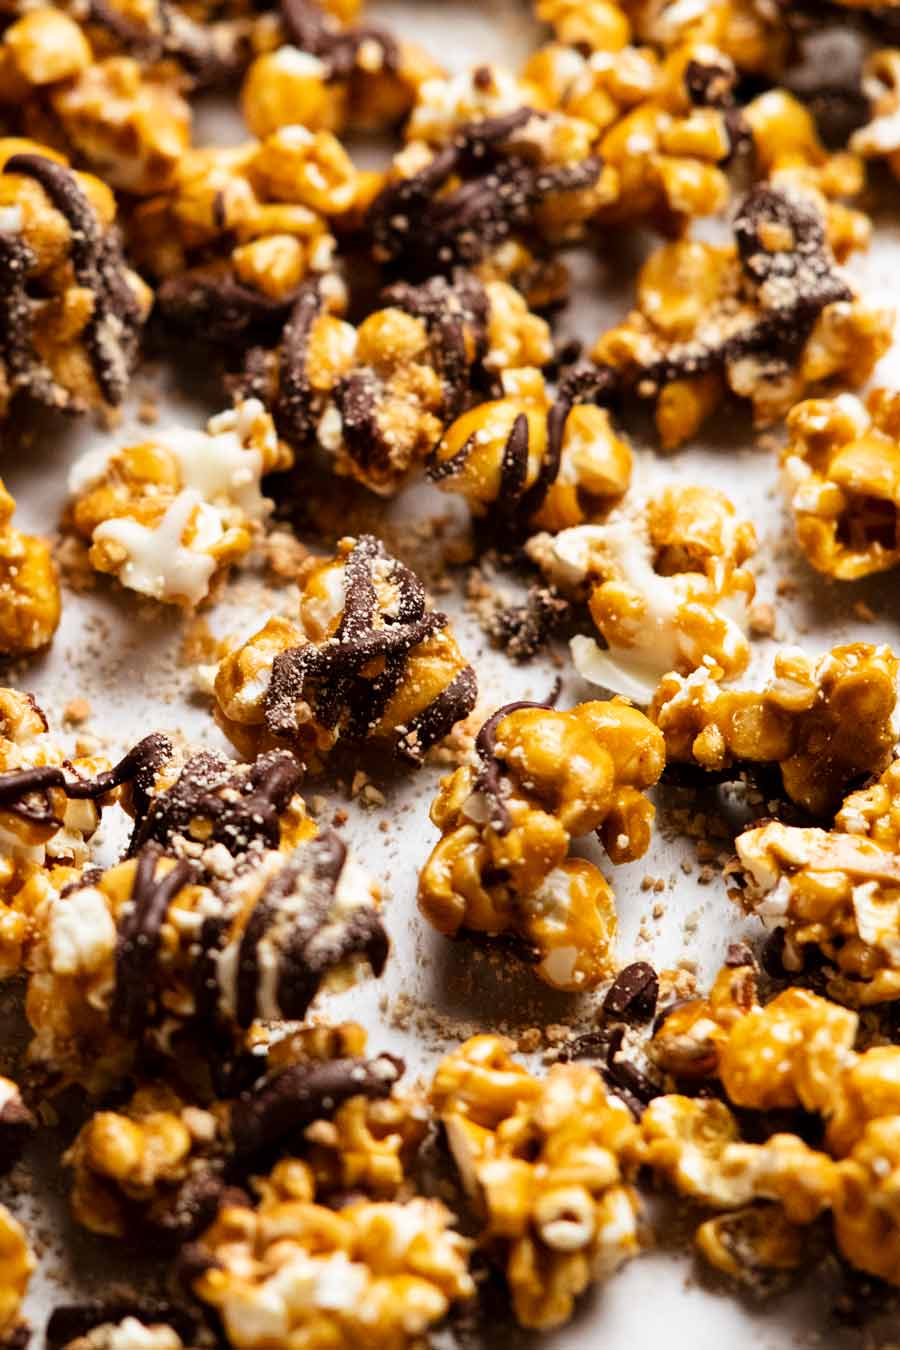
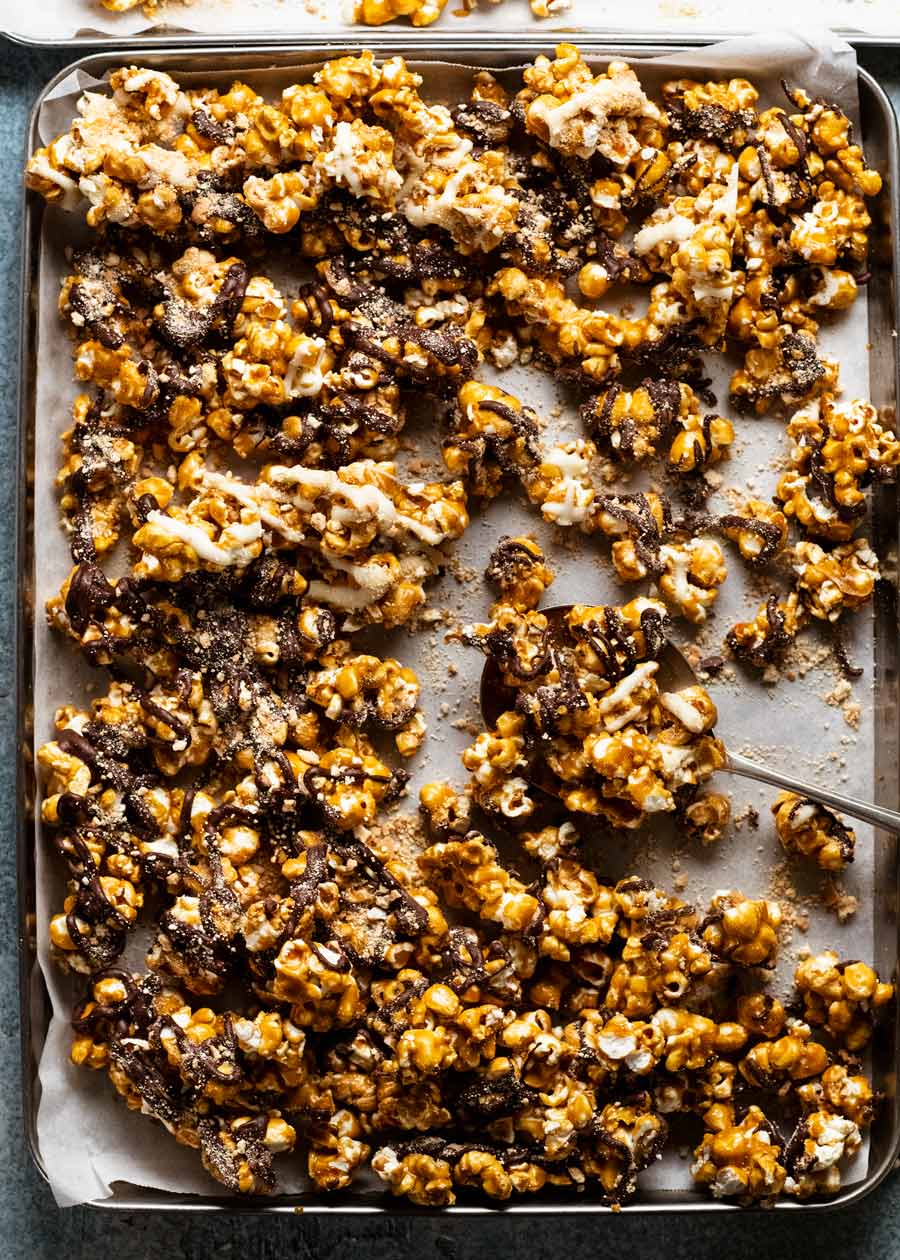
A quick inspection of the ingredients label was all I needed to come up with a copycat recipe. It’s really just caramel popcorn with a drizzle of chocolate and sprinkling of biscuit crumbs.
However, my homemade Gaytime Popcorn is far more generous on the chocolate drizzling (oh, why not? 😇). And you won’t break the bank!
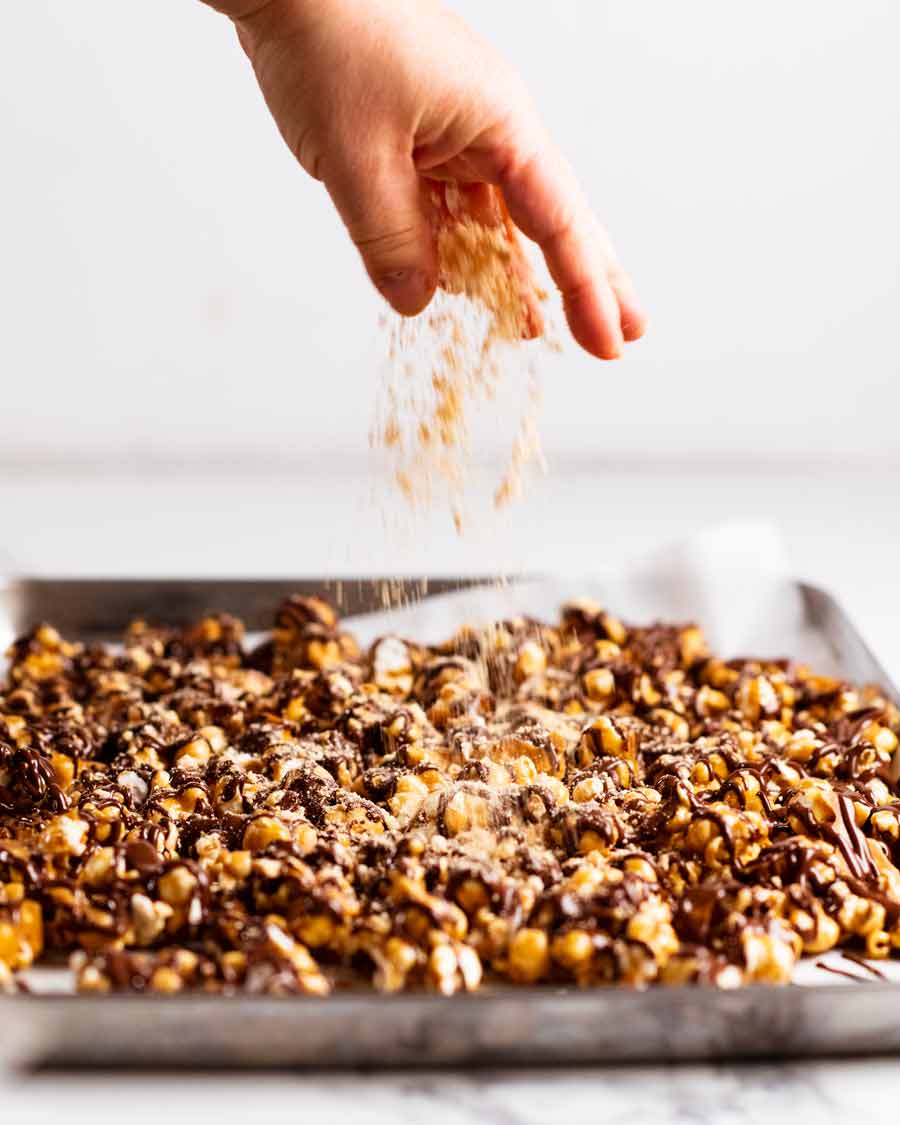
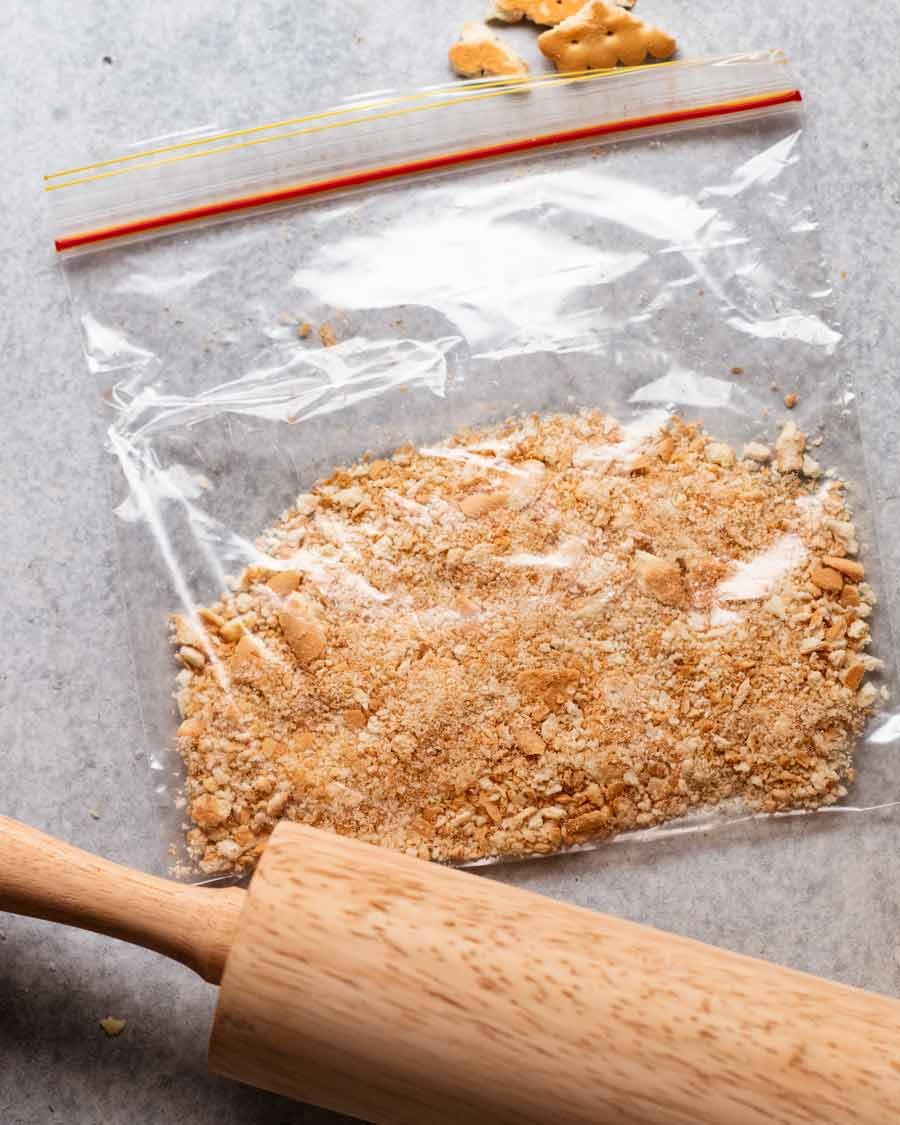
Hmm, I did a “sprinkling of biscuit crumbs”, didn’t I. But it looks more like I’m assertively throwing biscuit crumbs in the photo below. You want biscuit crumbs? Here’s your biscuit crumbs!!! 😂
Ingredients you need
Here’s what you need to make this. The first part covers the caramel popcorn, then the second part covers the chocolate drizzle and biscuit crumbs.
Caramel popcorn ingredients
Here’s what you need for the caramel popcorn:
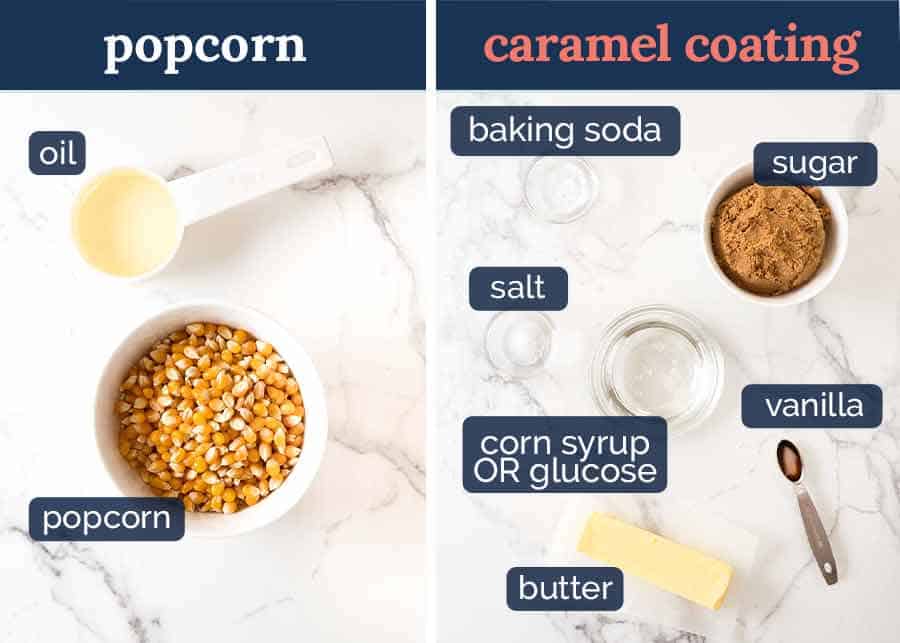
Corn syrup – This stabilises the caramel to ensure sugar crystallisation doesn’t occur, gives the caramel a nice shiny finish that’s crisp rather than sticky. Common grocery item in the US and Canada ! It can be purchased online in Australia from USAFoods.com.au and Amazon.
Glucose is a perfect substitute for corn syrup which is available in Australian supermarkets (baking aisle, clear thick syrup with honey consistency). Just a little harder to measure out because it’s so thick. However, the popcorn needs to be baked for 15 minutes longer to make sure the caramel coating dries out and becomes crisp. This is because glucose has slightly higher water content.
Baking soda / bi-carb – This makes the caramel coating become sort of foamy and increase in volume when you whisk it in. It helps get even coverage of caramel on the popcorn. Without the baking soda, you end up with big globs of caramel. It can’t be substituted with baking powder.
Toffee, caramel or vanilla essence – Store-bought Gaytime popcorn has a stronger albeit more artificial caramel flavour than homemade. To replicate this, use a caramel or toffee essence. Otherwise, just stick with vanilla like normal caramel popcorn. It’s honestly not a big deal, the popcorn still has a lovely caramel-y flavour.
Brown sugar rather than white sugar, for better caramel flavour.
Butter – For flavour. Not margarine or other alternatives. I can’t predict what that will do to the crispness of the caramel coating.
Oil – Anything neutral flavoured like vegetable, canola or peanut oil. This is for cooking the popcorn. It doesn’t work as well with butter (because butter is ~15% water and dairy, not just fat).
Popping corn! It’s usually sold in the potato crisps aisle in grocery stores here in Australia.
Chocolate drizzle and biscuit crumbs
For the chocolate drizzle and biscuit crumbs, you just need chocolate suitable for melting and some plain biscuits to crush up then sprinkle on the popcorn.
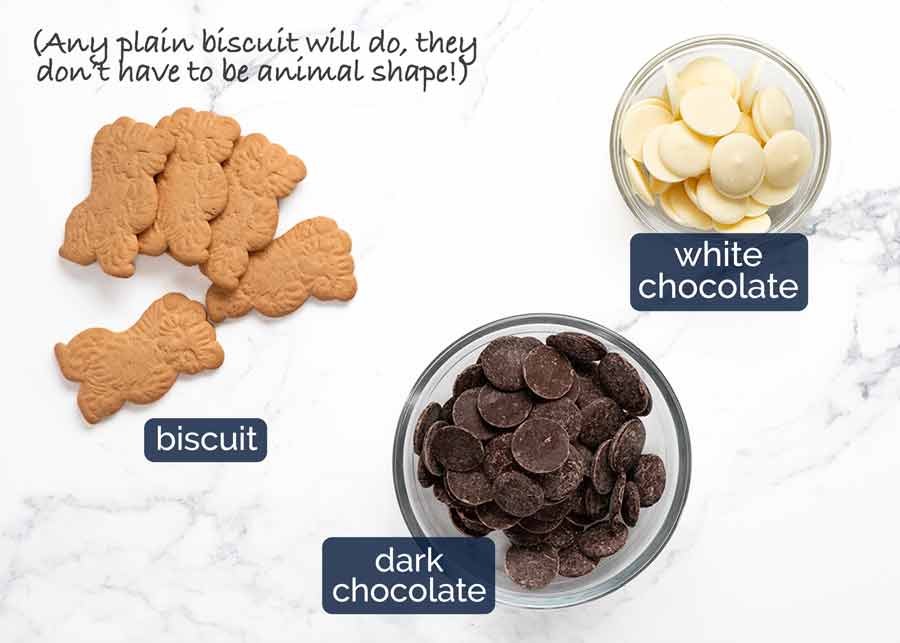
Chocolate -You can use a combination of dark and white chocolate, as I have done (like the store-bought Gaytime popcorn mix), or just one or the other.
Use a chocolate purchased from the baking aisle rather than eating chocolate. Baking chocolate is purpose-made for melting and cooking with, whereas eating chocolate is actually often designed specifically so it doesn’t melt when warm! I typically use “melts” for melting and chocolate chips for things like chocolate chip cookies as they are designed to hold their shape when cookies are baked.
For those of you in the US, semi-sweet chocolate chips is perfect.
Plain biscuits – A signature part of Golden Gaytime Popcorn is the sprinkling of crushed biscuits on the popcorn. The ingredients label specifies that it’s vanilla biscuits. Honestly though, any plain sweet biscuits will work just fine!

How to make Golden Gaytime Popcorn
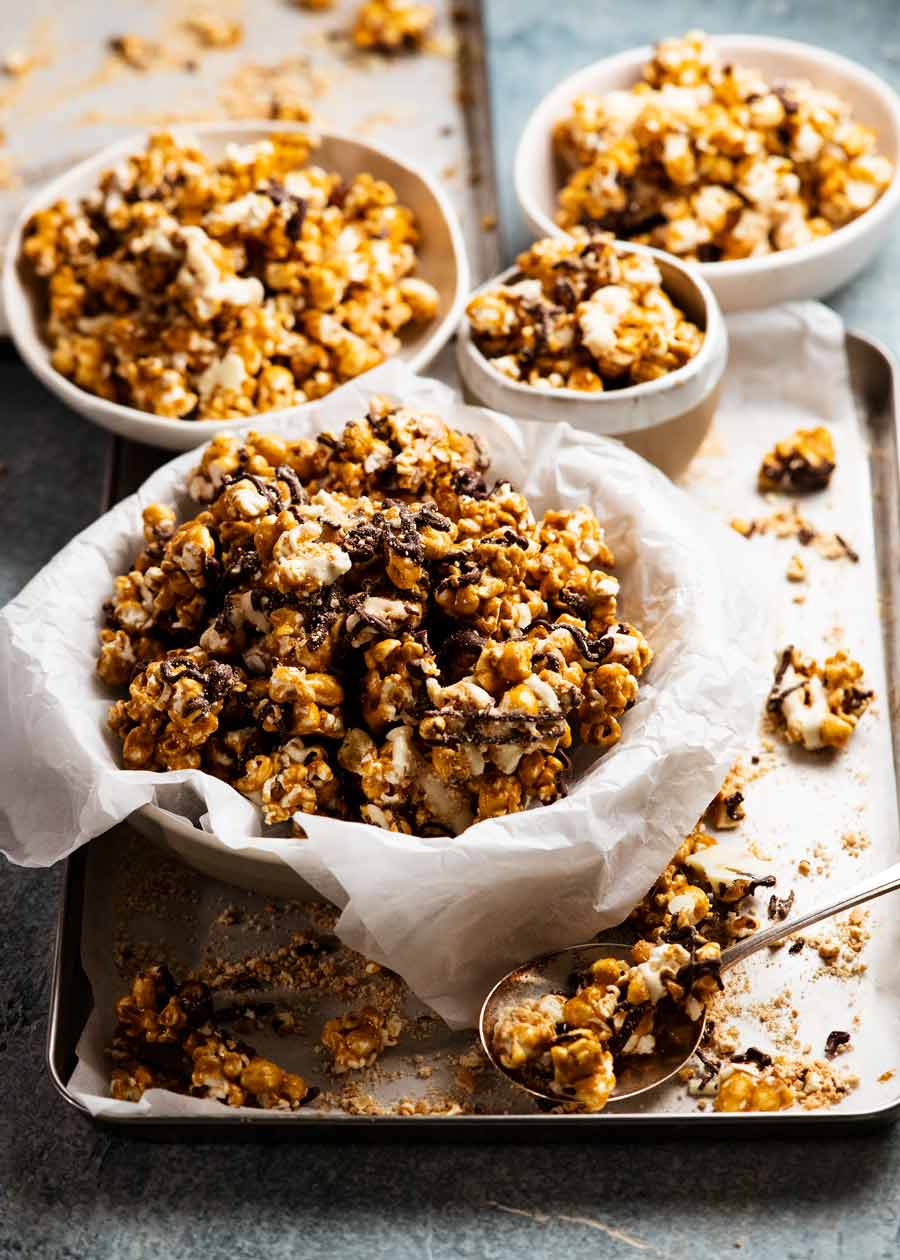
Simply make caramel popcorn then finish with a drizzle of chocolate and sprinkle of biscuit crumbs. It will stay crisp and fresh for at least a week – I’m sure it will last for longer (caramel popcorn lasts for weeks). But every test batch I made mysteriously disappeared before I could finish testing the shelf life!!
1. Pop popcorn
Pop your popcorn kernels using your method of choice – stove or popcorn maker, if you have one (I do, but for some reason digging it out of the back of the cupboard seems like more effort than cooking the popcorn on the stove).
Here’s how to cook popcorn on the stove.
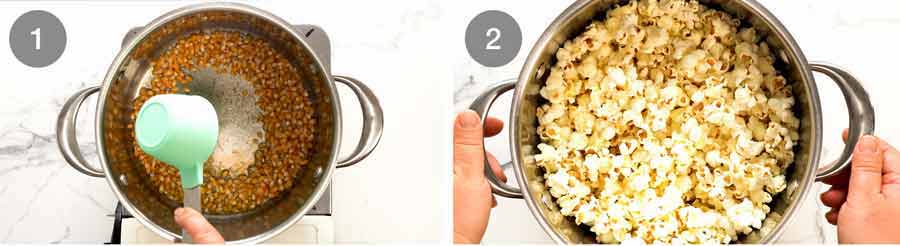
Test kernels – Heat oil in a large pot over medium heat. Add a few pieces of popcorn and wait until it pops, then quickly remove.
Add remaining popcorn, elevate off stove to shake and spread corn out evenly. Cover with a lid.
Shake! Once the popcorn starts popping in earnest, shake the pot gently once. Remove from heat when the popping stops (when you can count to 3 between pops) and transfer to a (very!) large bowl.
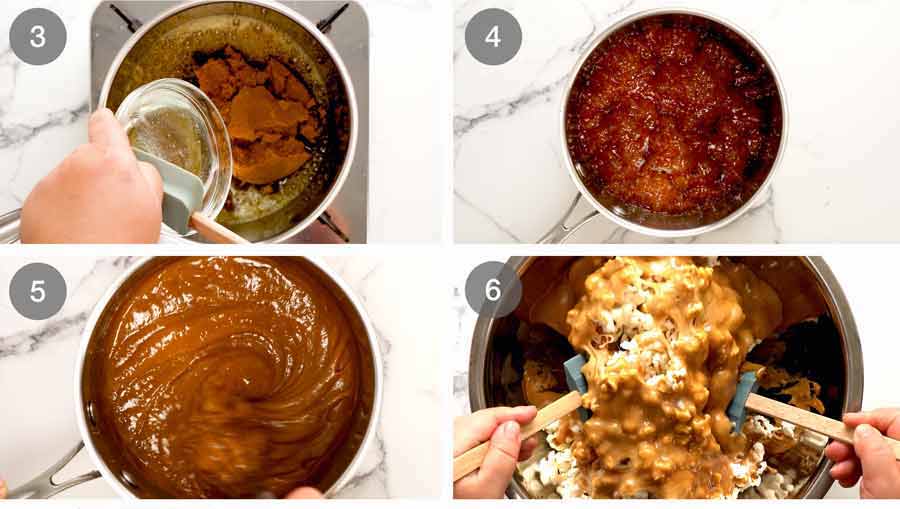
To make the caramel melt butter in a saucepan over medium heat. Add sugar, corn syrup and salt. Stir until just combined.
Simmer – When it starts to bubble, simmer for 4 minutes – DO NOT STIR! This may cause the sugar to crystallise so you won’t end up with a smooth caramel.
Baking soda “foamy” – Remove from heat then quickly whisk in caramel (toffee or vanilla) and baking soda. When you stop whisking, the caramel will foam and increase in volume. This is what makes the caramel coat the popcorn evenly. Without the baking soda, you end up with thick heavy globs of caramel on the popcorn and it’s impossible to toss.
Coat popcorn – Quickly pour the foamy caramel straight over the popcorn and toss to coat the popcorn as best you can until the caramel cools and starts to harden.
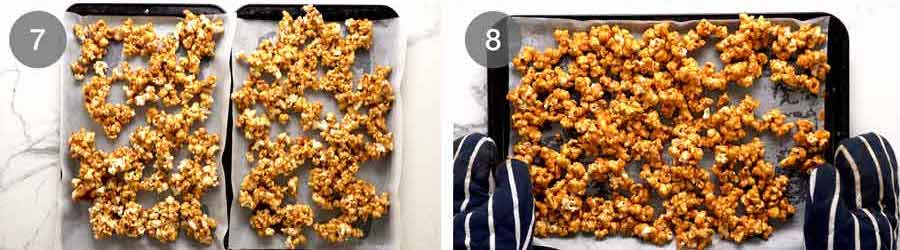
Bake for 45 minutes, tossing every 10 minutes or so. The caramel will remelt for the first 2-3 tosses so it coats the popcorn more evenly.
REMINDER: If using glucose instead of corn syrup, bake for an extra 15 minutes.
Cool – Remove from oven, leave to cool on the tray for 20 minutes so the caramel hardens. Then break up the popcorn – no need to be too pedantic, clumps are great!
Gaytime the popcorn!
OK, so time to transform our caramel popcorn into Gaytime Popcorn! Here’s how:
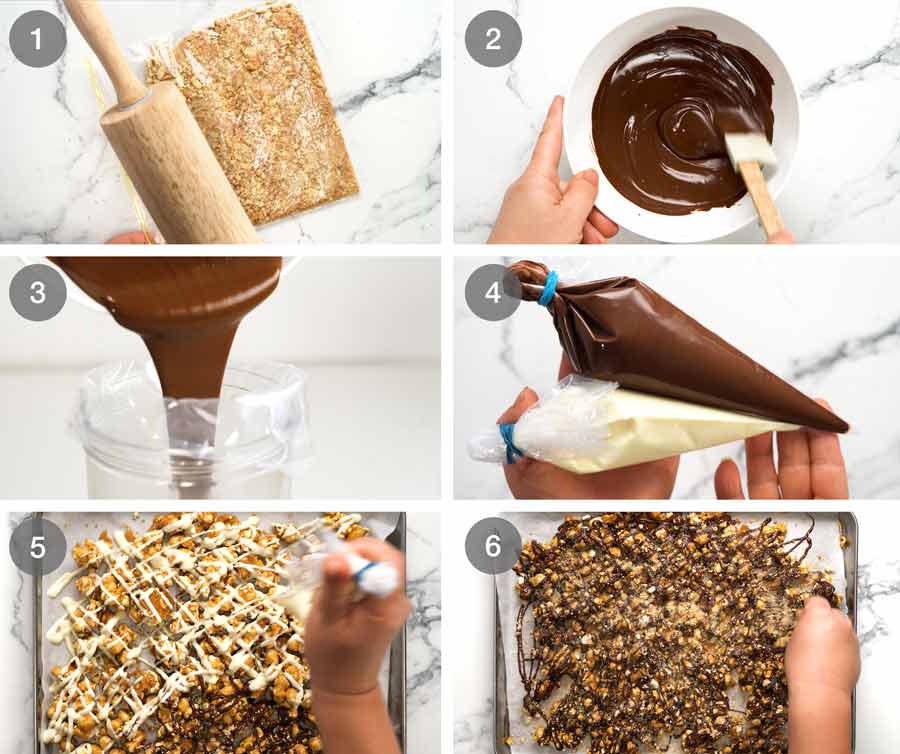
Bash the biscuits into crumbs either in a ziplock bag or using a mortar and pestle.
Melt the chocolate in the microwave (I use this) or bain-marie (bowl set over simmering water).
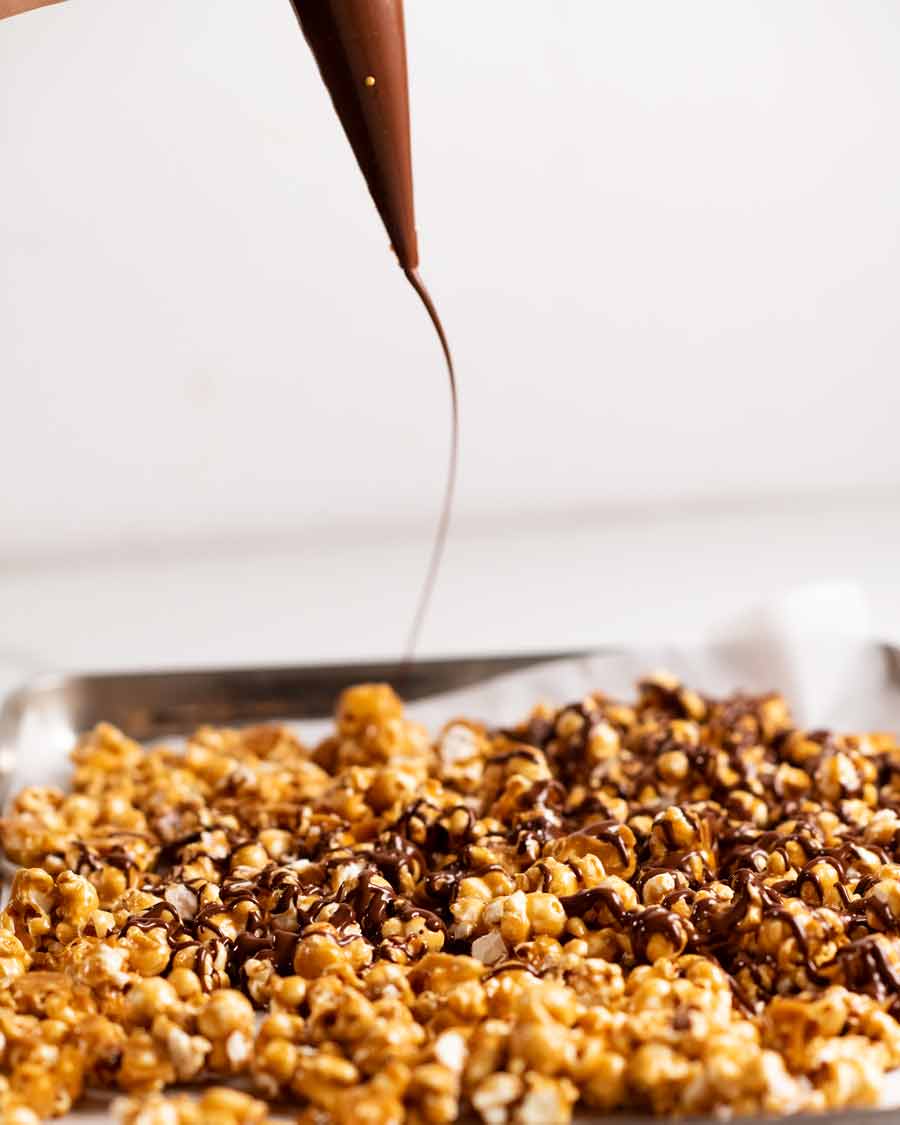
Transfer the melted chocolate into a piping bag. This makes it easier to get even coverage and zig-zag chocolate drizzles like you get with the store bought Gaytime popcorn. But if you prefer, you can just use a spoon for drizzling.
Ready for drizzling!
Drizzle the chocolate all over the popcorn in whatever pattern you prefer. There are no rules! Except – aim for even coverage. Nobody wants to be the unlucky person who gets a handful of chocolate-less popcorn!
Sprinkle the popcorn with the biscuit crumbs while the chocolate is still wet. The biscuits will stick to the chocolate part only, and it kind of sticks in concentrated (albeit small) patches so you can taste it a little better. I preferred this method rather than sprinkling it on the caramel popcorn whilst in the oven (the crumbs kind of got lost).
Once the chocolate sets – I speed things up by popping the trays in the fridge for 15 minutes – it’s ready to dive in!!
Storage
In theory, Gaytime Popcorn should stay fresh and crisp as long as Caramel Popcorn which has an excellent shelf life of several weeks.
Test batches made it to around the 1 week mark successfully before mysteriously disappearing. So I can’t say for sure, but I’m confident it should last for at least 2 weeks. Just make sure it is stored in an airtight container in a cool and dry place. If moisture gets in and/or it’s hot and humid, the caramel coating will get sticky and chewy so it gets stuck in your teeth.
This was a jar intended for gifting. It never got gifted. 🤭

REPORT CARD: Homemade is 68% cheaper!!
I boldly stated when I started on the Gaytime Popcorn Project that I believed I could make it for 80% less than store-bought.
We’ve run the numbers and the results are in.
One batch costs $8.96 to make which equates to 5 packets of store bought Gaytime Popcorn which costs $28.75 ($5.75 per packet). That’s a 68% saving!
So, I was 12% off. But still. I would never spend $28.75 for 5 packets of Gaytime. But I would spend $8.96 to make a batch of this any day of the week – and twice for movie night! – Nagi x
Watch how to make it
Golden Gaytime Popcorn – copycat recipe!
Ingredients
For the popcorn
- 1/4 cup vegetable oil (not required if air popping with a popcorn maker)
- 1/2 cup popping corn
For the caramel
- 100g / 7 tbsp unsalted butter
- 1 cup brown sugar , tightly packed cup
- 1/2 cup light corn syrup (sub glucose, Note 1)
- 1/2 tsp cooking/ kosher salt
- 2 tsp toffee or caramel essence OR 1 tsp vanilla (substitute) (Note 2)
- 1/2 tsp baking soda (bi-carb) (Note 3)
Golden Gaytime Finishes
- 1 1/4 cups dark or white chocolate melts or chips (US: semi-sweet chips), I used ~25% white and 75% dark (Note 4)
- 4 plain sweet biscuits (like Marie Crackers) (Note 5)
Instructions
Popcorn
- Test oil – Heat oil in a large pot over medium heat. Add a few pieces of popcorn and wait until it pops, then quickly remove.
- Pop – Add remaining popcorn, elevate off stove to shake and spread corn out evenly. Cover with a lid. Once the popcorn starts popping in earnest, shake the pot gently once. Then crack the lid a tiny bit – let's steam escape for crisper popcorn.
- Remove from heat when the popping stops (when you can count to 3 between pops) and transfer to a (very!) large bowl.
Caramel:
- Preheat oven to 110°C/230°F (both fan and standard ovens).
- Combine – Melt butter in a saucepan over medium heat. Add sugar, corn syrup and salt. Stir until just combined.
- Simmer – When it starts to bubble, simmer for 4 minutes – DO NOT STIR!
- Baking soda "foamy" – Remove from heat then quickly whisk in caramel (toffee or vanilla) and baking soda. When you stop whisking, the caramel will foam and increase in volume.
- Coat popcorn – Quickly pour straight over popcorn, toss until caramel cools and starts to harden.
Baking to crisp caramel coating:
- Spread popcorn on 2 large paper lined baking trays.
- Bake for 45 minutes, tossing every 10 minutes or so. Caramel will remelt for the first 2-3 tosses – tossing coats popcorn more evenly with caramel. (If using glucose, bake further 15 minutes).
- Cool – Remove from oven, leave to cool on the tray for 20 minutes. Then break up the popcorn – no need to be too pedantic, clumps are great!
Drizzle and crumbs
- Crumbs – Place biscuits in a ziplock bag and bash into crumbs.
- Melt chocolate – Place chocolate in a heatproof bowl and microwave in 30 second increments on high, stirring in between, until melted and smooth – about 1 1/2 minutes. (If doing a small amount of white chocolate, reduce to 20 second increments).
- Piping bags – Transfer chocolate into a piping bag. Use scissors to snip a small opening at the tip. (Alternative: just drizzle with a spoon).
- Drizzle & crumb – Push the popcorn together but in a single layer. Drizzle criss-cross (or any pattern!) all over the popcorn. Sprinkle with biscuits crumbs while the chocolate is wet so it sticks.
- Fridge – Refrigerate for 15 minutes until the chocolate is firm. Gently break popcorn into pieces. EAT!
- Store in an airtight container in a cool place. Stays crisp for at least a week. Our test batches never lasted any longer!
Notes
Nutrition
Life of Dozer
I promise Dozer, there is nothing going on in here that would be of interest to you…..😂

The post Golden Gaytime popcorn (copycat) appeared first on RecipeTin Eats.
]]> This Spicy Tuna Crispy Rice recipe is a shameless copycat of a signature appetiser at the trendy Nobu restaurant. Bite size crispy rice is served with tuna in a creamy spicy dressing. I love it. It’s expensive. So I copied it. And added a canned tuna option too. 🙂 Nobu copycat: Spicy Tuna Crispy Rice... Get the Recipe
The post Spicy Tuna Crispy Rice (Nobu) appeared first on RecipeTin Eats.
]]>This Spicy Tuna Crispy Rice recipe is a shameless copycat of a signature appetiser at the trendy Nobu restaurant. Bite size crispy rice is served with tuna in a creamy spicy dressing. I love it. It’s expensive. So I copied it. And added a canned tuna option too. 
Nobu copycat: Spicy Tuna Crispy Rice
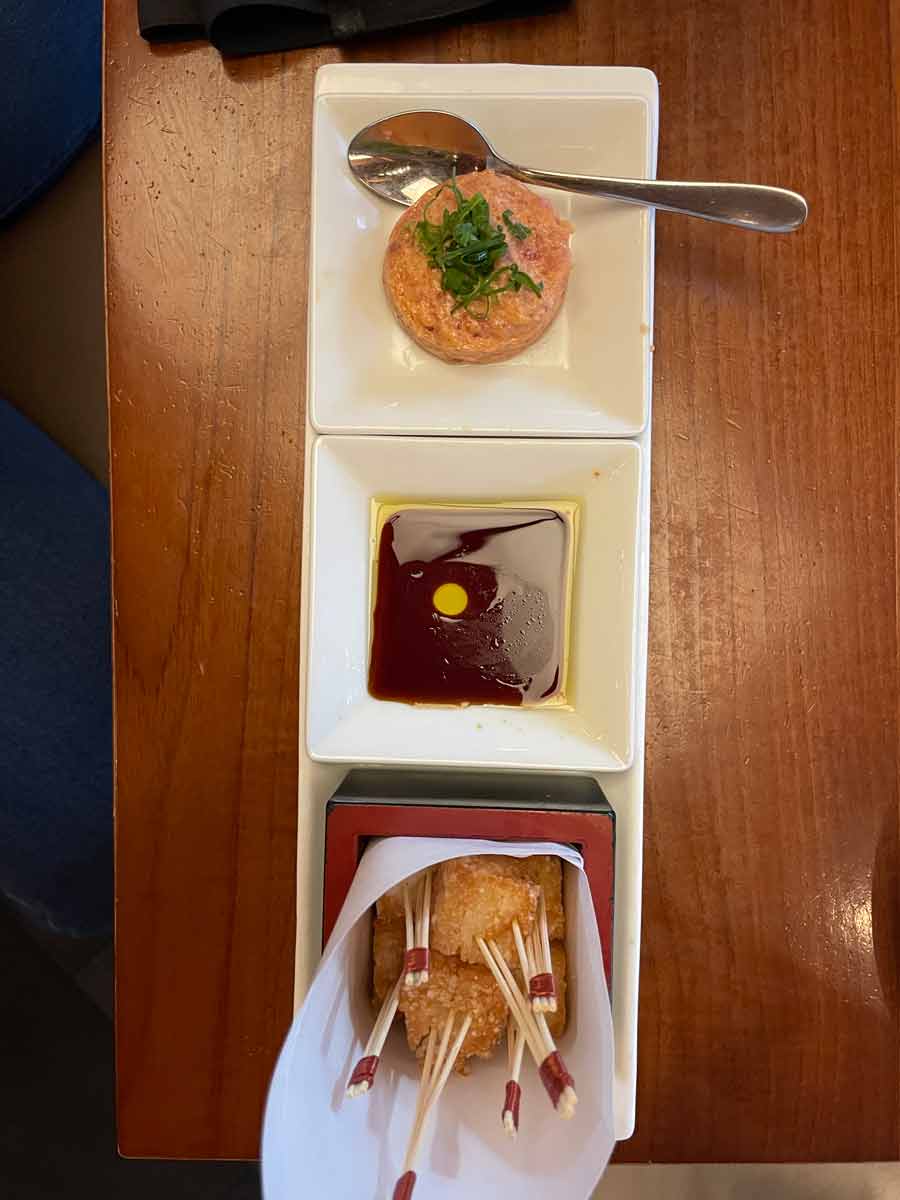
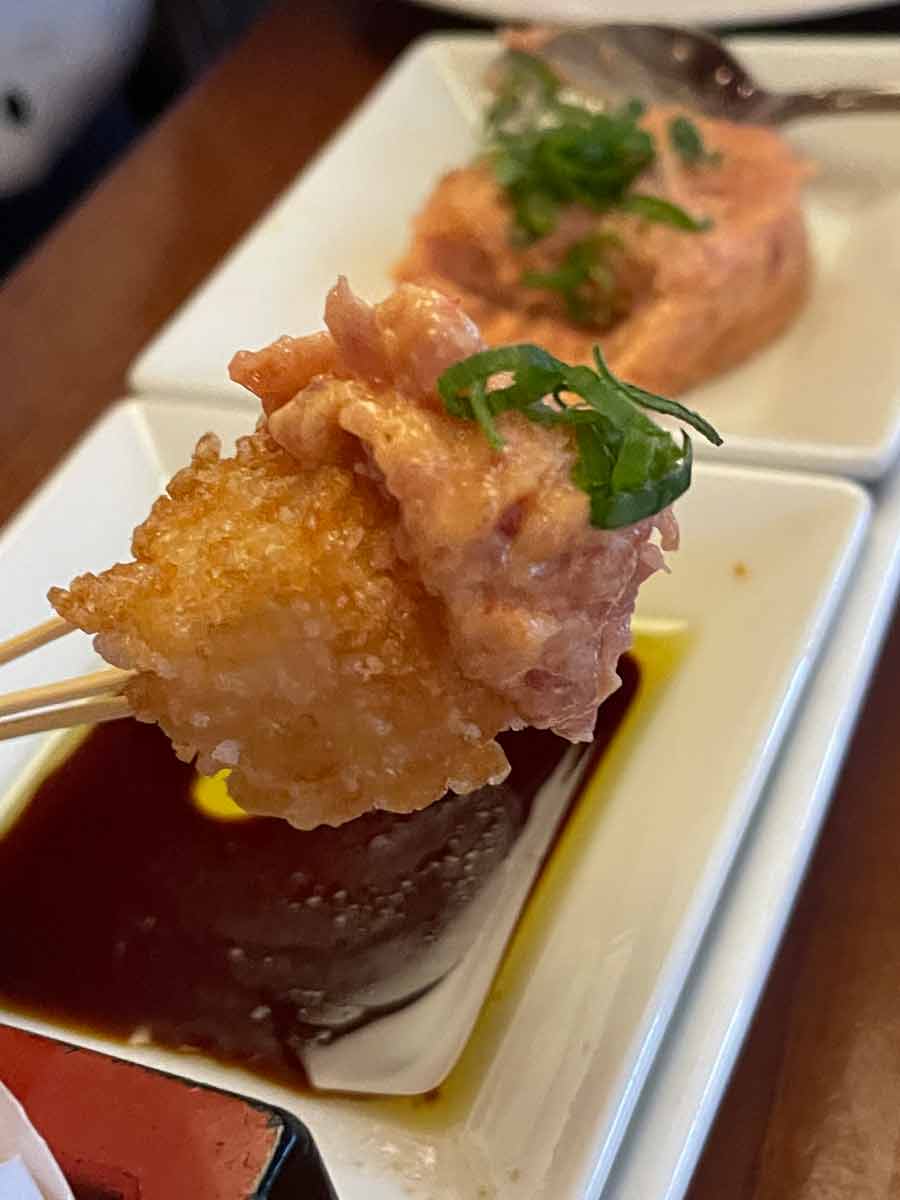
There’s no feel-good story behind today’s recipe. It’s just a blatant fact that I really love the Spicy Tuna Crispy Rice at Nobu* which is a signature starter of this globally renowned restaurant. But you pay through the nose for it – $30 for a very small serving. Here it is at Melbourne Nobu – top quality phone snaps! 😂
* In case you’re not familiar with Nobu, it’s a trendy modern Japanese restaurant founded by world-famous chef Nobuyuki Matsuhisa that is now global with a presence in major cities like New York, Tokyo, London, Dubai, Sydney. Won’t lie – I’ve had hits and misses in various cities. But overall, it’s very reliable. Firm favourite with celebrities.
Price aside, I don’t want to go to Nobu every time I want to have it. So I decided to copy it. It seemed like a simple enough recipe – and it is! Crispy rice topped with raw finely chopped tuna mixed with a creamy spicy dressing.


Nobu vs my version
At Nobu, the rice is served in small cube form which you stab with (fancy) toothpicks then dip into the tuna which is so finely minced it is like a spread. Based on the perfect golden colour on each side of the rice cubes, I suspect they are deep fried.
I’ve made my rice cakes flatter so they can be pan fried instead of deep fried, and pre-assembled with the toppings. I also do not have a dipping sauce because I’ve incorporated seasonings in the tuna toppings.
Plus, I’ve made a canned tuna version as well, as an option you make right now instead of going out to find sashimi-grade tuna! Think – canned tuna fillings in sushi rolls. It’s really tasty! This is the canned tuna version:
What you need
Here’s what you need to make this Nobu copycat Spicy Tuna Crispy Rice.
1. Sashimi tuna or salmon – OR canned!
As mentioned above, the base recipe is a copy-cat of the Nobu version which is made with raw sashimi-grade tuna, Plus, I’ve created a canned tuna version too as an easier make it now version / those who can’t get or don’t like raw tuna. It’s like the canned tuna filling you get in sushi rolls – it’s really tasty!
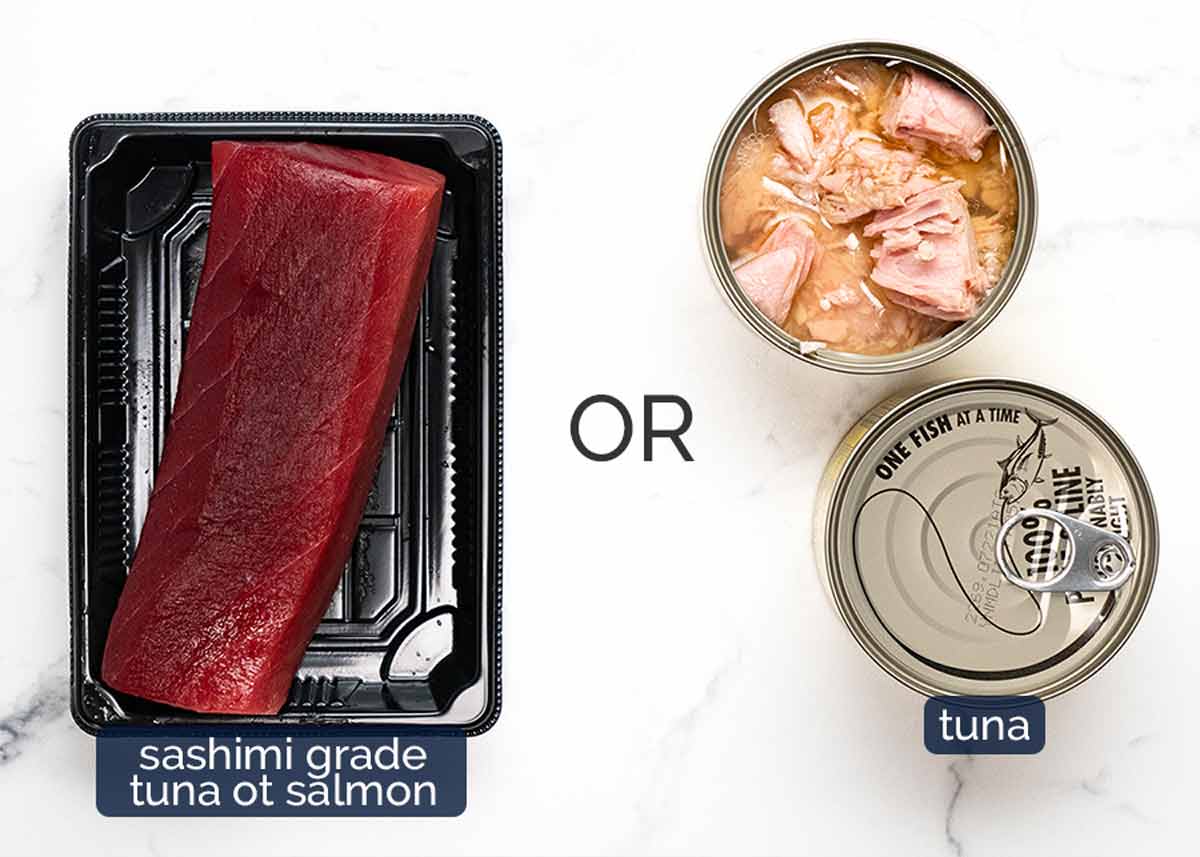
Sashimi grade tuna – To make the raw tuna version, you will need to get sashimi grade tuna. This is tuna that is fresh enough, handled and stored in a manner suitable for eating raw. It is more expensive than tuna intended for cooking.
Common sashimi tuna types
Bluefin tuna – the frontrunner, most premium type. For flavour, colour and texture.
Yellowfin and bigeye tuna (ahi ahi) – The more common type that is more economical. It is softer, not as red.
Canned tuna – Tuna in oil is best. If using tuna in spring water, the mixture is a little drier so perhaps add extra mayo.
2. Spicy creamy dressing & assembling
Here’s what you need to make the creamy dressing and for assembling. The same ingredients are used for both, it’s just that you need more for the canned tuna (lots of little tuna bits = more surface area = more dressing required).
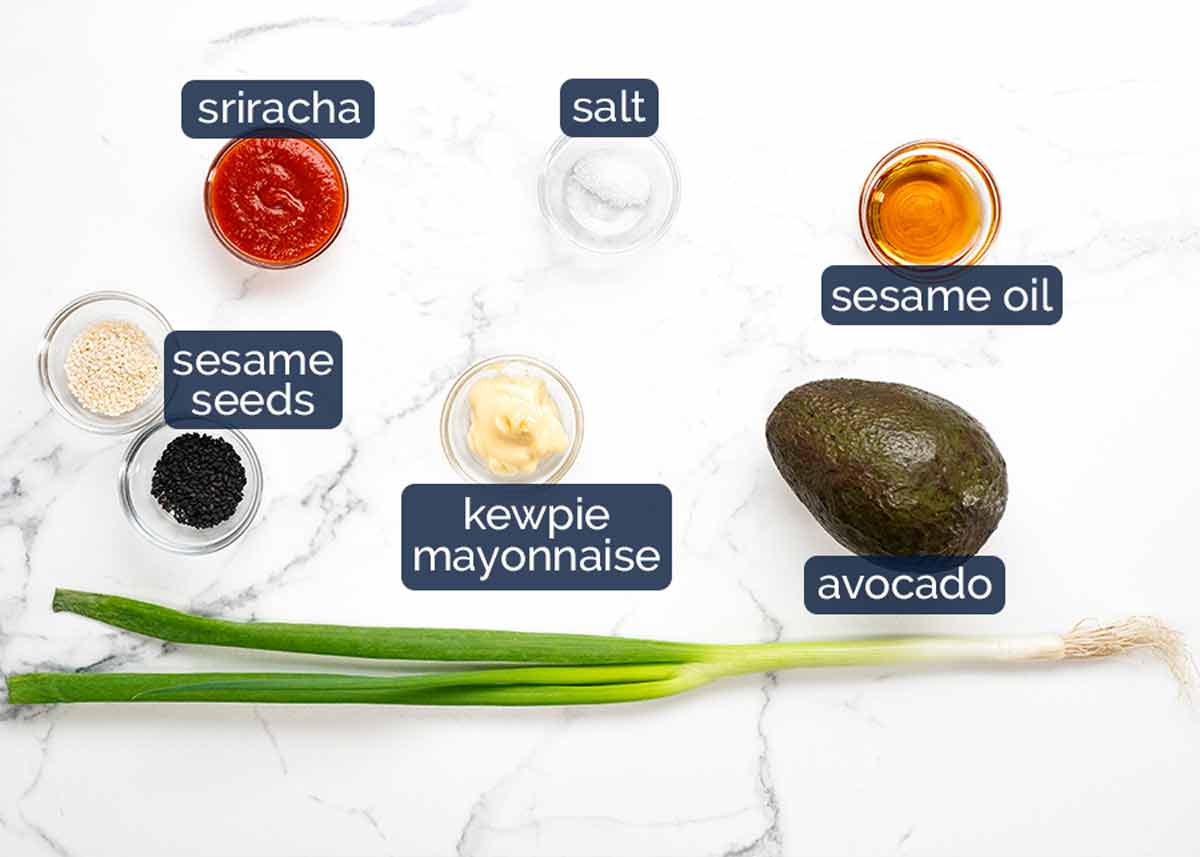
Kewpie mayonnaise is a Japanese mayonnaise that has a smoother flavour than Western ones. Substitute with whole egg mayonnaise. Normal mayonnaise (ie not labelled “whole-egg”) is tangier / sweeter which will dominate the raw tuna version too much but ok for the canned tuna version.
Sriracha is a red Asian spicy sauce that has other flavours in it in addition to chilli, such as vinegar and garlic. Substitute with other spicy sauce of choice, but adjust quantity based on spiciness.
Non spicy option – Ketchup!
Green onion – For nice green specks and a bit of freshness.
Sesame oil & seeds – For toasty sesame flavour!
Lemon – For the canned tuna version, I found a hint of extra tang was desirable. For the raw tuna version, fresh lemon juice made the dressing a little too loose so I stick with using the tang in sriracha.
Avocado – Optional (and not in Nobu’s version), but I really like how it adds an extra creamy element. If avocado is not in season or pricey, I’d skip it.
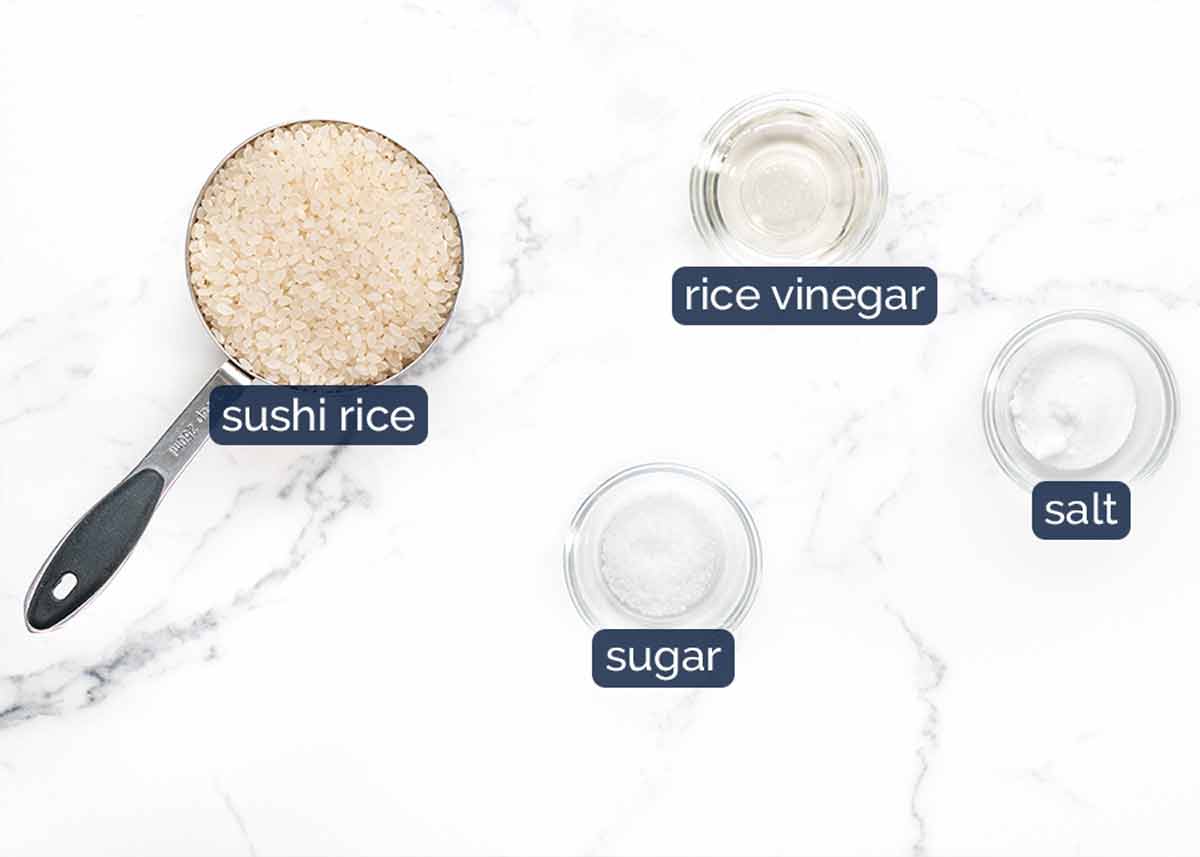
Crispy rice
All you really need for the crispy rice is sushi rice, oil for cooking and salt for seasoning. But it makes it extra tasty to flavour the rice with sushi rice seasoning – just rice vinegar and sugar.
See the separate crispy rice recipe for commentary on the ingredients.
How to make Nobu’s crispy rice with spicy tuna
The crispy rice cakes has been published as a separate recipe – because it’s deemed worthy as such! It’s really easy – cook rice, press in pan, chill to set, cut, pan fry.
So the steps below are for the topping and assembling.
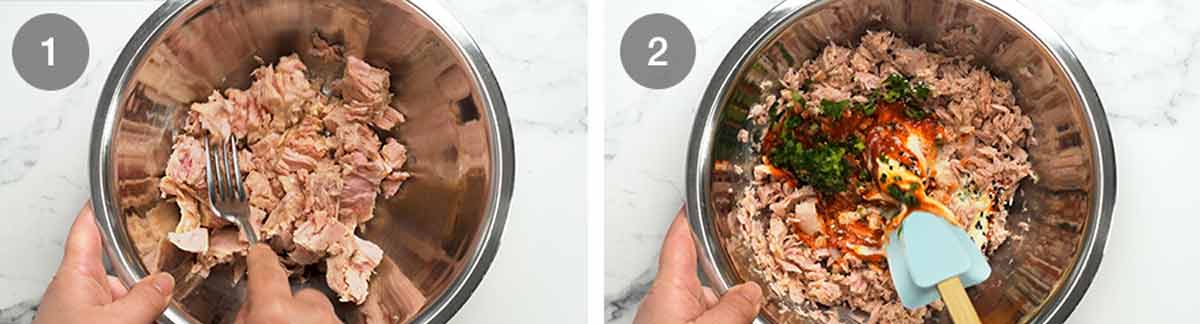
1. Nobu spicy tuna topping
Tip: Raw fish is hard to finely dice because it is so soft. To make it (much!) easier, partially freeze the fish first to make it firmer. Just 30 minutes in the freezer.
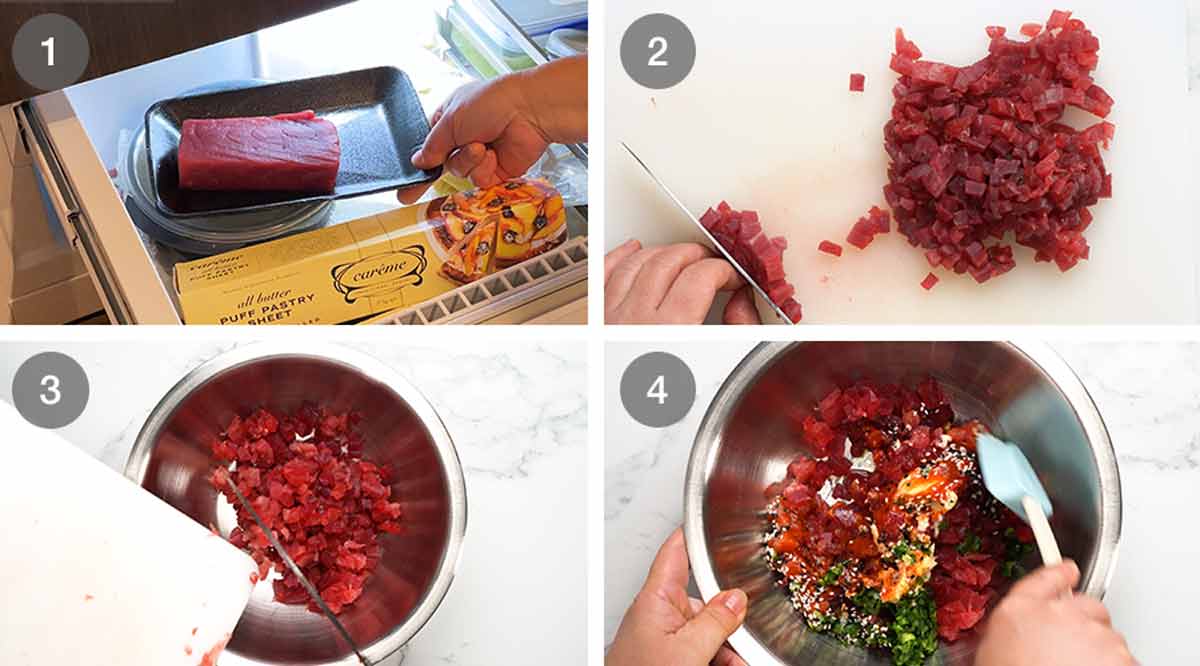
Partially freeze the raw tuna (or salmon) in the freezer for 30 minutes. This will make it much easier to cut.
Cut into small 0.5cm / 1/5″ dice. To do this, I slice 0.5cm / 1/5″ thick pieces, then 0.5cm / 1/5″ strips, then dice.
De-chill the fish for 20 minutes or so, so it’s not ice-cold. Sushi tastes best when at room temperature which is around 18C/65F. Small diced tuna will de-chill fairly quickly.
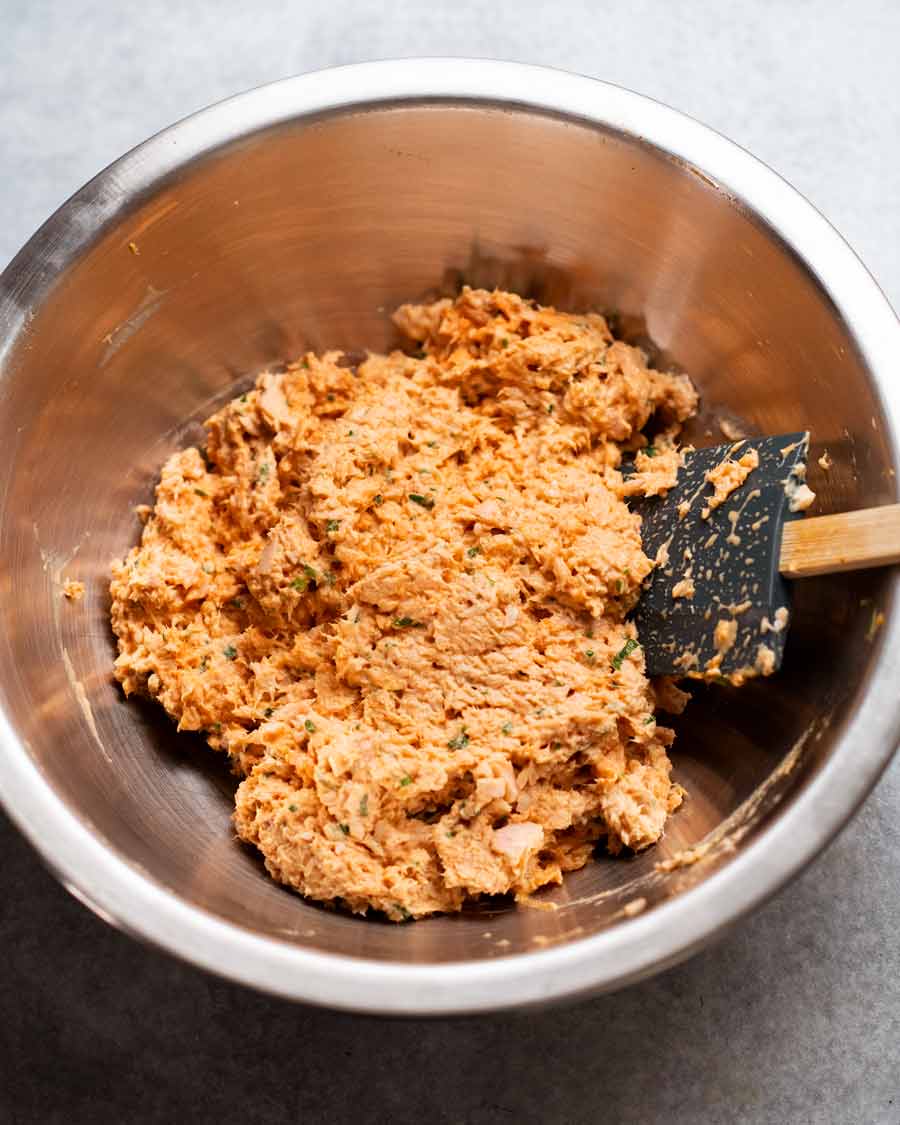
Mix – Add the mayonnaise, sriracha, green onion, sesame oil, sesame seeds and salt. Mix gently to combine. Then refrigerate until required. But remember to aim for the room temperature for serving! Warm crispy rice cakes with ice-cold tuna isn’t ideal.
Creamy canned tuna topping
Mash the drained canned tuna with a fork until it’s really fine. The finer the better.
Add everything else and mix!
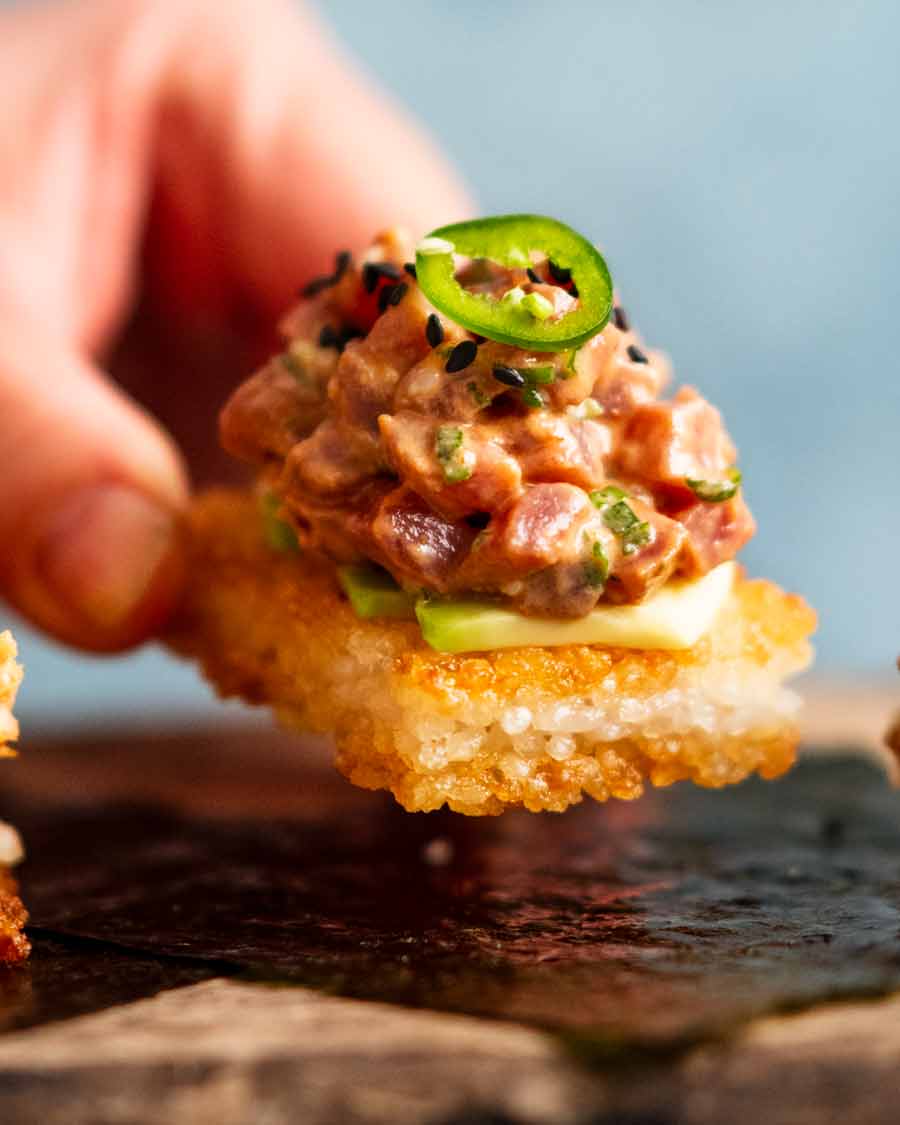
3. Assembling the crispy rice cakes
Nobu serves this as a DIY set up with cubes of rice that is speared with fancy toothpicks then dunked into the spicy tuna which is almost in paste-like form. I like to assemble for an easy finger food option.
Also, cubes of rice either need to be turned 6 times in a pan (what a pain!) or deep fried (what a pain!). Pan frying 2 sides of a flatter pieces is so much less effort!

Cook the rice cakes after you’ve mixed the toppings. See directions in the crispy rice cakes recipe.
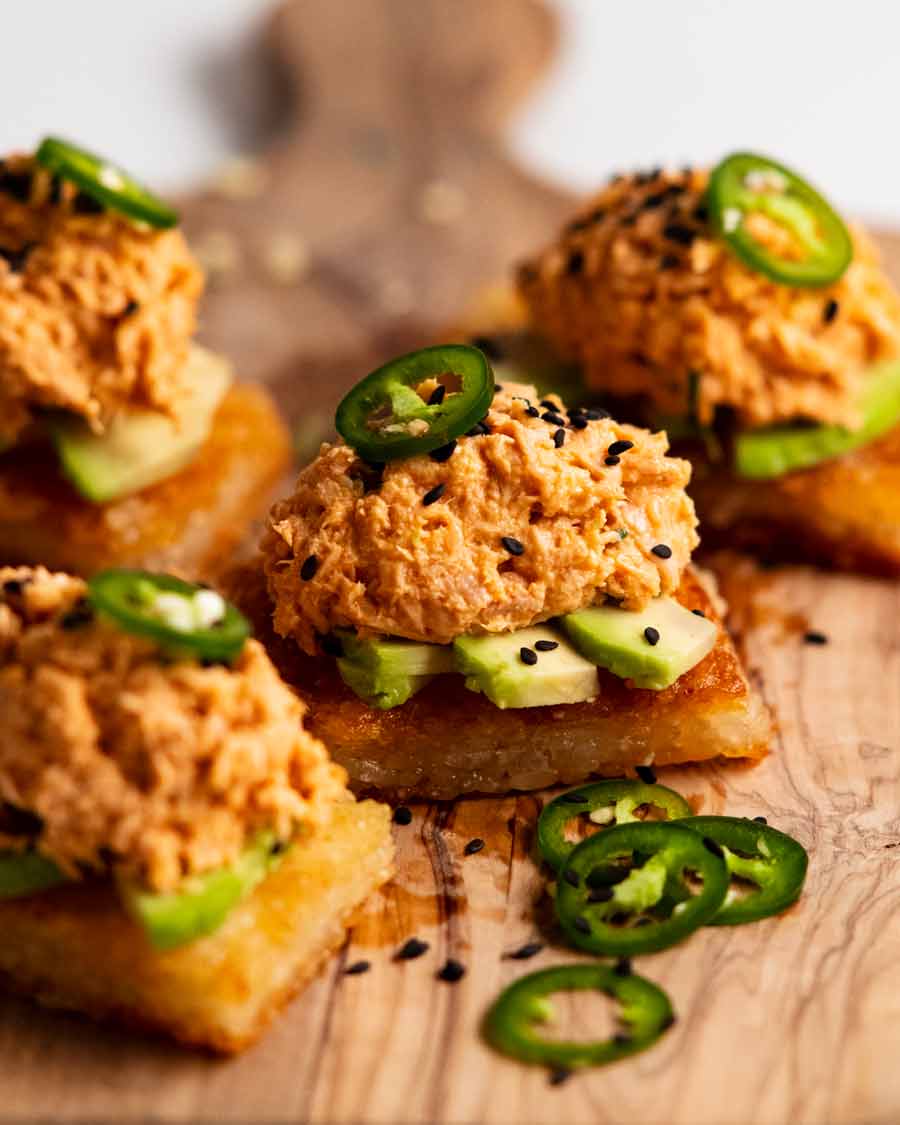
Avocado – Place on a serving platter and top with avocado slices. You can either use 1 large, or fan out smaller pieces as I have done. You could also pipe on avocado sauce – a good option for speedy assembling if making big batches.
Shape – Use 2 teaspoons to shape a mound of the topping into a “football” shape so it sticks together.
Assemble – Place tuna on avocado. Sprinkle with sesame seeds, top with jalapeño. Repeat with remaining rice cakes. EAT!

I see you making this for friends who come round for Saturday night drinks. Impressing the pants off your friends at book club. For your mum’s birthday lunch.
And just generally because you want to eat Nobu in the comfort of your own home, in trackies and your favourite slouchy t-shirt, and feel smug that it cost you around…oh I don’t know. About 80% less? At least!! – Smug Nagi x
Watch how to make it

Crispy rice with spicy tuna (Nobu copycat)
Ingredients
- 1 batch crispy rice cakes (15 pieces)
- ONE topping of choice (below) – Nobu sashimi tuna or canned tuna
- 1 avocado , cut into small thin slices (or make avocado sauce)
- 15 jalapeño slices , thin, optional garnish
- 1/2 tsp black sesame seeds , for garnish
Nobu spicy tuna (raw):
- 225g / 7oz sashimi grade tuna , or salmon (Note 1)
- 1 tbsp sriracha , adjust spiciness to taste (Note 2)
- 4 tsp kewpie mayonnaise (Note 3)
- 1 tsp sesame oil
- 1/4 tsp cooking salt
- 2 tbsp finely chopped green onion
- 1 tsp white sesame seeds
- 1/2 tsp black sesame seeds , divided
Creamy spicy canned tuna topping:
- 360g/12oz canned tuna in oil , drained (Note 4)
- 3 tbsp sriracha (Note 2)
- 4 tbsp kewpie mayonnaise (Note 3)
- 1 tbsp lemon juice (sub rice vinegar)
- 1 tsp sesame oil
- 1/2 tsp cooking/kosher salt
- 1/4 cup finely chopped green onion
- 2 tsp white sesame seeds , optional
- 1 1/2 tsp black sesame seeds , divided
Instructions
- Start the rice the day before or first thing in the morning – it needs minimum 4 hours to chill.
- Make the toppings first, then refrigerate while you cook the crispy rice cakes.
- Cook the crispy rice cakes and sprinkle with salt per the recipe.
- Assemble – Place rice cakes on a serving platter. Pile on toppings – I use teaspoons to make football shapes then slide on. Sprinkle with black sesame seeds, top with jalapeño. Eat!
Nobu spicy tuna topping:
- Freeze to firm – Place tuna in the freezer for 30 minutes to partially freeze – it's much easier to finely chop when slightly firm.
- Cut into 0.5cm / 1/2" cubes – the smaller the better! Place into a bowl and let it de-chill for 20 minutes (not as nice ice-cold).
- Mix – Add everything into the tuna and mix until combined.
Creamy canned tuna (sushi-roll filling style):
- Place tuna in a bowl and use a fork to mash it up really finely. Add everything else and mix well.
Notes
Nutrition
Life of Dozer
Crispy rice cake size context.

The post Spicy Tuna Crispy Rice (Nobu) appeared first on RecipeTin Eats.
]]> Crispy rice is just rice that’s packed in a pan, cut then pan fried until golden and ultra crispy. Can’t-stop-eating-them good! Munch on them plain like chips, or use as a base for toppings to make modern Asian-style canapés – like Nobu’s Spicy Tuna Crispy Rice. Crispy rice cakes These are the base for the... Get the Recipe
The post Crispy rice appeared first on RecipeTin Eats.
]]>Crispy rice is just rice that’s packed in a pan, cut then pan fried until golden and ultra crispy. Can’t-stop-eating-them good! Munch on them plain like chips, or use as a base for toppings to make modern Asian-style canapés – like Nobu’s Spicy Tuna Crispy Rice.
Crispy rice cakes
These are the base for the Nobu copy-cat Spicy Tuna Crispy Rice recipe that I also published today. But everyone who’s tried the plain crispy rice cakes declared them so good, they insisted they should be published as a separate recipe. So here it is!

Ingredients
All you really need to make crispy rice cakes is rice, oil for frying and salt for seasoning. However, the rice is tastier if you add sushi rice seasoning which is just sugar and rice vinegar. Especially if you plan to serve these as plain snacks with no toppings.
Sushi rice – Find this type of rice labelled as such alongside other rice at the grocery store. It’s a short grain type of rice that is stickier than other types of rice, so the rice sticks together to make the rice balls for sushi.
For the same reason, it’s the best type of rice to make rice cakes! Other rice types won’t stick together as firmly so the rice cakes won’t cut as neatly or fry up as golden and crispy. Medium grain rice should work nearly as well (because it’s fairly sticky too) but I don’t recommend trying this with long grain rice, brown rice, wild rice or basmati rice.
Rice vinegar – An Asian vinegar made from….wait for it….rice! Smoother and milder than plain white vinegar, this is used to flavour rice to make sushi. As noted above, it can be skipped but it makes the rice cakes tastier.
Sugar – Also for seasoning the rice.
Salt – For sprinkling on the cooked rice cakes. I use 3/4 teaspoon. It will seem like a lot for the amount of rice cakes but they can take it! They are like potato – they take more salt than you think. Also, some salt falls off when you turn them to sprinkle the other side.
How to make crispy rice cakes
You simply cook rice, press in a pan, cool to make it solid, cut, then pan fry until golden. Then munch away!
1. Cook and flavour rice
No need to rinse. Use the right amount of water. And don’t peek! My full rice-making rants here.
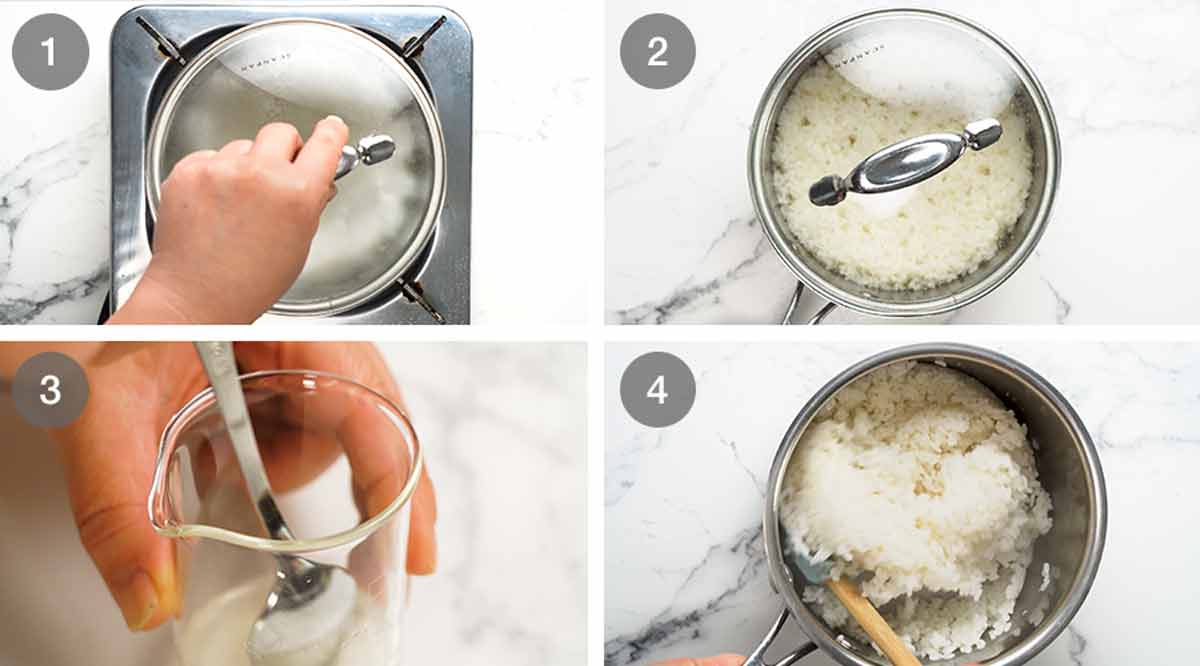
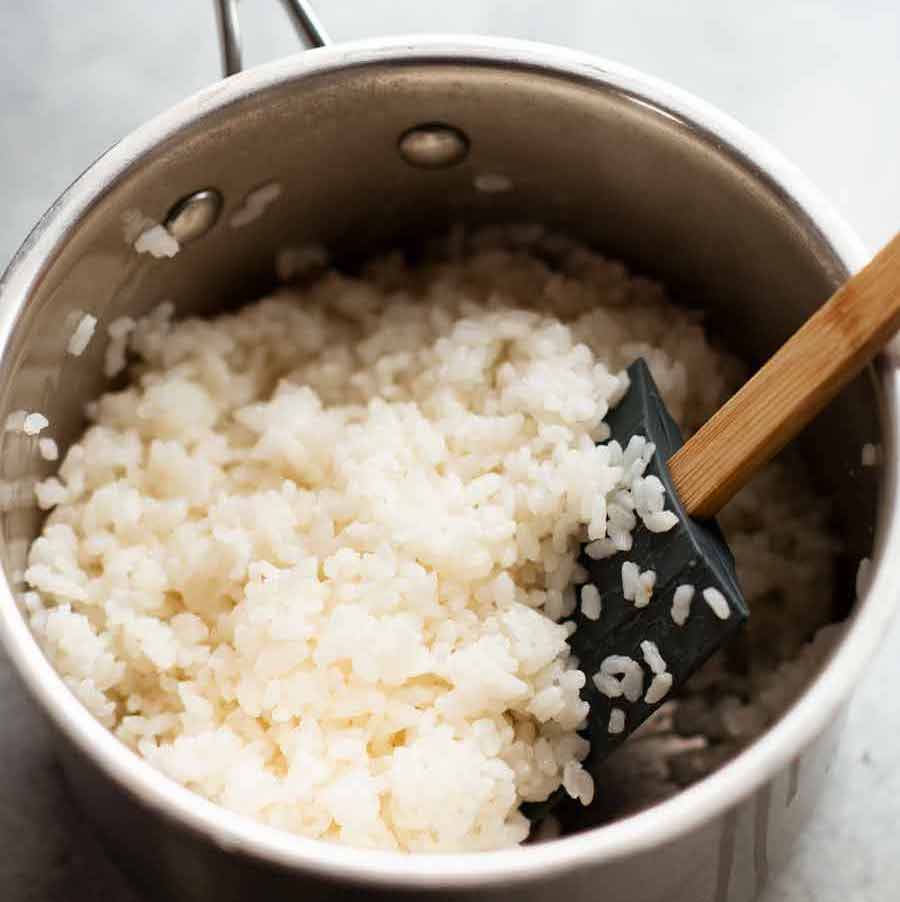
Cook rice – Place rice and water in a small pot (no lid) over medium high heat. Once it’s bubbling, put the lid on and turn down to medium low. Cook for 13 minutes or until water is absorbed – no peeking!
Rest for 10 minutes with the lid on.
Sushi rice seasoning – Mix the vinegar and sugar together until the sugar dissolves.
Fluff – Pour seasoning over the hot rice. Fluff with a rice paddle or rubber spatula. The rice will absorb the flavour as it cools in the pan.
2. Press and cut
For really crispy rice cakes, be sure to press the rice in firmly.
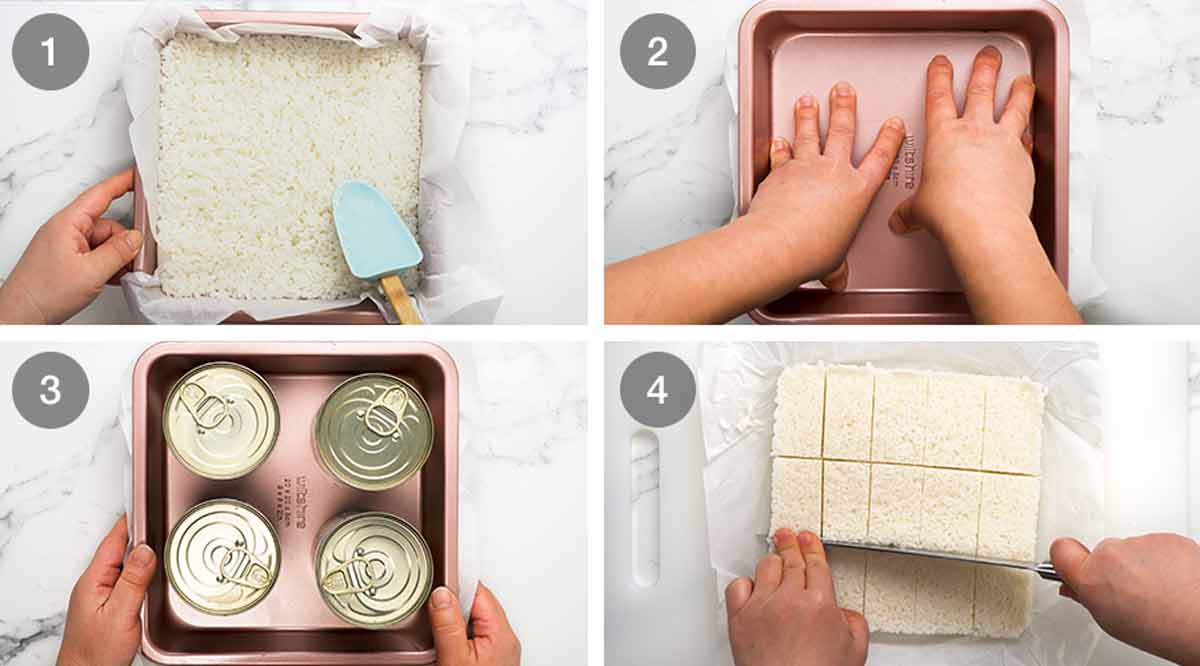
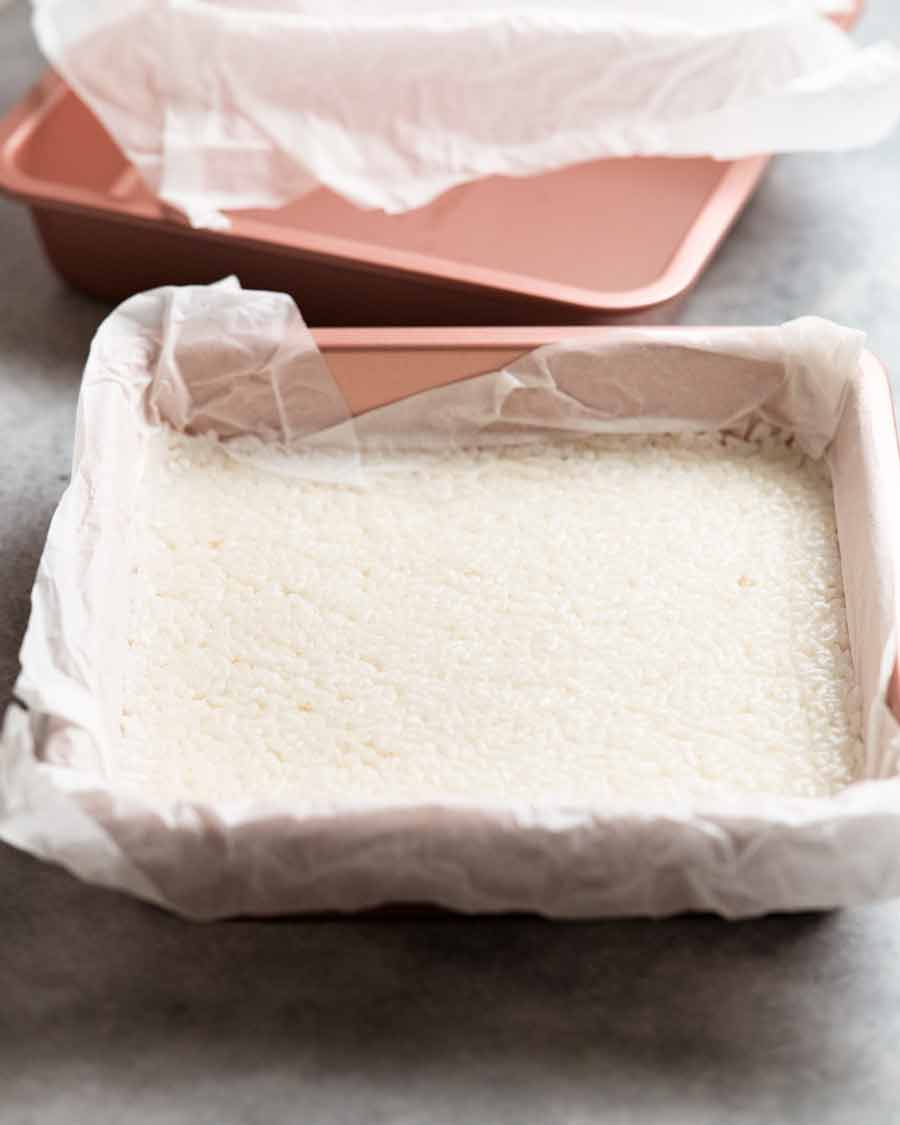
Press – Place a sheet of baking/parchment paper on a 20cm/8″ square pan. Scrape the hot rice into the pan and spread evenly. Cover with another piece of paper and press the rice in very firmly, concentrating on the corners and edges. The rice should be around 1.25cm / 1/2″ thick.
Weigh down (recommended) – For best results, place something flat on top then weigh it down with 4 or 5 x 400g/14oz cans. I used a second pan that is the same size.
Weighing down the rice packs the rice together more tightly as it sets in the fridge. This means you can cut neater pieces and they will crisp up better. It’s also just generally really irritating when you get little loose bits of rice in the pan when you’re frying up the rice cakes!
Cool – Fully cool, then refrigerate overnight (minimum 6 hours). As it cools, the rice will stick together and become a solid slab you can lift up and cut.
Speedy option for the impatient: Put the rice in the fridge until it’s fully cool (around 1 hour), then freezer for 1 hour (edges will semi-freeze, centre should be perfect), then back in the fridge for 1 hour (to thaw edges). Warning: Do not let the rice freeze fully, it will become loose and wet when it thaws so not suitable for rice cakes!
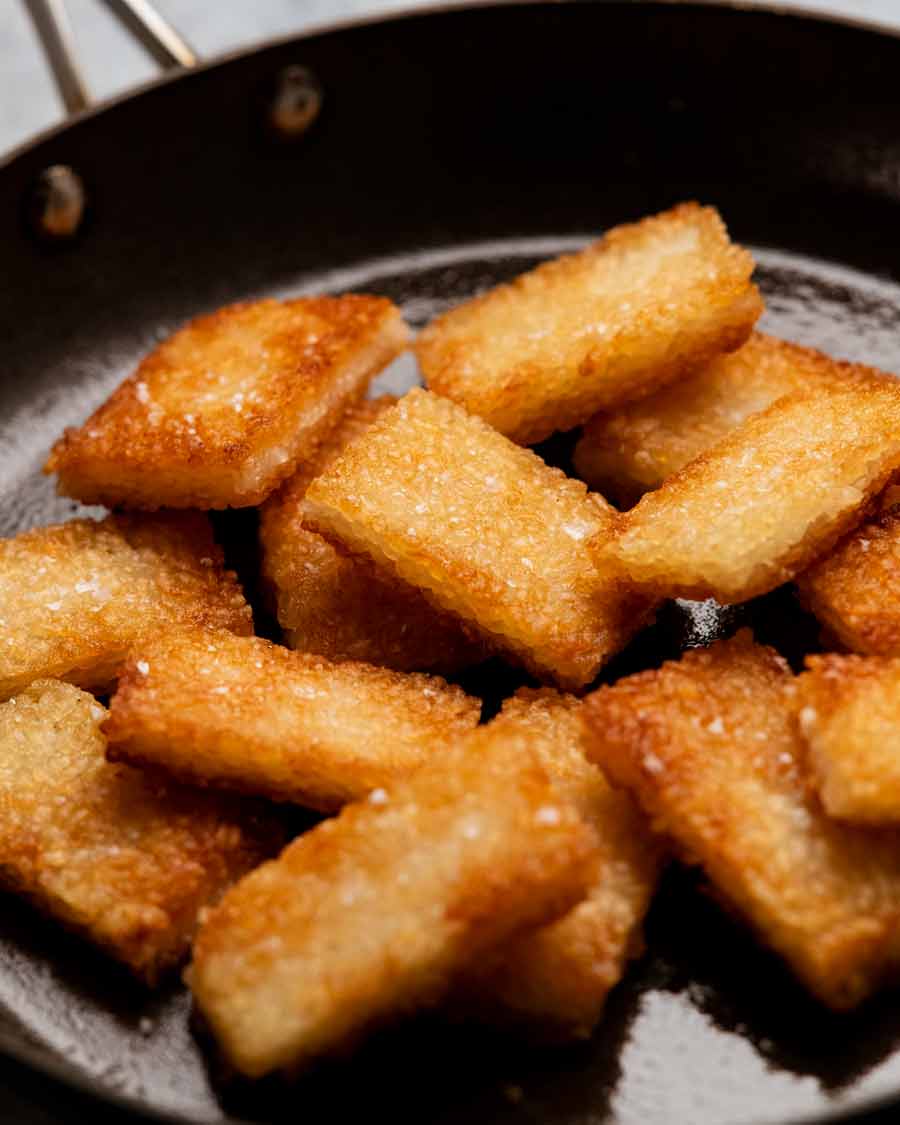
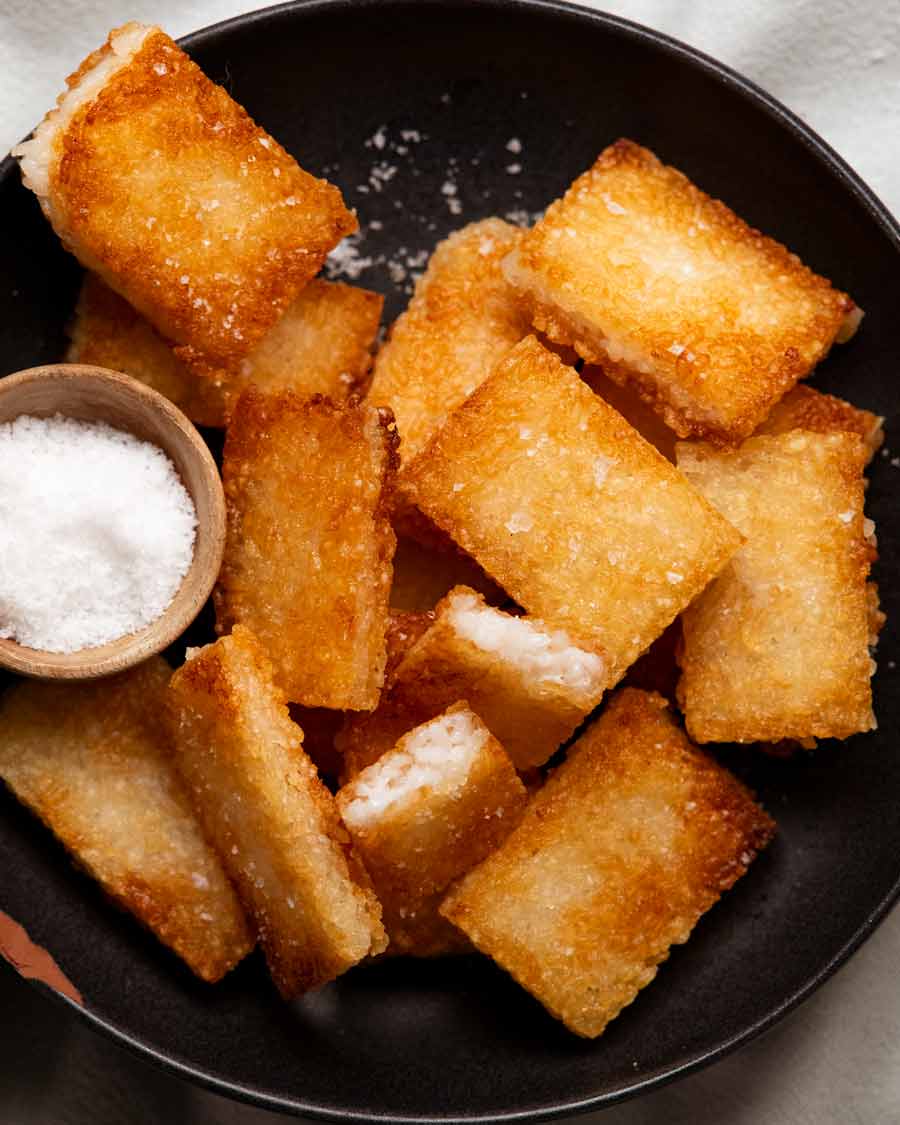
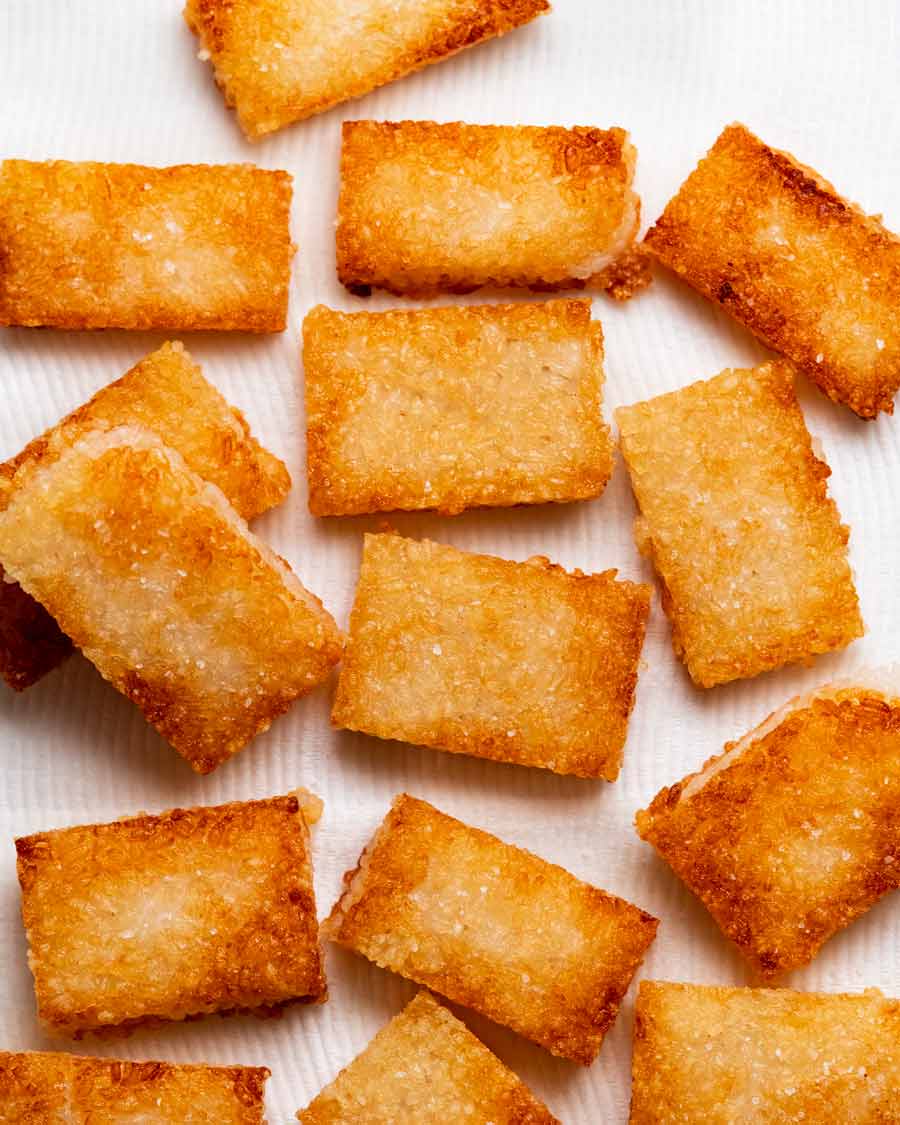
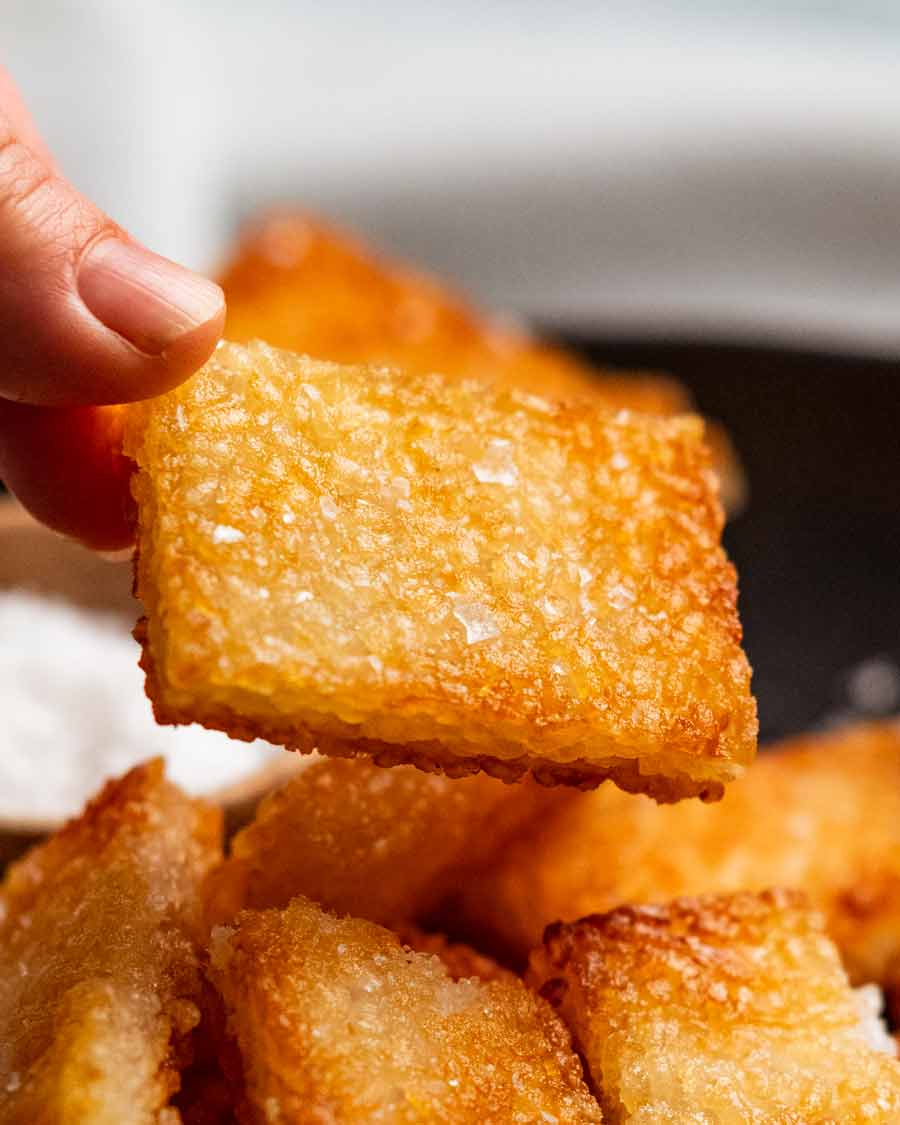
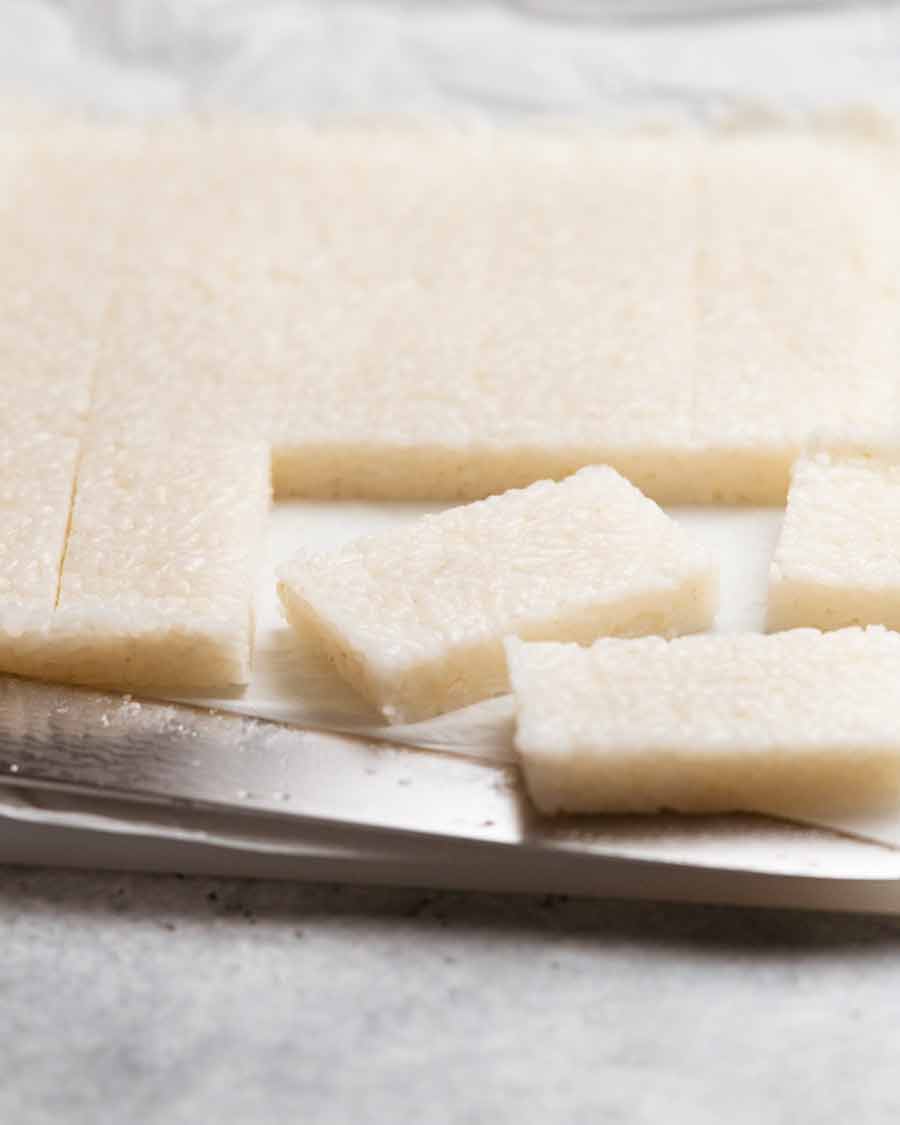
Cut – Lift rice out using paper overhang. Wet the knife blade (neater cuts). Cut rice into desired shapes. I do 15 rectangles for the pictured Nobu Crispy Rice with Spicy Tuna (5 strips, then each into 3). Smaller and more would make great snacking options, albeit lots of turning in the pan!
3. Cooking:
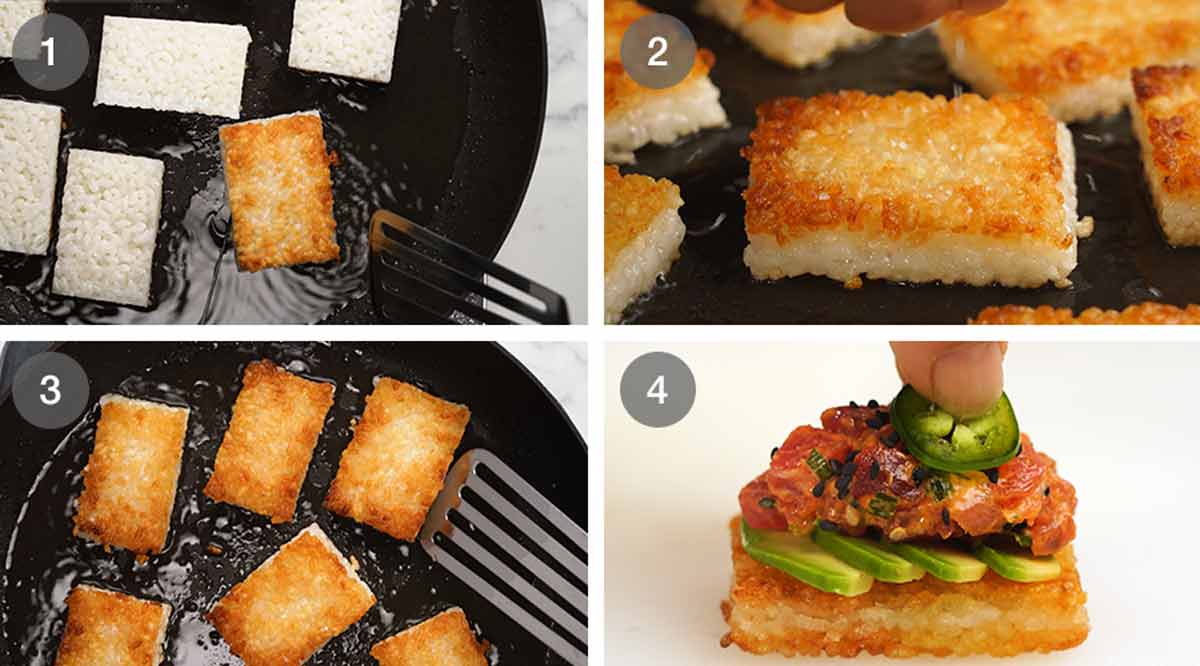
Pan fry – Heat about 1/4 cup of the oil in a large non-stick pan over medium high. Place in half the rice cakes – they should sizzle gently. Lower heat to medium. Cook for 4 minutes until really golden and crispy. Turn and cook the other side for 4 minutes.
Salt – Remove onto a paper towels lined plate. Sprinkle each side with salt while hot.
Keep cooking – Add remaining oil and cook remaining rice cakes.
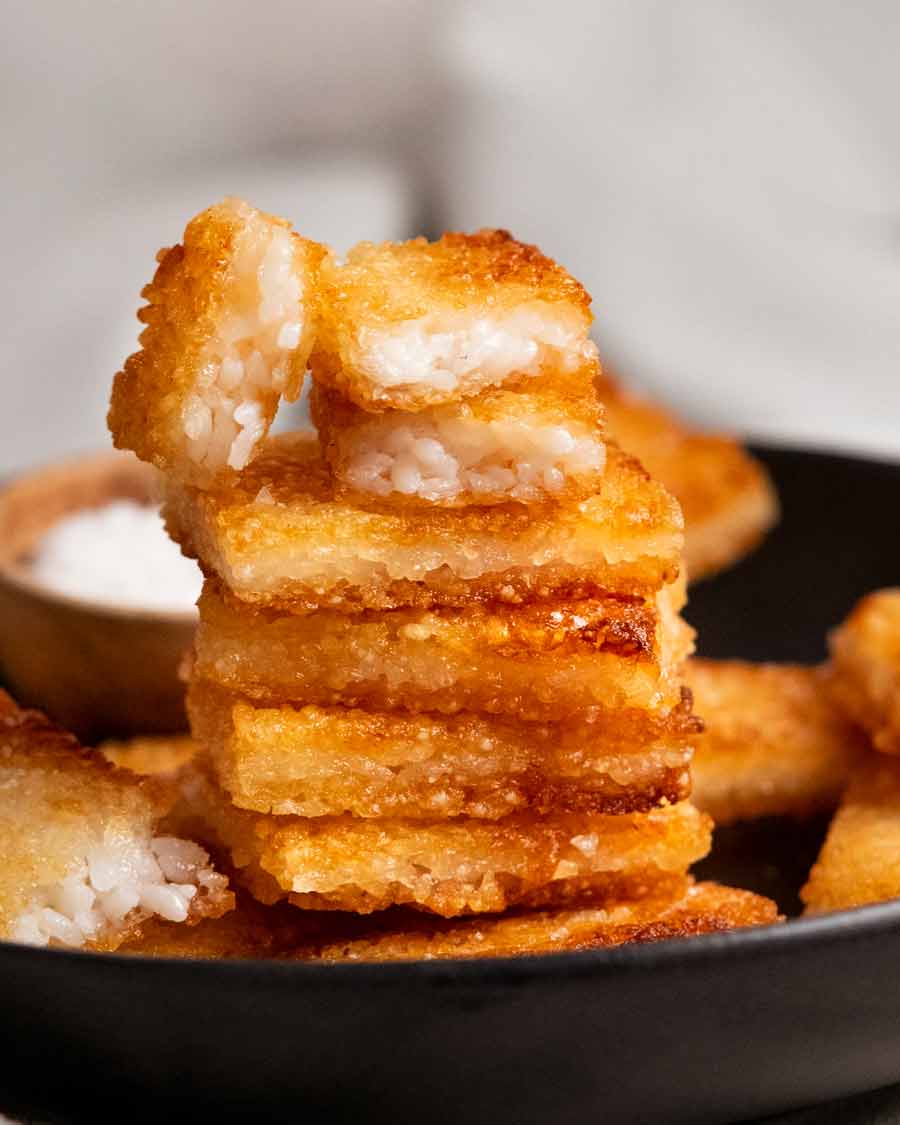
Serve as snack (you won’t be able to stop!) or use as a base for canapés. See the separate recipe for the spicy tuna topping I also shared today which is a blatant Nobu restaurant copy-cat. See next section for more topping suggestions!
How to serve crispy rice cakes
Serve them plain for snacking or add toppings to make irresistible appetisers.
Serving plain
Eat like potato chips! You won’t be able to stop. I probably wouldn’t say no to some kind of dip either – French Onion Dip immediately comes to mind.
Topping suggestions
As noted above, I’m sharing this crispy rice cakes recipe as a base for a creamy spicy tuna topping to make a copycat of a signature Nobu restaurant appetiser, Spicy Tuna Crispy Rice (raw or canned). However, given the flavour of the rice cakes is fairly neutral rather than specifically Asian, there’s stacks of topping options! Here’s some ideas that come to mind:
Creamy spicy tuna or salmon – Nobu copycat made with sashimi grade tuna or salmon. Canned tuna option included.
Tuna poke – A no mayo topping option with sashimi tuna in a gingery soy sauce dressing
Kingfish ceviche – YES! I can’t wait to try this. (Chop everything smaller so they stay on the rice cakes or use the rice cakes for scooping)
Salmon mousse – I pipe this on cucumber rounds for a fancy(ish) healthy(ish) canapé. Would be perfect on rice cakes!
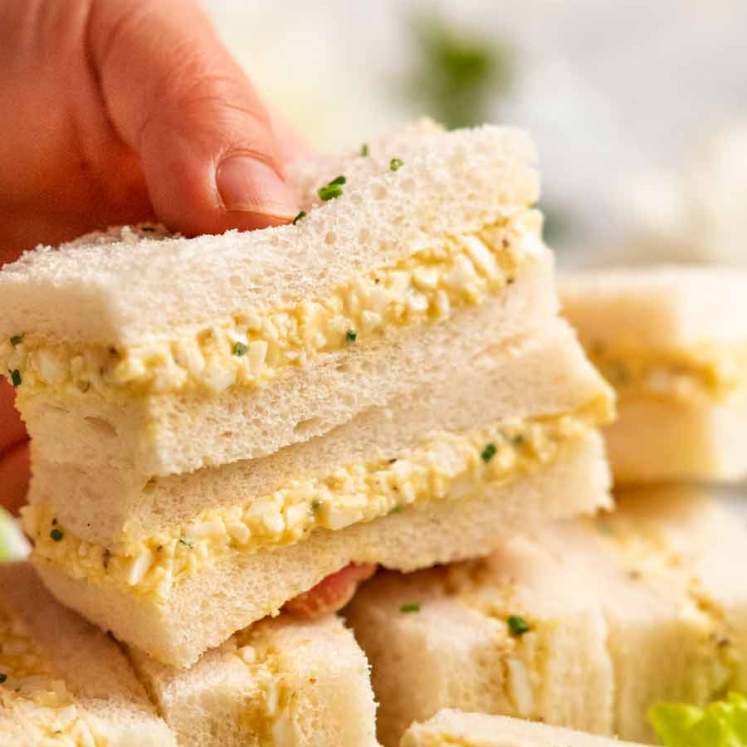
Chicken or egg sandwich fillings – I’d add finely chopped pickles or green onion for freshness
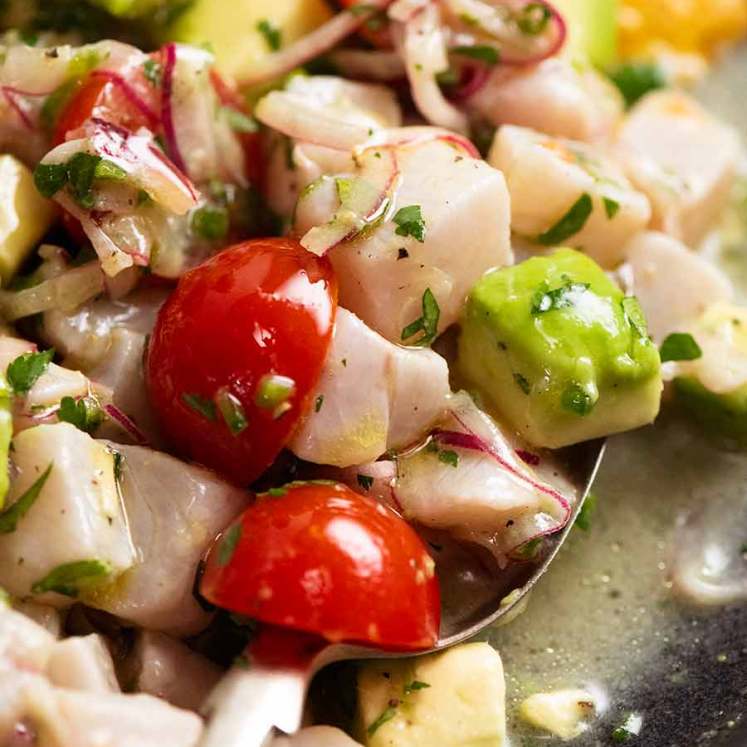
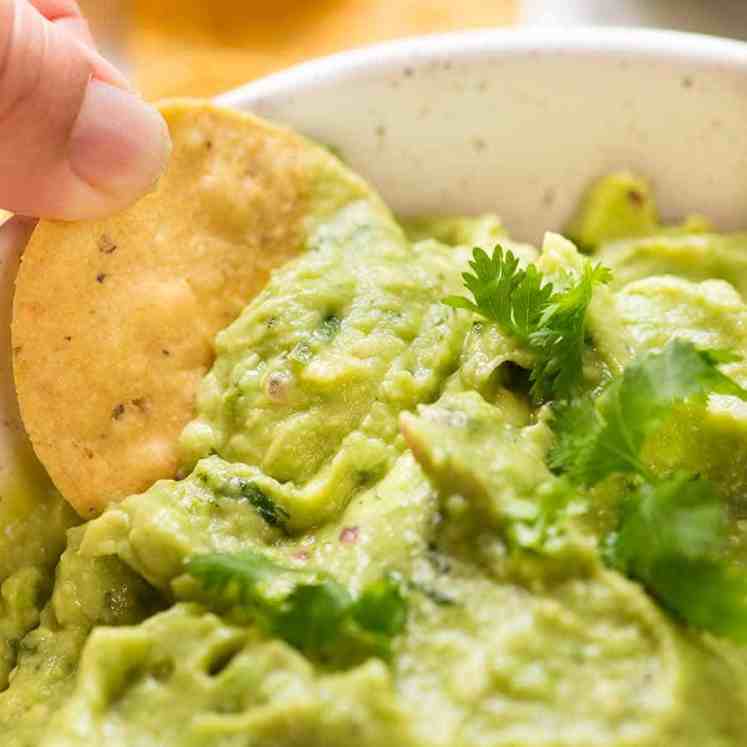
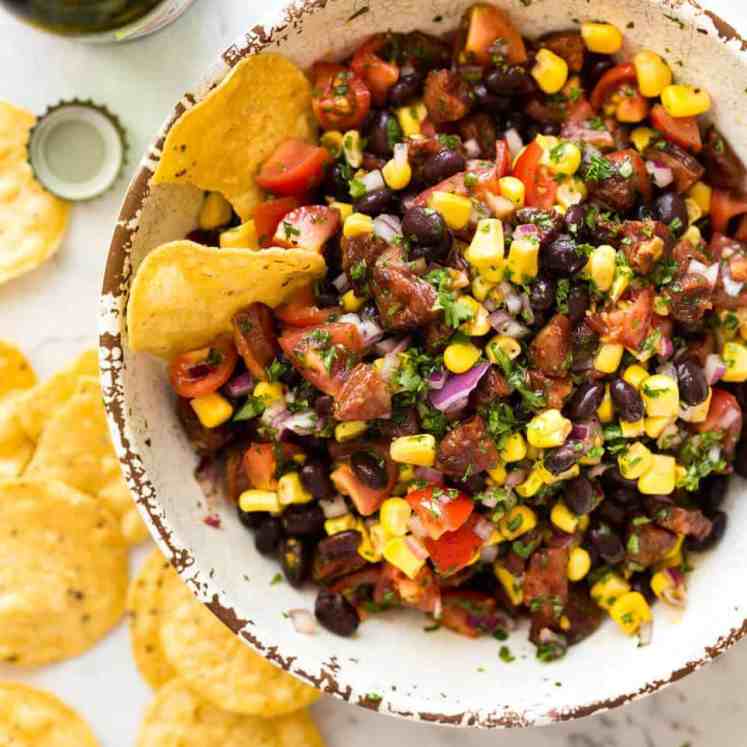
Spread with guacamole then top with Pig Out Salsa or Mexican Corn Salad
I’d love to hear your suggestions! What will you top these with? – Nagi x
Watch how to make it

Crispy rice
Ingredients
- 1 cup sushi rice (Note 1)
- 1 1/2 cups water
- 1/3 cup canola oil (vegetable, peanut or other neutral oil)
- 3/4 tsp cooking / kosher salt , for sprinkling rice cakes (Note 2)
Sushi seasoning:
- 1 tbsp rice vinegar (Note 3)
- 1 tsp caster sugar (Note 3)
Instructions
SUMMARY RECIPE
- Cook rice, rest, pour over seasoning, fluff. Press firmly into 20cm/8" lined pan, weigh down. Cool, fridge overnight (min 6 hrs). Cut into 15 rectangles, pan fry 4 min each side, sprinkle with salt.
FULL RECIPE
- Sushi seasoning – Mix together until sugar dissolves.
- Cook rice (Note 4) – Place rice and water in a small pot (no lid) over medium high heat. Once it's bubbling on the edges and the middle is rippling, put the lid on and turn down to medium low (or low for strong stoves). Cook for 13 minutes or until water is absorbed.
- Rest – Remove from heat then rest for 10 minutes with the lid still on.
- Season – Remove lid. Pour over sushi seasoning. Fluff rice with rubber spatula.
Press, cool, cut:
- Press – Place a sheet of baking/parchment paper on a 20cm/8" square pan. Scrape hot rice into the pan and spread evenly. Cover with another piece of paper and press in very firmly.
- Weigh down (recommended, Note 5) – For best results, place something flat on top (2nd same size pan is ideal) then weigh down with 5 x 400g/14oz cans.
- Cool – Fully cool, cover with cling wrap, then refrigerate overnight (min 6 hours). Speedy option: Fridge uncovered until fully cool, cover, freeze 1 hour, fridge 1 hour.
- Cut – Lift rice out using paper overhang. Wet the knife blade (neater cuts). Cut rice into 15 rectangles (5 strips, then each into 3).
Cooking:
- Pan fry – Heat about 1/4 cup of the oil in a large non-stick pan over medium high. Place in half the rice cakes – they should sizzle gently. Lower heat to medium. Cook for 4 minutes until really golden and crispy. Turn and cook the other side for 4 minutes.
- Salt – Remove onto a paper towels lined plate. Sprinkle each side with salt while hot.
- Keep cooking – Add remaining oil and cook remaining rice cakes.
Serving:
- Serve as snack (you won't be able to stop!) or a base for canapés.
- Topping suggestions – Spicy tuna (Nobu copycat), tuna poke, salmon mousse, crostini toppings.
Notes
2. I know this seems like a lot but these can take a lot of salt. Use less if you doubt me then add more later when you realise you need it!
3. Seasonings for sushi rice. They can be skipped but it makes the rice cakes tastier, and in the spirit of crispy sushi rice!
4. Rice cooking – Use a pot ~17cm/7″ wide. Not much larger else the rice doesn’t have enough depth = risk of burning base. No need to rinse the rice if you bought it in packs at the shop, the rice will be fluffy cooking it my way and with the right water/rice ratio. If you insist on rinsing the rice, reduce water by 2 tablespoons (to account for water logged in the rice).
5. Packing the rice in tightly makes the rice cakes firmer so you can cut neat squares, plus they are crispier. Weighing down while cooling is best, but still ok if you just press the rice really tightly with your hands. If you don’t, then they will crumble on the edges when you cut and fry. Not fatal, but annoying – and not quite as crispy.
Nutrition
Life of Dozer
This is his sitting up straight look-how-good-I-am food scavenging position. It’s highly effective!

The post Crispy rice appeared first on RecipeTin Eats.
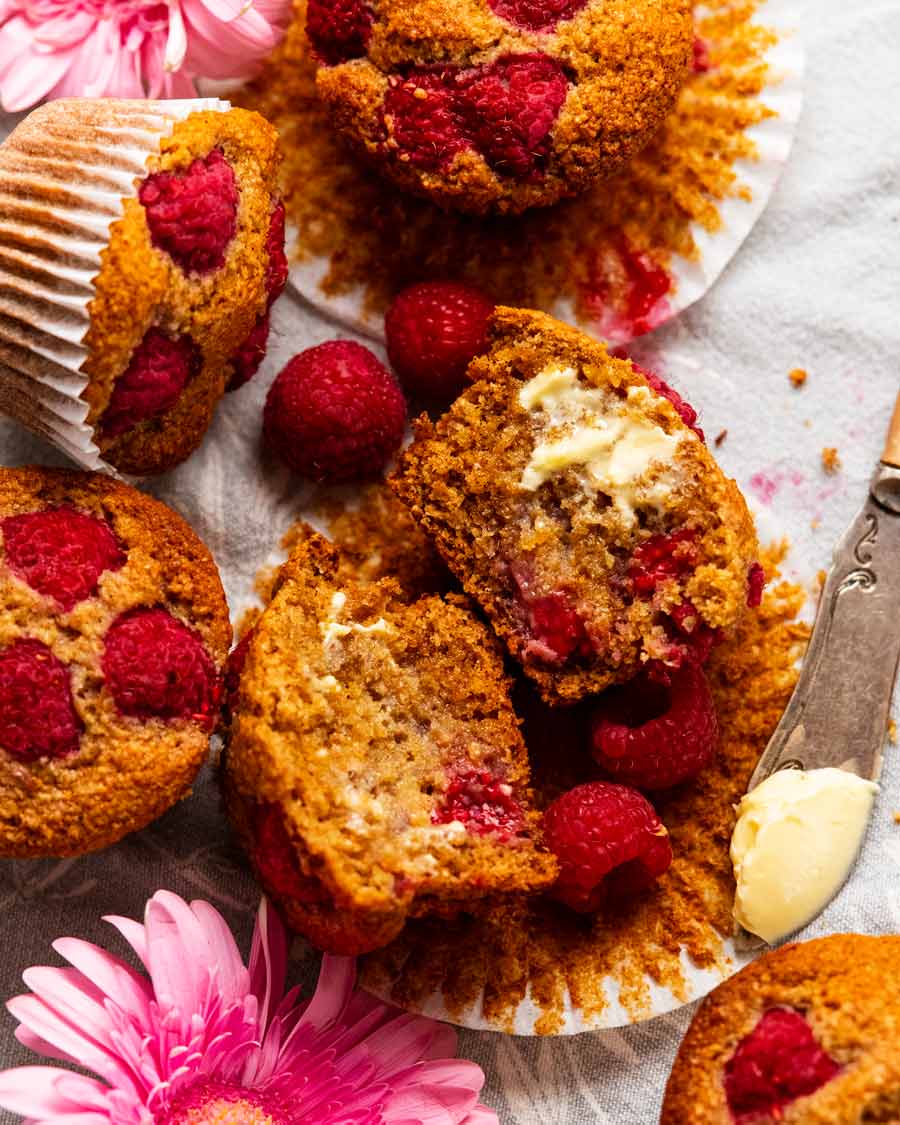
]]> Healthy muffins that are actually delicious! A copy-cat of the raspberry bran muffins from Sydney’s beloved Bowan Island Bakery, these breakfast muffins are a nutritious, convenient breakfast option that’s far better for you than take-away on the way to school or work. Up-and-go Breakfast Muffins Being a savoury gal, I’ve always been partial to savoury... Get the Recipe
The post Up-and-go breakfast muffins! appeared first on RecipeTin Eats.
]]>Healthy muffins that are actually delicious! A copy-cat of the raspberry bran muffins from Sydney’s beloved Bowan Island Bakery, these breakfast muffins are a nutritious, convenient breakfast option that’s far better for you than take-away on the way to school or work.
Up-and-go Breakfast Muffins
Being a savoury gal, I’ve always been partial to savoury muffins for breakfast (proof here, here and here). But a breakfast muffin with a sweet slant has been on my list for a while. I’m talking about the type that doesn’t make you feel like you’re eating cake for breakfast, a muffin that is just sweet enough but still good for you and good to eat.
So here it is!
Why these muffins are better for you
Low fat – just 1 1/4 tsp coconut oil per muffin
Refined-sugar free
Lightly sweetened – Just 2 teaspoons honey per muffin
Extra dietary fibre – keeps your insides….err….moving, shall we say ☺️ as well as keeping you full for longer and stabilising your blood sugars.
Convenient – Grab and go! No need to reheat, eat on the move.
Long shelf life – These last for 4 to 5 days, and are freezable.
Easy to make – One-bowl batter mixed with just a wooden spoon
Add-ins of choice – dried fruit and nuts, oats, fruit, choc chips!

Ingredients in breakfast muffins
Here’s what you need to make these breakfast muffins. Add-ins are flexible – see below for suggestions.
The key ingredient in this for goodness and flavour is wheat germ. Good-for-you extra fibre that gives these muffins a fabulous nutty flavour and lovely warm brown colour!
Dry ingredients
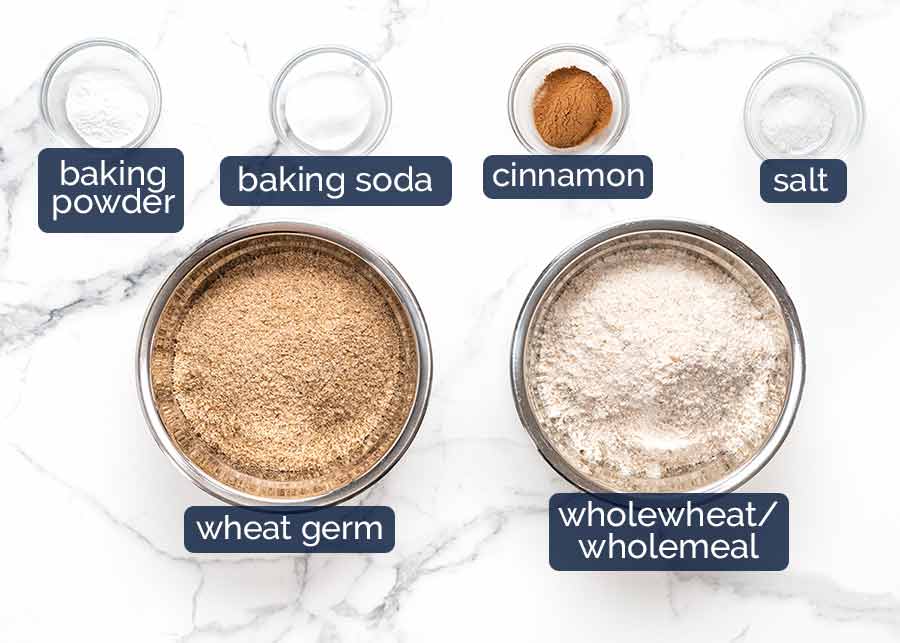
Wheat germ (sub wheat bran) – The good-for-you extra fibre boost! Found in either the cereal aisle, health food section or flour aisle or grocery stores. While both wheat germ and wheat bran work, I think wheat germ is nicer. It has lovely nutty flavour because it’s the seed inside wheat kernels. Whereas wheat germ is the exterior of wheat kernels so it gives the muffins a slightly earthier flavour. Both have similar nutrition characteristics – high in dietary fibre as well as other nutrients. Better for you than plain flour!
Wholewheat / wholemeal flour – In keeping with the better-for-you spirit of these muffins, I’ve opted for wholemeal rather than plain white flour. It has more nutrients because it’s less processed, plus it enhances the nutty flavour of these muffins.
Baking powder AND baking soda (bi-carbonate) – These both make things rise but baking soda is 3x as strong and they each have different rising characteristics. For this recipe, using a combination of both delivers the muffin top shape and crumb texture I want.
The baking soda can be substituted with more baking powder but the crumb is not quite as soft. See recipe card notes for quantity.
Cinnamon – For flavour!
Salt – Brings out the other flavours in the muffins, doesn’t make it salty!
Wet ingredients
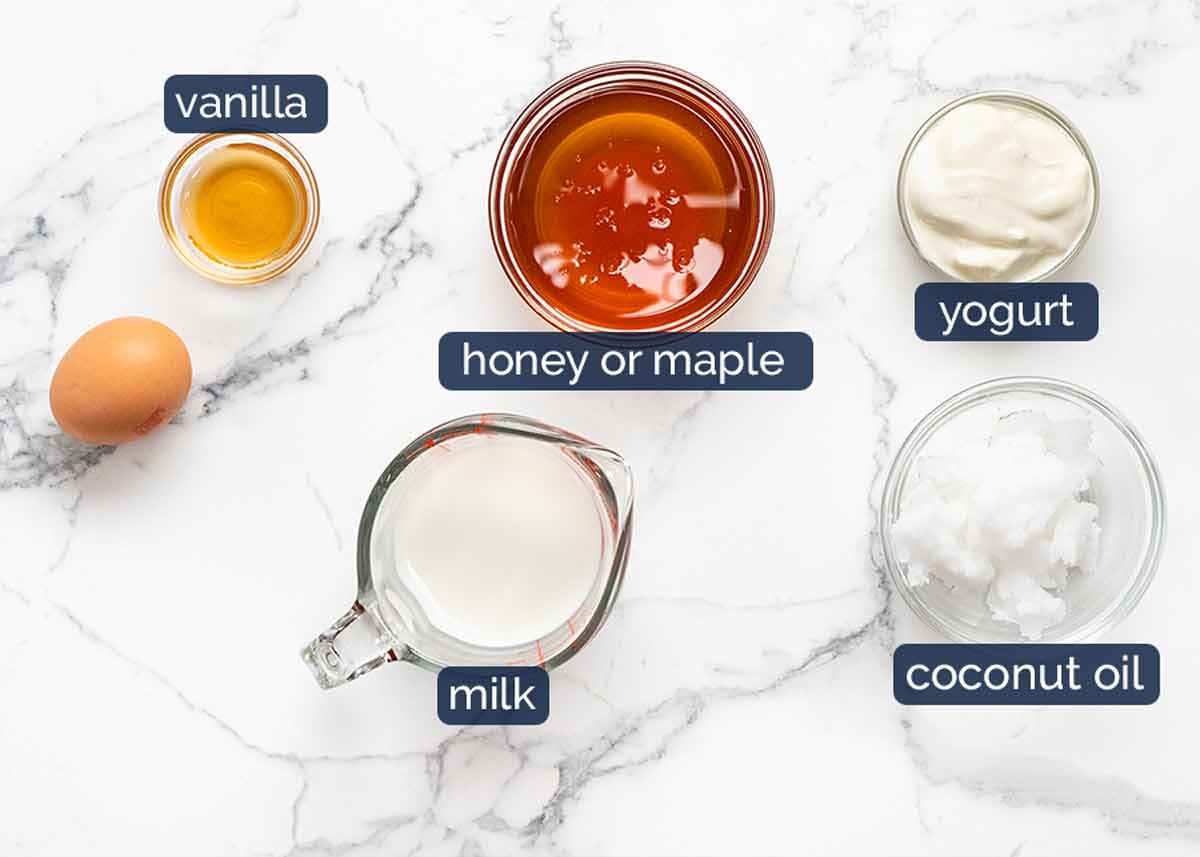
Honey or maple syrup – For sweetening! We only use 1/2 cup across 12 muffins which equates to 2 teaspoons per muffin. See commentary below on why honey is better for you than sugar.
Coconut oil – This is the fat in the muffins. I like to use unrefined / virgin coconut oil which adds a lovely very subtle coconut flavour into the muffins. By no means would anyone call these “coconut muffins”! Use the type that is firm like butter and needs to be melted to mix into batters, rather than the pourable type.
Note: There is also refined coconut oil which is stripped of all coconut oil and aroma. This and other oils will work in this recipe but will not add flavour. If you opt for another oil, I’d suggest doubling the vanilla and adding extra cinnamon.
Yogurt and milk – This is the wet in the batter. Using yogurt serves two purposes. Firstly, it has acid in it which gives the baking soda a rising kick start. Sometimes I use a teaspoon of vinegar in recipes to serve the same purpose, like in my Magic Stay-Moist Apple Muffins.
Secondly, yogurt is not as watery as milk. So it adds wetness to batters without making it as loose which means less flour needed = muffin more moist!
Egg – Just one, to hold the muffins together. Using only 1 egg makes a massive difference to the moistness of the crumb of muffins as the more egg you use, the sturdier but drier the crumb gets.
Vanilla – For flavour.
Why is honey better than sugar?
Because honey is:
sweeter than sugar so you can use less in recipes;
lower GI so your blood sugar levels won’t spike as quickly – which keeps you feeling full for longer; and
more nutritious than sugar which is “empty calories”. That is, sugar literally just contains sugar and nothing else! Honey contains nutrients such as amino acids, enzymes, vitamins and minerals.

Add-ins of choice!
I’ve used raspberries in these because they were on special. However, you really can add any add-ins you want. See suggestions below.
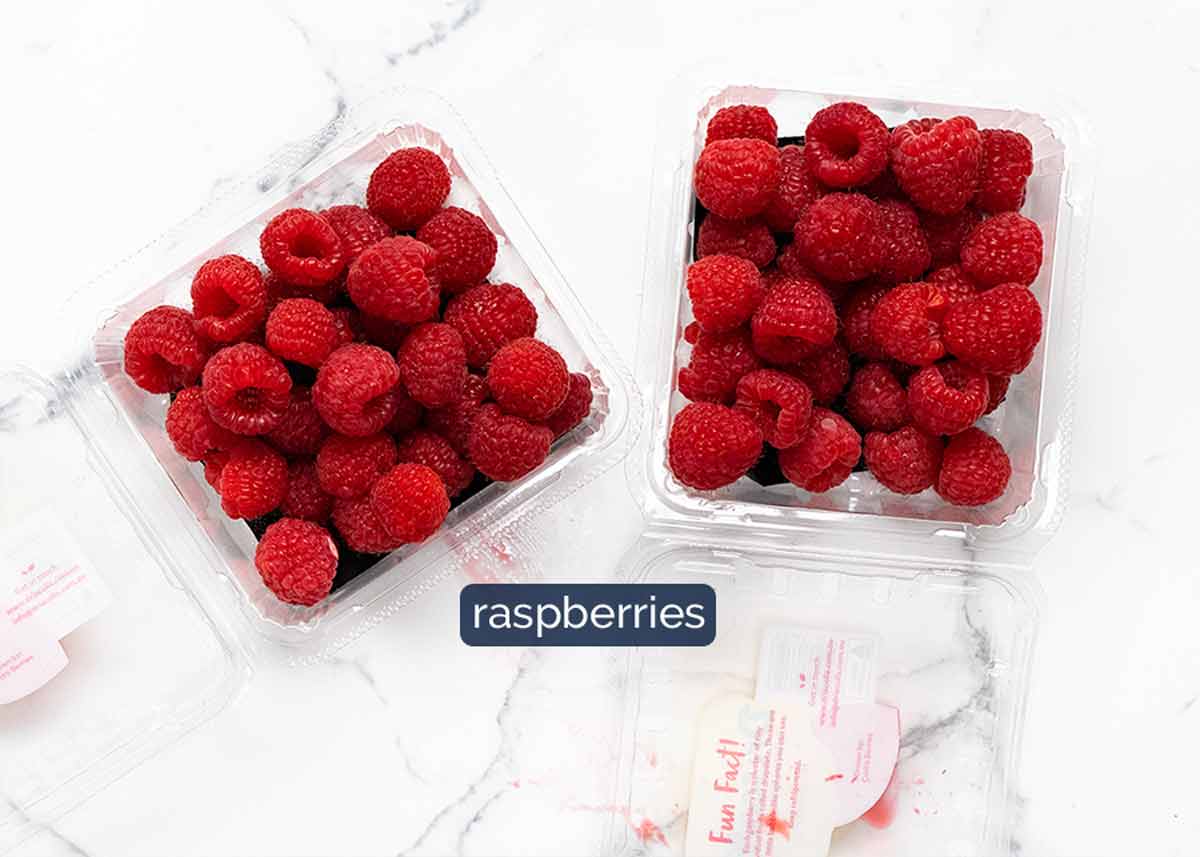
Add-in options:
Raspberries or blueberries, other berries – 250g/8oz, 2 heaped cups
Chopped fruit like apple, pears, cherries, grapes. (Not overly juicy fruit like oranges, peaches etc as they will leech too much liquid into the batter)
Dried fruit – sultanas, apricots, cranberries, apple, mango – anything goes!
Nuts and seeds
Chocolate chips – I mean, the rest of the muffin is healthy. So this tips the scales back to neutral? 😈
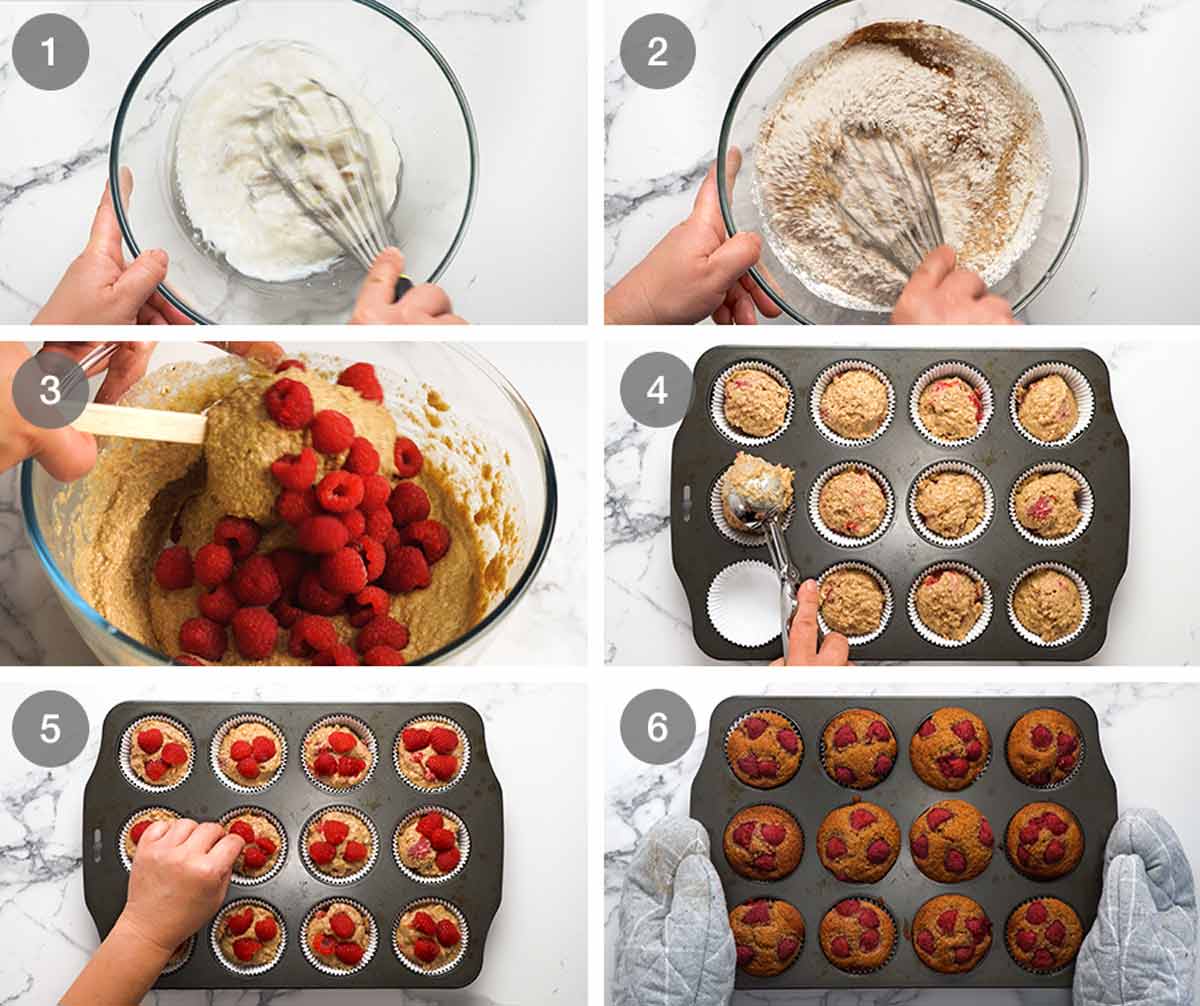
How to make breakfast muffins
It’s as easy as 1-2-3:
Mix wet ingredients
Mix in dry ingredients
Fill muffin holes and bake!
I like to reserve some raspberries to decorate the top, but this entirely optional – for visual purposes only. I know some people prefer more INSIDE the muffins!
Whisk wet – Melt the coconut oil in a microwavable bowl. Then whisk in all the wet ingredients: egg, yogurt, milk, honey and vanilla.
Mix in dry ingredients – Scatter across the surface (incorporates easier) then whisk in. Once you can no longer see flour, stop! Don’t get too enthusiastic with mixing as it will make the muffins tough.
Add-ins – Fold through the raspberries or whatever add-ins you’re using.
Divide between 12 holes. I used liners but it’s not essential, you could just spray with oil.
Top with reserved raspberries, if using.
Bake for 25 minutes at 190°C / 375°F (170°C fan) or until golden brown on the surface. Cool then devour!

Other matters of Up-and-Go Breakfast Muffins
Breakfast on the run – I’ve named these breakfast muffins as such because they are a great grab-and-go breakfast that doesn’t need heating and can be literally eaten on the run. More filling and less sweet than than muesli bars which I personally consider to be more suitable for a snack rather than breakfast.
Storage – These will keep for 4 to 5 days without going stale because they are more moist than typical muffins thanks to the coconut oil and yogurt. If it’s hot where you are, best to keep them in the fridge, otherwise just keep them in the pantry in an airtight container. They will also freeze for 3 months.
And with that, I think I’ve said all I need to on the matter of these breakfast muffins! Just to reiterate, these are less sweet than your usual muffins. To me, they are the perfect sweetness to have as breakfast without feeling like you’re being naughty and eating cake. And they are just sweet enough to have as a morning tea treat. In fact, people who often find Western cakes and cookies too sweet will probably find these the perfect level of sweetness.
Hope you give them a go! Love to know what add-ins you use if you do. – Nagi x
Watch how to make it

Up-and-go breakfast muffins!
Stays fresh for days.Ingredients
Wet:
- 1/3 cup coconut oil , virgin or unrefined (normal oil also works but not as tasty, Note 1)
- 1 large egg , at room temperature (~55g/2oz)
- 2/3 cup milk , at room temperature – full fat best (low fat and non-dairy ok too)
- 1/3 cup yogurt , plain/unsweetened
- 1/2 cup honey (or maple syrup)
- 1/2 tsp vanilla extract
Dry:
- 1 1/4 cups wheat germ (best) OR 1 1/4 cups (80g) wheat bran (Note 2)
- 1 1/2 cups wholemeal flour (sub ordinary flour – Note 3)
- 1/4 tsp salt
- 1 tsp cinnamon powder
- 1 tsp baking powder (Note 4)
- 1 tsp baking soda , sifted if lumpy (or 3 tsp extra baking powder) – Note 4
Add ins – CHOOSE ONE:
- 250g / 8 oz raspberries , 18 set aside and cut in half to decorate top if desired
- 2 cups diced fresh fruit (not watery) – like apples, pears
- 1 1/4 cups dried fruit, nuts, choc chips etc
Instructions
- Preheat oven to 190°C / 375°F (170°C fan). Line a 12 hole standard muffin tin with muffin cases OR spray generously with oil.
- Whisk wet – Place coconut oil in a microwave proof bowl. Microwave for 45 seconds on high or until melted. Add remaining Wet ingredients, whisk until smooth.
- Mix in Dry – Sprinkle the Dry ingredients across the surface in the order listed. Mix just until combined.
- Raspberries – Gently stir in the whole raspberries or other add-ins of choice.
- Fill muffin tin – Divide batter between the 12 holes using an ice cream scoop. Decorate top with halved raspberries.
- Bake 25 minutes. Cool 5 minutes then transfer to a cooling rack.
Notes
Nutrition
Life of Dozer
While I’m in Melbourne for the Good Food & Wine Show, Dozer is with the golden retriever boarder and apparently not showing any signs of separation anxiety. Hmmph!

The post Up-and-go breakfast muffins! appeared first on RecipeTin Eats.
]]>